All You Need to Know About Loading and Animating Models in Three.js
Published on 19 Mar, 2024 | ~14 min read
Have you stumbled upon an amazingly realistic 3D model but are unsure about integrating it into your Three.js application? Or perhaps you've crafted one in Blender and are seeking guidance on exporting it with animations seamlessly? Fear not, because you've landed in the perfect spot for all your needs.
I'm assuming you have some basic familiarity with Three.js, such as knowing what a scene is and how to create one. But if you don't, no worries; this article will provide you with everything you need to gain a solid understanding of the essential concepts in Three.js.
How to Load a Model
First and foremost, before loading a model, we need to have a project and scene ready to use. If you already have these prepared, that's excellent! However, if you don't, don't worry—I have a boilerplate template available.
This boilerplate provides an empty project that you can use to follow along, saving you time from creating a new project from scratch.
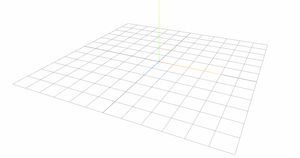
By following the instructions provided in the boilerplate's README, you should have your project up and running. And this is what you should be currently seeing.
Now, let's choose a model to use. Personally, I recommend the free models available at quaternius.com. For this example, I'll be using the flying dragon from his Ultimate Monsters pack.
The models are available in three file extensions: .obj, .fbx, and .gltf. While all of them work, it's recommended to use .gltf and .glb files.
Just like textures, loading a model also requires a loader. There are various loaders available, and the one you need to use depends on the file extension of the model.
In our case we're going to use the GLTFLoader since the file extension is .gltf.
Note: The GLTFLoader is used to load both .gltf and .glb files since they are essentially the same format.
To use GLTFLoader, we must first import it into our project.
import {GLTFLoader} from 'three/examples/jsm/loaders/GLTFLoader';The next step is to create an instance of the GLTFLoader and invoke the load method on it. The load method takes two arguments: the first one being the path to the file, and the second being a callback function.
const gltfLoader = new GLTFLoader();
gltfLoader.load('./assets/Dragon_Evolved.gltf', function(gltf) {
   // What should be done once the model is loaded.
});
Our model is now stored as a property named scene within the gltf object. To integrate it into our scene, we'll add it just like we would with a simple mesh.
scene.add(model);So as you can see the model is introduced to the scene but it's all black due to the absence of a light source. So let's add some light.
// Outside the body of the load callback function.
const aLight = new THREE.AmbientLight(0xFFFFFF, 1);
scene.add(aLight);

const dLight = new THREE.DirectionalLight(0xFFFFFF, 10);
scene.add(dLight);
dLight.position.set(4, 10, 3);
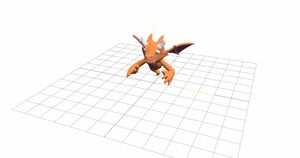
And with that done you should be able to see your model now.
The load() method actually has a couple of optional arguments, which are also functions.
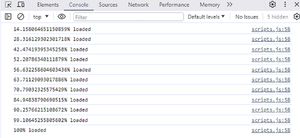
The third argument of load() is a function that is called while the loading is in progress, providing information about how much data has been loaded. This can be useful, for example, in creating a loading bar (more on this subject in a future article).
// Ensure that you have a large file available for loading.
// The one I'm loading here is 14.1 MB
gltfLoader.load('./assets/free_datsun_280z.glb', function(glb) {
    const model = glb.scene;
    scene.add(model);
}, function (xhr) {
    console.log((xhr.loaded / xhr.total * 100) + '% loaded');
});
The xhr argument represents an XMLHttpRequest instance, which contains the total property representing the total size of the file, and the loaded property representing the number of bytes already loaded.
The fourth and final argument of the load() method is a function that is called when a loading error occurs. It takes one argument, which contains the default error message.
gltfLoader.load('./assets/wrong_file_name.glb', function(glb) {
    const model = glb.scene;
    scene.add(model);
}, function (xhr) {
    console.log((xhr.loaded / xhr.total * 100) + '% loaded');
}, function (error) {
    console.log('Loading failed');
});
Model with Animations
Animating The Model
As you may know, models often come with a set of animations. Typically, the website from which you download the model provides a way to preview these animations. However, in case they don't, there is a method to view them.
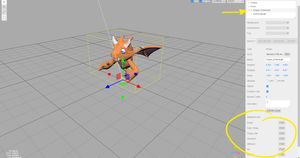
With that being said, head over to the Three.js editor and drag and drop your model.
Again your model will look all black due the absence of a light source. To add one, just select add on the navigation menu and choose directional light.
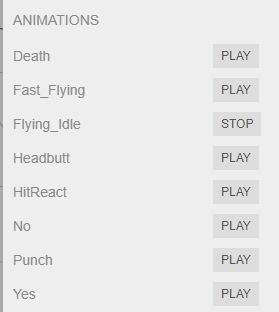
To view the animations available in your model, first select the model in the right navigation panel. Then, scroll down to the ANIMATIONS section.
Now, to play the animations we've just seen in the editor in our own scene, we need to follow these steps.
First, we need to create a global variable since it will be filled within the load method and used outside of it.
// Outside the body of the load callback function.
let mixer;
Then, within the load callback, we're going to assign an instance of the AnimationMixer class to the mixer variable and pass the model as an argument to the constructor method.
As stated in the documentation. The AnimationMixer is a player for animations on a particular object in the scene.
// Within the body of the load callback function.
mixer = new THREE.AnimationMixer(model);
Next, we're going to select which clip we want to play by calling the static method findByName() from the AnimationClip class. This method takes the array of clips and the clip name as arguments.
// Within the body of the load callback function.

// Array of clips
const clips = gltf.animations;

mixer = new THREE.AnimationMixer(model);
const clip =
THREE.AnimationClip.findByName(clips, 'Flying_Idle');
// You can select it directly if you know
// its index in the clips array.
// const clip = clips[2];
Before we proceed, it's important to understand that the array of clips is essentially a collection of animation data. Each clip within the array contains the information necessary to play a specific animation. For example, one clip might represent the walking animation, while another clip represents the jumping animation.
The next step is to convert the selected animation clip into a playable action using the clipAction() method from the mixer, and then call play() to start playing the animation.
An action typically refers to a playable instance of an animation. It represents the control and playback of a specific animation clip within the scene. When you convert a clip into an action using the clipAction() method, you are essentially creating a playable instance of that animation that can be controlled, started, paused, and stopped as needed during runtime.
// Within the body of the load callback function.
const action = mixer.clipAction(clip);
action.play();
Before reviewing the results, we still have a couple of things to do first.
When discussing animation in the context of Three.js, one's mind should immediately turn to the animate() function. Since everything outside the animate function runs only once, we require a method to update the model's animation to make advancements.
It's a concept similar to that of a video player, where the playhead continuously advances over time unless stopped.
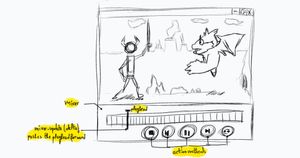
To play the animation, we'll navigate to the animate() function and call the update() method from our mixer variable.
The update() method requires an argument, deltaTime, which indicates how much time has passed since the last frame was rendered. It enables you to update object positions, velocities, and other properties based on the passage of time, ensuring that animations progress at a consistent rate even if the frame rate fluctuates. We obtain deltaTime from the Clock utility.
const clock = new THREE.Clock();
function animate() {
    if(mixer) {
        const delta = clock.getDelta();
        mixer.update(delta);
    }
    renderer.render(scene, camera);
}
Because the load() method is asynchronous, there's a possibility that the mixer might be undefined when the animate() function is called, leading to a problem. Therefore, I wrapped the update() call within an if clause to ensure it does not run until the load() method is finished and the mixer variable has a value.
With that done, your model should now be animated.
AnimationAction Properties And Methods
Now, let's explore some of the action methods and properties that can be invaluable depending on your specific use case.
We can use the paused property to pause the animation. Setting paused to true pauses the animation, and setting it to false resumes it.
// Within the body of the load callback function.
window.addEventListener('keydown', function(e) {
    if(e.code === 'Space')
        action.paused = !action.paused;
});
We can set the animation to loop once, repeat from the beginning every time it ends, or alternate between forward and backward animation.
// plays the clip once.
action.loop = THREE.LoopOnce;

// Repeats the animation from the beginning each time it ends.
// This is the default loop mode.
action.loop = THREE.LoopRepeat;

// Repeats the animation forwards and backwards,
// from start to end and then from end to start.
action.loop = THREE.LoopPingPong;
If you want to set a specific number of repetitions, you can either directly assign a value to the repetitions property or use the setLoop() method. This method takes two arguments: the looping mode and the number of repetitions.
// Option 1
action.loop = THREE.LoopPingPong;
action.repetitions = 3;

// Option 2
action.setLoop(THREE.LoopPingPong, 3);
If you want to gradually introduce an animation over a period of time instead of immediately, you can use the fadeIn() method.
const action = mixer.clipAction(clip);
action.play();
// The animation will start and gradually increase
// in speed, reaching the normal speed after 5 seconds.
action.fadeIn(5);
We also have fadeOut(), which does the opposite of fadeIn(). This means the animation will gradually decrease in speed until it stops completely.
const action = mixer.clipAction(clip);
action.play();
// The animation will start and gradually decrease
// in speed, stopping completely after 5 seconds.
action.fadeOut(5);
Furthermore, we have crossFadeTo() and crossFadeFrom() methods, which enable seamless transitions between different animations.
The crossFadeTo() method transitions from the current action to the action specified as an argument. In the example below, we're transitioning from action to action2 over a period of 1 second.
const clip2 =
THREE.AnimationClip.findByName(clips, 'Fast_Flying');
const action2 = mixer.clipAction(clip2);

window.addEventListener('keydown', function(e) {
    if(e.code === 'Space')
        action.paused = !action.paused;
    if(e.code === 'KeyF') {
        action2.play();
        action.crossFadeTo(action2, 1);
    }
});
Now, pressing the F key transitions the animation from the Idle action to the Fast_Flying action.
window.addEventListener('keydown', function(e) {
    if(e.code === 'Space')
        action.paused = !action.paused;
    if(e.code === 'KeyF') {
        action2.play();
        action.crossFadeTo(action2, 1);
    }
    if(e.code === 'KeyS') {
        action.play();
        action.crossFadeFrom(action2, 1);
    }
});
One thing you may have noticed is that I added action2.play(), which is crucial for the transition to work. Both animations should be playing simultaneously to enable a smooth transition between them.
Now, let's utilize crossFadeFrom() to transition from the Idle to Fast_Flying action by pressing the S key.
Now, if you press F, the transition from action to action2 occurs. However, if you then press S, action2 fades out and the animation stops. To restart the animations, we also need to reset the actions by calling reset().
The callback function's argument contains information about the finished action.
window.addEventListener('keydown', function(e) {
    if(e.code === 'Space')
        action.paused = !action.paused;
    if(e.code === 'KeyF') {
        action2.reset();
        action2.play();
        action.crossFadeTo(action2, 1);
    }
    if(e.code === 'KeyS') {
        action.reset();
        action.play();
        action.crossFadeFrom(action2, 1);
    }
});
Mixer Events And Animations Chaining
There are two events that signal the completion of either a single loop of an action or the entire action that's subscribed under the mixer.
To determine if a single loop of an action/a set of actions is/are finished, we need to use the "finished" event.
It's important to note that you must set a limited number of repetitions for the action, as this event will not be triggered in an endlessly looped action.
const clip3 =
THREE.AnimationClip.findByName(clips, 'Yes');
const action3 = mixer.clipAction(clip3);
action3.play();
action3.loop = THREE.LoopOnce;

const clip4 =
THREE.AnimationClip.findByName(clips, 'No');
const action4 = mixer.clipAction(clip4);
action4.play();
action4.repetitions = 3;

mixer.addEventListener('finished', function(e) {
    console.log(`Action ${e.action._clip.name} is finished`);
});
The code within the callback function will be executed twice: once when action3 is completed, and again when all three repetitions of action4 are finished.
To determine if one iteration of the loop is finished, we need to use the "loop" event instead.
const clip4 =
THREE.AnimationClip.findByName(clips, 'No');
const action4 = mixer.clipAction(clip4);
action4.play();
action4.repetitions = 3;

mixer.addEventListener('loop', function(e) {
    console.log(`One iteration of ${e.action._clip.name} is finished`);
});
Now, armed with this knowledge, we can easily create a simple loop composed of a couple of actions.
gltfLoader.load('./assets/Dragon_Evolved.gltf', function(gltf) {
    const model = gltf.scene;
    scene.add(model);
    const clips = gltf.animations;

    mixer = new THREE.AnimationMixer(model);

    const clip3 =
    THREE.AnimationClip.findByName(clips, 'Yes');
    const action3 = mixer.clipAction(clip3);
    action3.play();
    action3.loop = THREE.LoopOnce;

    const clip4 =
    THREE.AnimationClip.findByName(clips, 'No');
    const action4 = mixer.clipAction(clip4);
    action4.loop = THREE.LoopOnce;

    mixer.addEventListener('finished', function(e) {
       if(e.action._clip.name === 'Yes') {
        action4.reset();
        action4.play();
       } else
       if(e.action._clip.name === 'No') {
        action3.reset();
        action3.play();
       }
    });
});
Importing Realistic Models
You come across a mesmerizing ultra-realistic model, such as this car, and decide to use it in your app. However, after setting up the necessary code, instead of the expected car with shiny and reflective surfaces, you encounter this result.

The model is displayed in a scene with AmbientLight and DirectionalLight instances, but it doesn't look as realistic as it does in the Sketchfab viewer. The reason behind this is that the materials used in the car model require a special type of lighting.
To achieve a realistic look, the lighting also needs to be realistic. This can be accomplished by loading the light from an .hdr image and setting it as the environment light source.
If you're unfamiliar with environment maps and .hdr images, this article is definitely a must-read!
To load an .hdr image in Three.js, we utilize a special loader known as the RGBELoader.
With that said, our first step is to load it.
import {RGBELoader} from 'three/examples/jsm/loaders/RGBELoader';Afterward, create an instance of it and call load(), passing two arguments: the path to the .hdr image and a callback function.
const rgbeLoader = new RGBELoader();

rgbeLoader.load('./assets/hdrImage.hdr', function(texture) {

});
In the callback function, specify the mapping mode of the texture and set it as an environment map for the scene.
texture.mapping = THREE.EquirectangularReflectionMapping;
scene.environment = texture;
Now, you have the option to load the model inside the callback function. However, it's not necessary to do so.
Lastly, you have the option to set THREE.ACESFilmicToneMapping as the renderer's tone mapping algorithm to achieve even better results. However, this step is optional, as everything needed has already been completed.
Here is the code:
const gltfLoader = new GLTFLoader();
const rgbeLoader = new RGBELoader();

renderer.toneMapping = THREE.ACESFilmicToneMapping;

rgbeLoader.load('./assets/hdrImage.hdr', function(texture) {
    texture.mapping = THREE.EquirectangularReflectionMapping;
    scene.environment = texture;

    gltfLoader.load('./assets/car.glb', function(glb) {
        const model = glb.scene;
        scene.add(model);
    });
});
And here is the result:

Final Thoughts
In conclusion, mastering the loading and animation of models in Three.js opens up a world of possibilities for creating immersive and interactive experiences on the web.
With the knowledge gained from this article, you now have the tools to bring your 3D creations to life, whether it's for gaming, visualization, or interactive storytelling.
Remember to experiment, explore, and never hesitate to delve deeper into the vast capabilities of Three.js. As you continue your journey in 3D web development, may your models be dynamic, your animations seamless, and your creativity boundless.
Happy coding!
Related Content
-
Three.js Tutorial for Absolute Beginners
-
How to Create Ultra-Realistic Scenes in Three.js
-
How to Export 3D Models with Their Animation from Blender and Import Them into Your Three.js App
-
How to Import a Model from Sketchfab.com into Your Three.js Web App
-
Unreal Bloom Selective - Three.js Post Processing
