Animating Lines and Curves in Three.js with MeshLine
Published on 13 Feb, 2025 | ~5 min read | Demo
In this short read, we'll explore a simple method for animating lines in Three.js and use it to create an animated heart as the demo. (Fitting, right? Hint: check the date!)
MeshLine: The Basics
First and foremost, create a new project and install Three.js, or just use my Three.js boilerplate.
As mentioned in the title, we won't use the classic combination of LineBasicMaterial and one of the curve creation classes. Instead, we'll use a third-party module called MeshLine.
With that said, let's install it by running this command in the terminal: npm install meshline
Next, of course, we'll import it into our project.
import { MeshLineGeometry, MeshLineMaterial } from 'meshline';As you can see, we have a new special type of material and geometry for the lines.
As usual, to add something to the scene, we need to create a geometry and a material, then combine them into a mesh.
So, let's start with the geometry by creating a new instance of MeshLineGeometry.
const geometry = new MeshLineGeometry();Next, we'll need to create an array containing the coordinates of the points that form the curve we want to draw in our scene.
const geometryPoints = [
  new THREE.Vector3(-2, 3, 0),
  new THREE.Vector3(3, 3, -2),
  new THREE.Vector3(0, -2, 0),
  new THREE.Vector3(-2, 0, 2),
  new THREE.Vector3(-2, 6, 5),
  new THREE.Vector3(5, 2, -3),
];
Now, we'll assign these coordinates to the geometry using the setPoints() method.
geometry.setPoints(geometryPoints);And that's all for the geometry.
For the material, we'll create a new instance of the MeshLineMaterial class and pass the color, width, and resolution as properties of the configuration object.
const lineMaterial = new MeshLineMaterial({
  color: new THREE.Color(0xff0000),
  lineWidth: 1,
  resolution: new THREE.Vector2(window.innerWidth, window.innerHeight),
});
With that done, we'll simply create a new mesh, add it to the scene, and that's it!
const mesh = new THREE.Mesh(geometry, lineMaterial);
scene.add(mesh);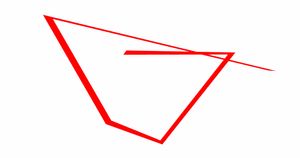
The Animated Heart
MeshLineMaterial comes with a set of interesting properties, but in this article, I'll highlight just three of them that we'll need to achieve the best animation possible.
First, let's create a loop to generate a smooth curve that forms the shape of a heart.
const geometry = new MeshLineGeometry();

// const geometryPoints = [
//   new THREE.Vector3(-2, 3, 0),
//   new THREE.Vector3(3, 3, -2),
//   new THREE.Vector3(0, -2, 0),
//   new THREE.Vector3(-2, 0, 2),
//   new THREE.Vector3(-2, 6, 5),
//   new THREE.Vector3(5, 2, -3),
// ];

const geometryPoints = [];
for (let t = 0; t <= Math.PI * 2; t += 0.01) {
  const x = 16 * Math.pow(Math.sin(t), 3);
  const y =
    13 * Math.cos(t) -
    5 * Math.cos(2 * t) -
    2 * Math.cos(3 * t) -
    Math.cos(4 * t);
  geometryPoints.push(new THREE.Vector3(x, y, 0));
}

geometry.setPoints(geometryPoints);
Next, let's update the camera's position to get a full view of the masterpiece.
// camera.position.set(6, 8, 14);
camera.position.set(0, 0, 50);
"Dude, you're a genius! How did you figure out the math behind this perfectly shaped heart?!"

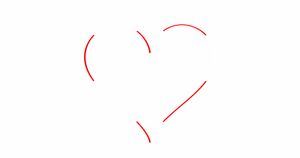
The first property we'll need for our animation is dashArray, which, as the name suggests, transforms continuous lines into dashed ones.
const lineMaterial = new MeshLineMaterial({
  color: new THREE.Color(0xff0000), // Line color (red in this case)
  lineWidth: 1,
  resolution: new THREE.Vector2(window.innerWidth, window.innerHeight),
  dashArray: 0.2,
});
To animate this, we'll keep updating the dash offset. This technique is commonly used for animating lines in CSS or with libraries like GSAP and Anime.js to animate SVG paths.
function animate() {
  lineMaterial.dashOffset -= 0.003;
  renderer.render(scene, camera);
}
To make the animation look like it's drawn with a single line, increase the dashArray value.
const lineMaterial = new MeshLineMaterial({
  color: new THREE.Color(0xff0000), // Line color (red in this case)
  lineWidth: 1,
  resolution: new THREE.Vector2(window.innerWidth, window.innerHeight),
  // dashArray: 0.2,
  dashArray: 2,
});The first problem is that the dashed part isn't completely invisible. Zoom in, and you'll notice it. This makes the line look cut because the section overlapped by the dashed part appears in front.
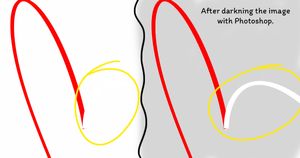
That being said, to make the dashed part truly invisible, we'll set the transparent property to true.
lineMaterial.transparent = true;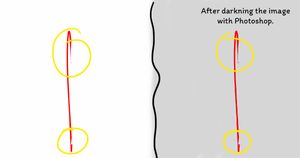
As you can see, we resolved one of the two issues by making the dashed part truly invisible. However, the visible part still looks cut because the dash is in front of it.
To prevent this occlusion culling issue, we'll set the depthTest property to false.
lineMaterial.depthTest = false;
We can make the curve change its width. For example, it can start thick and gradually become thinner toward the endpoint.
To do that, we'll add an arrow function as the second argument to the setPoints() method.
// geometry.setPoints(geometryPoints);
geometry.setPoints(geometryPoints, (p) => 1 - p);
We can do the opposite, meaning making the curve start thin and end thick.
// geometry.setPoints(geometryPoints);
// geometry.setPoints(geometryPoints, (p) => 1 - p);
geometry.setPoints(geometryPoints, (p) => 1 - (1 - p));
Finally, we'll simply do some post-processing to the scene, and we're all set!

Wrap Up
And there you have it — another cool trick for your Three.js toolset pocket.
Sending you lots of love, and see you next time!