Animating Models Programmatically in Three.js
Published on 28 Nov, 2024 | ~5 min read | Demo
If a picture is worth a thousand words, then a model is worth ten thousand. One key factor behind this is animation, which adds a lot to the storytelling and overall experience of a 3D web application.
That said, there are two ways to animate models in Three.js applications. The first is by using pre-built animations that come with the model. The second method is creating animations through code, and that's what we'll explore in this article.
Bones, Skeletons, and SkinnedMesh
Usually, when you want to animate a model, you use the AnimationMixer to play the animations stored in the model file. However, there are times when you might want to animate just a part of the model, triggered by something like a mouse move or scroll.
Furthermore, you might want the "amount of animation" (like the degree of a character's head rotation) or the orientation of a model's part to depend on the amount of mouse scroll or its direction—whether horizontal or vertical.
A more common example is when you want a mesh to keep orienting itself toward the cursor's position.
In such cases, you'll need to animate the bones of your skinned mesh manually through code.
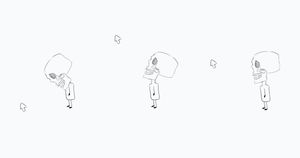
"Yeah, I get it... well, except for the bones and skinned mesh part, ’cause I have no idea what those are."
Just like the human body, a mesh is like the flesh—it can't move or perform any actions without bones.
A skinned mesh is basically a mesh with a skeleton, which is made up of a set of bones.
For example, if we want to rotate a model's hand using an HTML progress element, we just need to target the hand's bone.
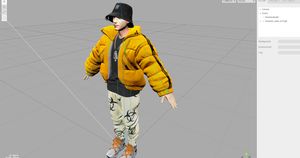
Before diving into the code editor, let’s use the Three.js online editor to experiment with a model’s skeleton.
As you can see, the skinned mesh is displayed along with its bones, which appear as green and blue lines since the bones helper is enabled by default in the editor.
The bones are arranged in a parent-child hierarchy. For example, the LeftUpLeg_60 bone controls the upper part of the left leg, and it has the LeftLeg_59 bone as its child, which controls the lower part of the left leg. This pattern continues with the LeftFoot_58 bone, and so on.
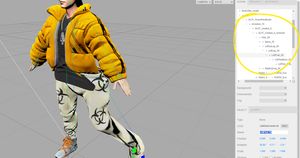
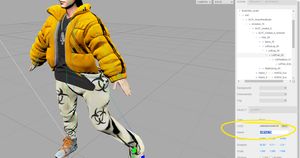
So, in the Three.js editor, you have access to all the bones, so feel free to take your time applying any geometric transformations to them. This is really helpful for planning your character's animation before diving into the code.
One thing to pay attention to is the name property, as it’s the one we'll use to target the bone in the example section.
Example
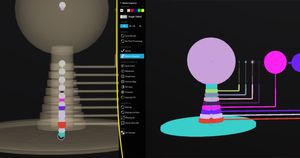
In this model, the bones are at the center, and as you can see in the image below, each bone is responsible for the rotation of one of the planets.
So, let's try animating this model by rotating the bones directly, instead of playing the pre-built animation with the mixer.
First and foremost, create a Three.js project or clone my Three.js boilerplate. Then, download the model and load it into the project.
Also, don't forget to install the dat.gui module.
import * as THREE from 'three';
import { OrbitControls } from 'three/examples/jsm/controls/OrbitControls.js';
import { GLTFLoader } from 'three/examples/jsm/loaders/GLTFLoader';
import { RGBELoader } from 'three/examples/jsm/loaders/RGBELoader.js';
import { GUI } from 'dat.gui';

const renderer = new THREE.WebGLRenderer({ antialias: true });
renderer.setSize(window.innerWidth, window.innerHeight);
document.body.appendChild(renderer.domElement);

const scene = new THREE.Scene();
const camera = new THREE.PerspectiveCamera(
  45,
  window.innerWidth / window.innerHeight,
  0.1,
  1000
);

camera.position.set(1, 1, 2);

const controls = new OrbitControls(camera, renderer.domElement);
controls.enableDamping = true;
controls.dampingFactor = 0.12;

const gui = new GUI();
const params = {
  Neptune: 0,
  Uranus: 0,
  Saturn: 0,
  Jupiter: 0,
  Mars: 0,
  Earth: 0,
  Venus: 0,
  Mercury: 0,
  Neptune: 0,
  Sun: 0,
};

const gltfLoader = new GLTFLoader();
const rgbeLoader = new RGBELoader();

gltfLoader.load('/solar_system_model_orrery.glb', function (glb) {
  const model = glb.scene;
  scene.add(model);
  model.position.y -= 0.2;
});

rgbeLoader.load('/rosendal_plains_1_1k.hdr', function (texture) {
  texture.mapping = THREE.EquirectangularReflectionMapping;
  scene.environment = texture;
});

function animate() {
  controls.update();

  renderer.render(scene, camera);
}
renderer.setAnimationLoop(animate);

window.addEventListener('resize', function () {
  camera.aspect = window.innerWidth / window.innerHeight;
  camera.updateProjectionMatrix();
  renderer.setSize(window.innerWidth, window.innerHeight);
});
What we'll do now is simply add a slider to the GUI, and then pass its value to the rotation property of the bone tied to a specific planet.
As I mentioned earlier, to target a specific bone, we'll use its name.
So, if we want to target a planet, we’ll pass its name as an argument to the getObjectByName() method, and then apply the rotation to it.
gltfLoader.load('/solar_system_model_orrery.glb', function (glb) {
  const model = glb.scene;
  scene.add(model);
  model.position.y -= 0.2;

  gui.add(params, 'Saturn', 0, 2 * Math.PI).onChange(function (value) {
    model.getObjectByName('Saturn_03').rotation.y = Number(value);
  });

  gui.add(params, 'Uranus', 0, 2 * Math.PI).onChange(function (value) {
    model.getObjectByName('Uranus_02').rotation.y = Number(value);
  });

  gui.add(params, 'Jupiter', 0, 2 * Math.PI).onChange(function (value) {
    model.getObjectByName('Jupiter_04').rotation.y = Number(value);
  });

  gui.add(params, 'Mars', 0, 2 * Math.PI).onChange(function (value) {
    model.getObjectByName('Mars_05').rotation.y = Number(value);
  });

  gui.add(params, 'Earth', 0, 2 * Math.PI).onChange(function (value) {
    model.getObjectByName('Earth_06').rotation.y = Number(value);
  });

  gui.add(params, 'Venus', 0, 2 * Math.PI).onChange(function (value) {
    model.getObjectByName('Venus_07').rotation.y = Number(value);
  });

  gui.add(params, 'Mercury', 0, 2 * Math.PI).onChange(function (value) {
    model.getObjectByName('Mercury_08').rotation.y = Number(value);
  });

  gui.add(params, 'Neptune', 0, 2 * Math.PI).onChange(function (value) {
    model.getObjectByName('Neptune_01').rotation.y = Number(value);
  });

  gui.add(params, 'Sun', 0, 2 * Math.PI).onChange(function (value) {
    model.getObjectByName('Sun_09').rotation.y = Number(value);
  });
});
Last Words
And that’s it for this introductory tutorial on bones and skeleton meshes. I hope you found it insightful!
Stay tuned for more articles on this topic, and I’ll see you soon!