Build a Loading Screen for a Three.js Application
Published on 11 Oct, 2024 | ~5 min read | Demo
As a rule of thumb, if your application takes time to load assets, you should inform the user that it's loading; otherwise, they may get frustrated and leave.
With that said, the most common indicator is a loading bar, and that's exactly what we'll build in this tutorial.
LoadingManager
First and foremost, create a Three.js project, ensuring it includes at least one model with a large file size.
main.js:
import * as THREE from 'three';
import { GLTFLoader } from 'three/examples/jsm/loaders/GLTFLoader.js';
import { RGBELoader } from 'three/examples/jsm/loaders/RGBELoader.js';
import { OrbitControls } from 'three/examples/jsm/controls/OrbitControls.js';

const renderer = new THREE.WebGLRenderer({ antialias: true });

renderer.setSize(window.innerWidth, window.innerHeight);

document.body.appendChild(renderer.domElement);

const scene = new THREE.Scene();

const camera = new THREE.PerspectiveCamera(
  45,
  window.innerWidth / window.innerHeight,
  0.1,
  1000
);

renderer.setClearColor(0xa3a3a3);

const controls = new OrbitControls(camera, renderer.domElement);
controls.enableDamping = true;

camera.position.set(2, 4, 6);
controls.update();

const grid = new THREE.GridHelper(20, 20);
scene.add(grid);

const gltfLoader = new GLTFLoader();

const rgbeLoader = new RGBELoader();

renderer.outputColorSpace = THREE.SRGBColorSpace;
renderer.toneMapping = THREE.ACESFilmicToneMapping;

rgbeLoader.load('/rosendal_plains_1_1k.hdr', function (texture) {
  texture.mapping = THREE.EquirectangularReflectionMapping;
  scene.environment = texture;

  gltfLoader.load('/free_datsun_280z/scene.gltf', function (gltf) {
    const model = gltf.scene;
    scene.add(model);
  });
});

function animate() {
  controls.update();
  renderer.render(scene, camera);
}

renderer.setAnimationLoop(animate);

window.addEventListener('resize', function () {
  camera.aspect = window.innerWidth / window.innerHeight;
  camera.updateProjectionMatrix();
  renderer.setSize(window.innerWidth, window.innerHeight);
});
As you can see, my code creates a simple scene with a model and an environment texture, both of which are quite large.
First, we'll create an instance of the LoadingManager class. Then, we'll pass that instance to the constructor of any loader we use to load the assets.
In my case, I'll pass it to the RGBELoader and the GLTFLoader.
const loadingManager = new THREE.LoadingManager();

const gltfLoader = new GLTFLoader(loadingManager);

const rgbeLoader = new RGBELoader(loadingManager);
The LoadingManager has a few methods that provide information about the loading process.
onStart
This method is called at the start of the loading process.
onStart() takes three arguments: the first represents the URL of the file to be loaded, the second represents the number of the loaded files, and the third is the total number of files to be loaded.
loadingManager.onStart = function (url, itemsLoaded, total) {
  console.log('Loading process has started!');
};
onProgress
This method is called every time a component of the model starts loading. Since our model has 30 textures, along with the .GLTF, .BIN files, and the .HDR texture, this should be called a total of 33 times.
loadingManager.onProgress = function (url, itemsLoaded, total) {
  console.log(`Started loading: ${url}
number of items loaded: ${itemsLoaded}
total number of items: ${total}
  `);
};
onLoad
onLoad() is called when the loading process is complete.
loadingManager.onLoad = function () {
  console.log('Loading process has been completed!');
};
onError
This method is called when an error occurs while loading one of the files. For example, if you delete one of the model's textures, you will see the default error message along with your custom message printed in the console.
loadingManager.onError = function (url) {
  console.error(`Got a problem loading: ${url}`);
};
Creating a Loading Progress Interface
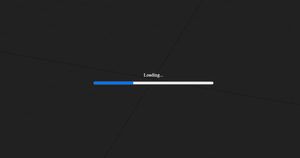
First, we will create a container <div>, a <label>, and a <progress> element for our progress bar, then style them with some basic CSS.
index.html:
<!DOCTYPE html>
<html lang="en">
  <head>
    <meta charset="UTF-8" />
    <meta http-equiv="X-UA-Compatible" content="IE=edge" />
    <meta name="viewport" content="width=device-width, initial-scale=1.0" />
    <title>Loading Manager - Wael Yasmina</title>
    <link rel="preconnect" href="https://fonts.googleapis.com" />
    <link rel="preconnect" href="https://fonts.gstatic.com" crossorigin />
    <link
      href="https://fonts.googleapis.com/css2?family=Montserrat:ital,wght@0,100..900;1,100..900&display=swap"
      rel="stylesheet"
    />
    <style>
      body {
        margin: 0;
      }

      .progress-bar-container {
        position: absolute;
        left: 50%;
        top: 50%;
        transform: translate(-50%, -50%);
        width: 100%;
        height: 100%;
        background-color: rgba(0, 0, 0, 0.8);
        display: flex;
        flex-direction: column;
        justify-content: center;
        align-items: center;
      }

      #progress-bar {
        width: 25%;
        margin-top: 0.5%;
        height: 2%;
      }

      label {
        color: white;
        font-size: 1.2rem;
      }
    </style>
  </head>
  <body>
    <div class="progress-bar-container">
      <label for="progress-bar">Loading...</label>
      <progress id="progress-bar" value="0" max="100"></progress>
    </div>
    <script src="/main.js" type="module"></script>
  </body>
</html>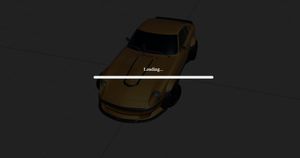
The code above creates an overlay and a progress bar, both of which are absolutely positioned on top of the canvas.
Now, using JavaScript, we will use the onProgress() method to update the values of the progress bar.
const progressBar = document.getElementById('progress-bar');

loadingManager.onProgress = function (url, loaded, total) {
progressBar.value = (loaded / total) * 100;
};
The formula (loaded/total)×100 calculates the percentage of files that have been loaded.
Now, we'll use the onLoad() function to remove the interface once loading is complete by setting the container's display property to none.
const progressBarContainer = document.querySelector('.progress-bar-container');

loadingManager.onLoad = function () {
progressBarContainer.style.display = 'none';
};
Conclusion
And that’s all you need to know to create a loading bar for your Three.js applications.
We created a minimalist interface, but there’s plenty of room for you to make it more engaging and eye-catching, ensuring users don’t feel bored and are less likely to leave—especially if the loading process takes some time.
Happy coding!