Create Custom Materials by Extending Three.js Default Materials
Published on 31 Jan, 2025 | ~6 min read
Creating your own materials using shaders is fun... Well, until you realize there are some features you take for granted that you'll have to rewrite yourself. The most common one? Making your material interact properly with light.
An easy and clean solution is to borrow the desired features from existing materials, and this article will show you exactly how to do that.
The Problem
Let's start with the following example.
Clone the Three.js boilerplate from here (if you don't have a project set up already) and copy-paste the code below.
import * as THREE from 'three';
import { OrbitControls } from 'three/examples/jsm/controls/OrbitControls.js';

const renderer = new THREE.WebGLRenderer({ antialias: true });
renderer.setSize(window.innerWidth, window.innerHeight);
document.body.appendChild(renderer.domElement);

// Sets the color of the background.
renderer.setClearColor(0xfefefe);

const scene = new THREE.Scene();
const camera = new THREE.PerspectiveCamera(
  45,
  window.innerWidth / window.innerHeight,
  0.1,
  1000
);

// Sets orbit control to move the camera around.
const orbit = new OrbitControls(camera, renderer.domElement);

camera.position.set(0, -2, 300);
camera.lookAt(0, 0, 0);

const ambLight = new THREE.AmbientLight(0xa3a3a3, 0.8);
scene.add(ambLight);

const dirLight = new THREE.DirectionalLight(0xffffff);
dirLight.position.set(2, 2, 8);
scene.add(dirLight);

const geo = new THREE.IcosahedronGeometry(4, 30);
const material1 = new THREE.MeshPhysicalMaterial();
for (let i = 0; i < 500; i++) {
  const mesh = new THREE.Mesh(geo, material1);
  mesh.position.x = Math.random() * 1000 - 500;
  mesh.position.y = Math.random() * 1000 - 500;
  mesh.position.z = Math.random() * 1000 - 500;
  mesh.scale.x = mesh.scale.y = mesh.scale.z = Math.random() * 3 + 1;
  scene.add(mesh);
}

function animate() {
  renderer.render(scene, camera);
}

renderer.setAnimationLoop(animate);

window.addEventListener('resize', function () {
  camera.aspect = window.innerWidth / window.innerHeight;
  camera.updateProjectionMatrix();
  renderer.setSize(window.innerWidth, window.innerHeight);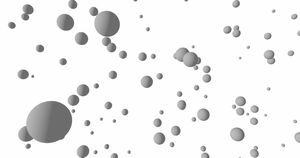
});Here, we have 500 meshes, all using MeshPhysicalMaterial, and you can clearly see how the light affects them.
Now, let's say we want to dynamically color these meshes based on their positions in the viewport.
To achieve that, we need to use a custom material.
First, we'll create an object that holds uniform variables like the resolution. In addition, we'll create an instance of ShaderMaterial.
main.js:
const uniforms = {
  u_resolution: {
    value: new THREE.Vector2(window.innerWidth, window.innerHeight),
  },
};

const material2 = new THREE.ShaderMaterial({
  uniforms,
  vertexShader: document.getElementById('vertexshader').textContent,
  fragmentShader: document.getElementById('fragmentshader').textContent,
});

const geo = new THREE.IcosahedronGeometry(4, 30);
// const material1 = new THREE.MeshPhysicalMaterial();
for (let i = 0; i < 500; i++) {
  // const mesh = new THREE.Mesh(geo, material1);
  const mesh = new THREE.Mesh(geo, material2);
  mesh.position.x = Math.random() * 1000 - 500;
  mesh.position.y = Math.random() * 1000 - 500;
  mesh.position.z = Math.random() * 1000 - 500;
  mesh.scale.x = mesh.scale.y = mesh.scale.z = Math.random() * 3 + 1;
  scene.add(mesh);
}
And of course, we'll create the vertex and fragment shaders.
index.html:
<script id="vertexshader" type="vertex">
  void main() {
    gl_Position = projectionMatrix * modelViewMatrix * vec4(position, 1.0);
  }
</script>

<script id="fragmentshader" type="fragment">
  uniform vec2 u_resolution;
  void main() {
    vec2 st = gl_FragCoord.xy / u_resolution.xy;

    gl_FragColor = vec4(vec3(st.x / 0.6, st.y / 1.8, (st.x + st.y) / 1.2), 1.0);
  }
</script>
And there we go—everything works fine... right?
Well, it might seem that way, but no.
As you can see, we lost an important detail: how the spheres respond to the scene's lights.
When you use ShaderMaterial in Three.js, you actually lose a ton of important information beyond just shading, like metalness, roughness, reflection, and more.
"So, how can we create custom materials while keeping those important details?"

To do that, we have three options.
The first one is to manually handle the calculations in the fragment shader.
The second option is to extend an existing material by using onBeforeCompile() to replace parts of its GLSL code.
The third option is similar to the second, but we use a library instead. And that's exactly what we're going to do.
Three Custom Shader Material
Three Custom Shader Material is a library that lets you build new materials on top of existing ones. This solution is arguably the easiest and cleanest option available.
First and foremost, we need to install the library by running this command in the terminal: npm install three-custom-shader-material.
Next, we'll import it.
import CustomShaderMaterial from 'three-custom-shader-material/vanilla';Note: make sure to add '/vanilla' to the path if you're using standard Three.js, not React Three Fiber.
Now, we'll simply create an instance of CustomShaderMaterial and set the material we want to extend using the baseMaterial property.
const material3 = new CustomShaderMaterial({
  baseMaterial: THREE.MeshPhysicalMaterial,
});
// const mesh = new THREE.Mesh(geo, material2);
const mesh = new THREE.Mesh(geo, material3);
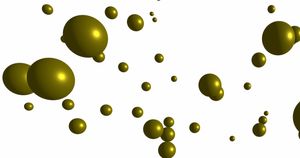
As you can see, everything works as expected. Additionally, we can set material properties like color, maps, and all the properties that belong to MeshPhysicalMaterial.
const material3 = new CustomShaderMaterial({
  baseMaterial: THREE.MeshPhysicalMaterial,
  color: 0xffea00,
  metalness: 0.6,
  roughness: 0.4,
});
Now, let's revisit the example I tried earlier.
So, we'll set the fragment shader and pass the resolution uniform.
const material3 = new CustomShaderMaterial({
  baseMaterial: THREE.MeshPhysicalMaterial,
  color: 0xffea00,
  metalness: 0.6,
  roughness: 0.4,
  fragmentShader: document.getElementById('fragmentshader').textContent,
  uniforms: {
    u_resolution: {
      value: new THREE.Vector2(window.innerWidth, window.innerHeight),
    },
  },
});
Doing this won't change anything because we need to update something in the fragment shader.
Right now, gl_FragColor is the shader's output, which is typically how things are done.
That said, you definitely don't want to modify that variable when using this library. Instead, we'll need to work with a new set of predefined variables.
In our case, we'll use the csm_DiffuseColor variable instead. This ensures we only modify the material's color while preserving other data, such as shading calculations.
csm_DiffuseColor = vec4(vec3(st.x / 0.6, st.y / 1.8, (st.x + st.y) / 1.2), 1.0);
// gl_FragColor = vec4(vec3(st.x / 0.6, st.y / 1.8, (st.x + st.y) / 1.2), 1.0);
And there you have it!
Now, let's say we want to animate the vertices of the meshes using the vertex shader.
To do that, we'll add the vertex shader to the CustomShaderMaterial instance and, of course, set the time uniform.
const material3 = new CustomShaderMaterial({
	baseMaterial: THREE.MeshPhysicalMaterial,
	color: 0xFFEA00,
	metalness: 0.6,
	roughness: 0.4,
	uniforms:{
		u_resolution: {value: new THREE.Vector2(window.innerWidth, window.innerHeight)},
		u_time: {value: 0}
	},
	vertexShader: document.getElementById('vertexshader').textContent,
	fragmentShader: document.getElementById('fragmentshader').textContent
});
const clock = new THREE.Clock();
function animate() {
material3.uniforms.u_time.value = clock.getElapsedTime();
renderer.render(scene, camera);
}And again, we'll need a special variable in the vertex shader called csm_Position.
uniform float u_time;
void main() {
  vec3 newPosition = position * sin(u_time);
  csm_Position = newPosition;
  // gl_Position = projectionMatrix * modelViewMatrix * vec4(position, 1.0);
}Wrap Up
And with that, we’ve come to the end of this article.
Now, you can unleash your creativity with shaders—no more struggling with massive onBeforeCompile() code just to make your masterpieces react to light like any other material.
Bye!