Demystifying Quaternions for 3D Development
Last updated on 15 Dec, 2024 | ~11 min read
Have you ever come across the term quaternion and tried to learn it, only to find every tutorial packed with intimidating math formulas that make you give up or push it off for another day?
Well, this time you’ve found the right tutorial! In this article, I’ll explain quaternions from a developer's perspective, not a mathematician's. You’ll finally understand what those mysterious objects in 3D libraries and software are and why they’re so useful.
Gimbal Lock
When you want to rotate an object in a 3D scene, your first thought is probably Euler angle rotations—picking an axis and an angle, and that’s it. Rotation done, right?
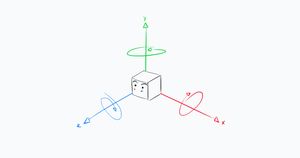
Well, even though this works most of the time, things can get a little more complicated sometimes. And here's why.
First, open this app and try rotating the box around each axis, one at a time. Rotate around the x-axis, observe how the box rotates, then reset the value to 0 and rotate around the y or z axis.
I know this might be boring, but bear with me—consider it a necessary warm-up or intro to the real deal.
Now, make a 90° z-rotation by setting the z value to 1.6. Then, rotate around the other two axes, one at a time.
And once again, everything should work as expected.
Now, do a 90° y-rotation by setting the y value to 1.6 and then rotate around the x-axis only.
And as expected, the rotation works fine.
"Bro, are you messing with me?"
No, please just keep following.
This time, keep the 90° y-rotation, reset the x value to 0, and before applying a z-rotation, take a moment to guess which direction the rotation will go.
"Wait what?!"
Yeah, that's exactly how I felt when I encountered this. The box is rotating around the x-axis instead of the z-axis. So, rotating around either the x or z axis gives the same result.
This loss of one degree of freedom is known as Gimbal Lock.
By the way, things can get even stranger. If you make a 90° x-rotation, the y and z rotations get flipped.
"So what’s going on here? What exactly is this phenomenon called Gimbal Lock?"
Let's first understand what a gimbal is.
"A gimbal is a ring that is suspended so it can rotate about an axis. Gimbals are typically nested one within another to accommodate rotation about multiple axes."
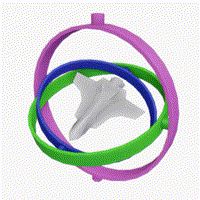
Essentially, each ring represents rotation around one axis. Keep in mind that the parent-child relationship between the rings means the child rings are affected by the parent ring's rotation.
That said, Gimbal Lock happens when two rings become aligned.
To see this in action, open Blender, select your mesh, enable the rotation gizmo, and switch from global to gimbal mode.
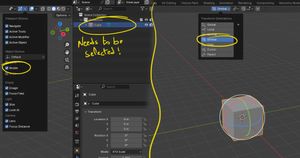
As you can see, we now have the rotation rings. The parenting relationship between them isn’t immediately obvious, but we can tell from the Mode dropdown list that the z-axis is the grandparent and the x-axis is the grandchild, based on the order of the axes.
An even better way to observe this is by rotating the box using the rotation sliders in the UI.
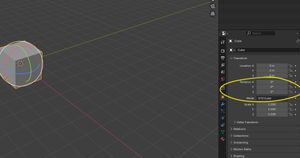
When you change the x value, you’ll notice that none of the axes seem to move—well, technically, the red one is moving, but since it’s a rotational movement, it’s not visually apparent.
Now, when you change the y value, you’ll notice that the red ring moves as well. This shows that the x-rotation ring is a child of the y-rotation ring.
When you update the z value, both the red and green rings move. This means the z-rotation ring is the grandparent.
Now, set the Y-rotation to 90° (you’ll immediately notice that the z-rotation ring disappears because it becomes aligned with the x-rotation ring). Then, apply the x and y rotations one at a time, just like we did earlier
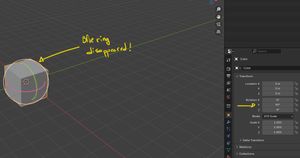
Back to the parenting relationship before we dive into the solution. You might think changing the order of the rings could fix Gimbal Lock, but it doesn’t.
To verify this, change the order by selecting a different value from the Mode dropdown, set one axis rotation to 90°, and then play with the other axes' values.
Quaternions Come to the Rescue
In a nutshell, a quaternion is a 4D representation of an object's orientation.
"But how do we use it?" You might be asking.
Well, first create a Three.js project and copy the code below. If you'd rather skip this part, I'll also post the live examples.
Note: don’t forget to install the lil-gui module if you choose the first option.
import * as THREE from 'three';
import { OrbitControls } from 'three/examples/jsm/controls/OrbitControls.js';
import { GUI } from 'lil-gui';

const renderer = new THREE.WebGLRenderer({ antialias: true });
renderer.setSize(window.innerWidth, window.innerHeight);
document.body.appendChild(renderer.domElement);

// Sets the color of the background.
renderer.setClearColor(0xfefefe);

const scene = new THREE.Scene();
const camera = new THREE.PerspectiveCamera(
  45,
  window.innerWidth / window.innerHeight,
  0.1,
  1000
);

// Sets orbit control to move the camera around
const controls = new OrbitControls(camera, renderer.domElement);
controls.enableDamping = true;
controls.dampingFactor = 0.12;

// Camera positioning.
camera.position.set(6, 6, 6);

const params = {
  'X (red)': 0.0,
  'Y (green)': 0.0,
  'Z (blue)': 0.0,
};

// Creates an axes helper with an axis length of 4.
const axesHelper = new THREE.AxesHelper(10);
scene.add(axesHelper);

const ambientLight = new THREE.AmbientLight(0x333333);
scene.add(ambientLight);

const directionalLight = new THREE.DirectionalLight(0xffffff, 1);
directionalLight.position.set(0, 10, 10);
scene.add(directionalLight);

const textures = [];
const textureLoader = new THREE.TextureLoader();

const texture1 = textureLoader.load('https://i.imgur.com/YMQABUE.jpeg');
const texture2 = textureLoader.load('https://i.imgur.com/Vpv0Ks6.jpeg');
const texture3 = textureLoader.load('https://i.imgur.com/4abQCRu.jpeg');
const texture4 = textureLoader.load('https://i.imgur.com/cVkGemV.jpeg');
const texture5 = textureLoader.load('https://i.imgur.com/AF2hju2.jpeg');
const texture6 = textureLoader.load('https://i.imgur.com/qEyeKr1.jpeg');

textures.push(texture1, texture2, texture3, texture4, texture5, texture6);

textures.forEach(function (texture) {
  texture.colorSpace = THREE.SRGBColorSpace;
});

const material = [
  new THREE.MeshBasicMaterial({ map: textures[0] }),
  new THREE.MeshBasicMaterial({ map: textures[1] }),
  new THREE.MeshBasicMaterial({ map: textures[2] }),
  new THREE.MeshBasicMaterial({ map: textures[3] }),
  new THREE.MeshBasicMaterial({ map: textures[4] }),
  new THREE.MeshBasicMaterial({ map: textures[5] }),
];

const geometry = new THREE.BoxGeometry(1.5, 1.5, 1.5);

const box1 = new THREE.Mesh(geometry, material);
scene.add(box1);
box1.position.x = -2;

const box2 = new THREE.Mesh(geometry, material);
scene.add(box2);
box2.position.x = 2;

const gui = new GUI();
gui.add(params, 'X (red)', 0.0, 2 * Math.PI, 0.1).onChange(function (value) {
  box2.rotation.x = Number(value);
});
gui.add(params, 'Y (green)', 0.0, 2 * Math.PI, 0.1).onChange(function (value) {
  box2.rotation.y = Number(value);
});
gui.add(params, 'Z (blue)', 0.0, 2 * Math.PI, 0.1).onChange(function (value) {
  box2.rotation.z = Number(value);
});

function animate() {
  controls.update();
  renderer.render(scene, camera);
}

renderer.setAnimationLoop(animate);

window.addEventListener('resize', function () {
  camera.aspect = window.innerWidth / window.innerHeight;
  camera.updateProjectionMatrix();
  renderer.setSize(window.innerWidth, window.innerHeight);
});
Now that the project is ready, apply a 90° y-rotation to the right box by setting the y value to 1.6. Its purple face will orient towards the right side of the scene, which is the expected behavior.
And again, if you apply another 90° rotation around the z-axis, the purple face should be oriented upwards, but it doesn’t, which is incorrect.
So, what we’re going to do now is apply the same sequence of rotations to the left box, but this time using quaternions instead.
"Ugh, finally!"
Let’s start with the first rotation.
First, let's create an instance of the Quaternion class. Then, call the setFromAxisAngle() method, which takes two arguments.
const quaternionY = new THREE.Quaternion();
quaternionY.setFromAxisAngle(
  new THREE.Vector3(0, 1, 0).normalize(),
  Math.PI / 2
);
The first argument is the normalized vector representing the axis we want to rotate the object around. In this case, (0, 1, 0) represents the y-axis.
The second argument is the amount of rotation we want to apply. Math.PI / 2 is 90° in radians.
Next, we'll simply call the applyQuaternion() method on the object and pass the quaternion we've created as an argument.
box1.applyQuaternion(quaternionY);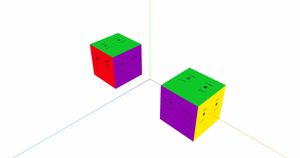
As you can see, we’ve completed the first rotation sequence. Now, let’s apply the second one.
Simply copy and paste the previous lines, change the variable name, and set (0, 0, 1) as the axis of rotation—the z-axis, to be precise.
const quaternionZ = new THREE.Quaternion();
quaternionZ.setFromAxisAngle(
  new THREE.Vector3(0, 0, 1).normalize(),
  Math.PI / 2
);
box1.applyQuaternion(quaternionZ);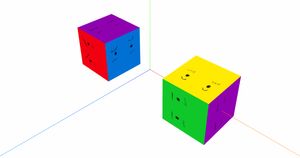
And there we go! Now we have the expected orientation—no gimbal lock, no unexpected results.
Quaternions Affect Animations
In addition to what we’ve covered, rotation animations can also be affected by Gimbal Lock.
That said, let’s animate the right cube using regular Euler rotations.
function rotateBox2() {
  box2.rotation.x += 0.01;
  box2.rotation.y += 0.01;
}
function animate() {
controls.update();
rotateBox2();
renderer.render(scene, camera);
}When you do that, you’ll see the box rotating, but notice that the animation is unpredictable—it looks like the box is rotating around all three axes.
Now, let’s apply a rotation animation around the same axes to the left box, but this time using quaternions.
function rotateBox1() {
  const quaternionX = new THREE.Quaternion().setFromAxisAngle(
    new THREE.Vector3(1, 0, 0).normalize(),
    0.01
  );
  box1.applyQuaternion(quaternionX);

  const quaternionY = new THREE.Quaternion().setFromAxisAngle(
    new THREE.Vector3(0, 1, 0).normalize(),
    0.01
  );
  box1.applyQuaternion(quaternionY);
}
function animate() {
controls.update();
rotateBox2();
rotateBox1();
renderer.render(scene, camera);
}And as you can see, the animation using quaternions looks smooth and consistent.
Spinning Objects Around Other Objects
In another article where I created a solar system, to make a planet rotate around the sun, I had to create an object at the same position as the sun. Then, I added the planet as a child of that object and rotated the parent object.
Another way to do this without creating an extra object is by using quaternions.
Actually, let’s do that to rotate one of the boxes around the other.
To do that, as usual, we'll create a quaternion with (0, 1, 0) as the axis of rotation, and then we'll apply that quaternion to the position of box1.
function rotateAroundOrigin() {
  const quaternionO = new THREE.Quaternion().setFromAxisAngle(
    new THREE.Vector3(0, 1, 0).normalize(),
    0.01
  );
  box1.position.applyQuaternion(quaternionO);
}
function animate() {
controls.update();
rotateBox2();
rotateBox1();
rotateAroundOrigin();
renderer.render(scene, camera);
}Furthermore, we can do the same thing with the camera to create a nice camera spinning animation
function rotateCameraAroundOrigin() {
  const quaternionO = new THREE.Quaternion().setFromAxisAngle(
    new THREE.Vector3(0, 1, 0).normalize(),
    -0.005
  );
  camera.position.applyQuaternion(quaternionO);
}
function animate() {
controls.update();
rotateBox2();
rotateBox1();
rotateAroundOrigin();
rotateCameraAroundOrigin();
renderer.render(scene, camera);
}Useful Quaternion Functions
A couple of very useful functions, among many others, that I want to end this article with are rotateTowards() and sleep().
rotateTowards()
rotateTowards() rotates the current quaternion towards another quaternion.
function animate() {
  controls.update();

  box1.quaternion.rotateTowards(box2.quaternion, 0.1);

  renderer.render(scene, camera);
}
The first argument here is the target quaternion, and the second is the step, which represents the fraction of the rotation that needs to be done at a time to reach the target quaternion.
Notice how smooth the animation is, which is one of the best parts about quaternion rotations, as it handles interpolation between the initial quaternion and the target one.
slerp()
slerp() is a variation of the previous function but provides an even smoother animation.
function animate() {
  controls.update();

  box1.quaternion.slerp(box2.quaternion, 0.1);

  renderer.render(scene, camera);
}
The first argument is the target quaternion, and the second one is alpha, which should be a value between 0 and 1. At 0, we have no rotation, and at 1, we have the final rotation.
Wrap Up
And that's it for this article! I hope this cleared up your confusions about quaternions.
Now you've got a new tool in your pocket, and most importantly, you can sound like the smartest person in the room by dropping this word, ayyy!
Credits and Resources
- Gimbal lock
- C# Quaternions in Unity! - Intermediate Scripting Tutorial
- Euler (gimbal lock) Explained
- What is Euler Rotation and How to Avoid Gimbal Lock
- What are Euler Rotations in Blender? | How to Avoid Gimbal Lock (2021)
- How to think about Quaternions without your brain exploding
- 10 mins GameDev tips - Quaternions
