Enhancing Three.js App Performance with LOD
Published on 18 Nov, 2024 | ~4 min read | Demo
The creation of a 3D application remains unfinished if performance optimization is not considered.
That being said, in this tutorial, we'll explore an excellent technique called Level of Detail (LOD), which can significantly improve performance.
The Theory
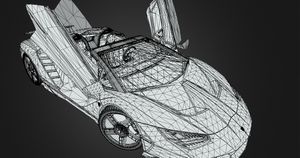
As you may know, a 3D object is made up of vertices and triangles. The more vertices and triangles a mesh contains, the more resources it requires to render.

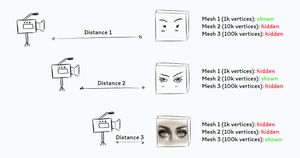
With this in mind, one way to enhance your Three.js app's performance, especially in scenes with a large number of meshes, is to adjust the level of detail based on the distance between the camera and the objects in the scene.
By "details," I mean the number of triangles that make up a mesh.
Since we can't see the fine details of an object from a long distance, it makes sense not to render all of them.
Instead, we can create a few copies of the same mesh, each with a different level of detail. Then, depending on the distance between the camera and the mesh, we render the appropriate version with the right level of detail.

The Practice
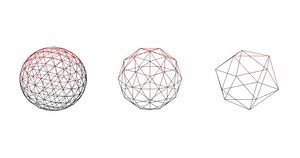
To learn how to use LOD, we'll create an example where we control the smoothness of an icosahedron.
Note: An icosahedron is transformed into a smooth sphere by increasing the number of its vertices (details).
First, create a Three.js project. You can save time by using my Three.js boilerplate.
Next, create three icosahedrons.
import * as THREE from 'three';
import { OrbitControls } from 'three/examples/jsm/controls/OrbitControls.js';

const renderer = new THREE.WebGLRenderer({ antialias: true });
renderer.setSize(window.innerWidth, window.innerHeight);
document.body.appendChild(renderer.domElement);

renderer.shadowMap.enabled = true;

// Sets the color of the background
renderer.setClearColor(0xfefefe);

const scene = new THREE.Scene();
const camera = new THREE.PerspectiveCamera(
  45,
  window.innerWidth / window.innerHeight,
  0.1,
  1000
);

// Camera positioning
camera.position.set(0, 3, 4);

// Sets orbit control to move the camera around
const controls = new OrbitControls(camera, renderer.domElement);
controls.enableDamping = true;
controls.dampingFactor = 0.12;

const dLight = new THREE.DirectionalLight(0xffffff, 1);
scene.add(dLight);

const material = new THREE.MeshPhongMaterial({
  color: 0xff0000,
  wireframe: true,
});

const ico1Geo = new THREE.IcosahedronGeometry(0.5, 3);
const ico1 = new THREE.Mesh(ico1Geo, material);
ico1.position.set(-1.5, 0, 0);
scene.add(ico1);

const ico2Geo = new THREE.IcosahedronGeometry(0.5, 1);
const ico2 = new THREE.Mesh(ico2Geo, material);
ico2.position.set(0, 0, 0);
scene.add(ico2);

const ico3Geo = new THREE.IcosahedronGeometry(0.5, 0);
const ico3 = new THREE.Mesh(ico3Geo, material);
ico3.position.set(1.5, 0, 0);
scene.add(ico3);

function animate() {
  controls.update();

  renderer.render(scene, camera);
}

renderer.setAnimationLoop(animate);

window.addEventListener('resize', function () {
  camera.aspect = window.innerWidth / window.innerHeight;
  camera.updateProjectionMatrix();
  renderer.setSize(window.innerWidth, window.innerHeight);
});
Now, for the most interesting part: we'll create an instance of the LOD class and add it to the scene.
const lod = new THREE.LOD();
scene.add(lod);
Next, instead of adding the first mesh directly to the scene, we'll add it to the LOD instance by calling the addLevel() method.
The second argument of this method is the distance between the camera and the object, which determines when the level of detail should change.
//scene.add(ico1);
lod.addLevel(ico1, 0);
Now, if we take a look, you'll notice that nothing has changed because we haven't added the other two meshes to the LOD. Let's go ahead and add them.

//scene.add(ico2);
lod.addLevel(ico2, 6);
This way, we're telling the renderer to display the first icosahedron if the distance between it and the camera is less than 8 units. On the other hand, if the distance is greater, the second icosahedron will be displayed.
//scene.add(ico3);
lod.addLevel(ico3, 15);
We've now added another case: if the distance to the camera is greater than 15 units, the third icosahedron will be rendered.
What we've just learned also applies to loaded models like in the demo. You can create three different versions of the same model, each with a specific level of detail.
const loader = new GLTFLoader();

const lod = new THREE.LOD();
scene.add(lod);

loader.load('/Cactus_high.glb', function (glb) {
  const model = glb.scene;
  //scene.add(model);
  lod.addLevel(model, 0);
});

loader.load('/Cactus_medium.glb', function (glb) {
  const model = glb.scene;
  //scene.add(model);
  lod.addLevel(model, 10);
});

loader.load('/Cactus_low.glb', function (glb) {
  const model = glb.scene;
  //scene.add(model);
  lod.addLevel(model, 20);
});Wrap Up
With that, we've reached the end of this tutorial. I hope you found it insightful and easy to follow.
Remember, LOD is just one of many techniques you can use to optimize the performance of your Three.js applications. So stay tuned for more on this topic in future articles!
Until next time.
