GLSL and Shaders Tutorial for Beginners (WebGL / Threejs)
Published on 10 Jun, 2024 | ~28 min read
In this tutorial, we're going to learn the syntax of the GLSL ES language. And then wrap up with some examples to better understand some of the concepts we're going to see.
Before we begin, it's assumed that you have a basic understanding of WebGL and some familiarity with the fundamentals of three.js, the library we'll be using for our examples.
Comments
In this language, comments function similarly to many other programming languages. For single-line comments, we use double slashes // followed by the comment. For multiline comments, we enclose the comment between /* and */
// One line comment

/*
Multiline
comment
*/
Variables and Constants
Same as the other programming languages, GLSL utilizes variables for storing information. However, it's essential to declare the data type of the variable before use, unlike JavaScript, where types are inferred. This explicit declaration ensures strict type handling.
int a = 77;In addition to variables, we have constants, which are variables that must be initialized upon declaration and cannot be updated afterward.
The main difference between constants in GLSL and JavaScript lies in the requirement to specify the data type in GLSL. Otherwise, their behavior is similar.
const float b = 50.0;There are a handful fundamental data types: int for integers, float for floating-point numbers, and bool for true/false values. Unlike some other languages, GLSL does not include character or string types.
int a = 77;
const float b = 50.0;
bool c = true;
Once a variable is assigned a data type, it cannot be reassigned a value of a different type. For instance, it's not possible to assign a float value to an int variable or vice versa, ensuring strict adherence to data types.
// These couple lines generate error messages.
int a = 20.0;
float b = 4;
The only way to assign the value of a variable to another one with a different type is by using a type conversion function. For instance, you can convert a float value to an integer using the int() function.
float x = 4.0;
int y = 20;
bool z = false;

// a = 4
int a = int(x);
// b = 20.0
float b = float(y);
// c = 0.0
float c = float(z);
In addition to variables and type conversions, we have a variety of operators for performing different operations such as addition (+), subtraction (-), division (/), and more.
// a = 4
int a = 2 + 2;
// a = 5
a++;
Vectors And Matrices
Besides basic types, GLSL also includes vectors and matrices. These types are analogous to objects in object-oriented languages, as they are composed of basic types and allow for more complex operations.
Throughout this tutorial, our focus will primarily be on the programming aspects. However, it's crucial to note that having a basic understanding of mathematics will greatly enhance your comprehension of the material, particularly when dealing with the mathematical representations we'll encounter.
I highly recommend checking out the "Math For Game Devs" playlist on Freya Holmér's channel. Her content thoroughly explores essential topics like vectors and matrices, as well as advanced concepts like vector normalization, interpolation, bezier curves, and more.
Vectors
Vectors are categorized into three types: float vectors vec, integer vectors ivec, and boolean vectors bvec. Each type is designed to handle specific kinds of data.
In addition to specifying the type, we need to use a digit to indicate the number of components in a vector. A vector can have a minimum of 2 components and a maximum of 4 components.
vec2 vectA = vec2(1.0, 5.0);
ivec3 vectB = ivec3(7, 10, 1);
bvec4 vectC = bvec4(true, true, false, false);
Another way to create a vector, when all its components have the same value, is by specifying that value only once.
// Same as: vec3 vectD = vec3(0.0, 0.0, 0.0);
vec3 vectD = vec3(0.0);
We can also initialize a vector by using the values from another vector.
vec2 vectE = vec2(3.0, 9.0);
// Same as: vec4 vectF = vec4(3.0, 9.0, 0.0, 10.0);
vec4 vectF = vec4(vectE, 0.0, 10.0);
// Same as: vec2 vectG = vec3(3.0, 9.0);
vec2 vectG = vec2(vectF);
Furthermore, we can combine values from multiple vectors to create a new vector.
bvec2 vectH = bvec2(true);
bvec2 vectI = bvec2(false);
// Same as: bvec4 vectJ = bvec4(true, true, false, false);
bvec4 vectJ = bvec4(vectH, vectI);
Now that we have learned how to create vector variables, let's explore how to set and retrieve data from their components.
To access the first component of a vector, specify the variable name followed by a period and then x, r, or s.
vec4 v = vec4(2.0, 3.0, 7.0, 5.0);
// a == b == c == 2.0
float a = v.x;
float b = v.r;
float c = v.s;
To access the second component of a vector, use the variable name followed by a period and then y, g, or t.
vec4 v = vec4(2.0, 3.0, 7.0, 5.0);
// a == b == c == 3.0
float a = v.y;
float b = v.g;
float c = v.t;
To access the third component of a vector, use the variable name followed by a period and then z, b, or p.
vec4 v = vec4(2.0, 3.0, 7.0, 5.0);
// a == b == c == 7.0
float a = v.z;
float b = v.b;
float c = v.p;
To access the fourth component of a vector, use the variable name followed by a period and then w, a, or q
vec4 v = vec4(2.0, 3.0, 7.0, 5.0);
// a == b == c == 5.0
float a = v.w;
float b = v.a;
float c = v.q;
As you can see, there are various notations for accessing vector components, each suited for different contexts. For example, when dealing with vertices' positions, it's more intuitive to use x, y, and z. For colors, r, g, and b are commonly used, while s, t, and p are preferred for textures.
It's important to note that we can access multiple components of a vector simultaneously. For example, we can create a new vector whose components are taken from the 1st and 3rd components of another vector.
vec4 vectA = vec4(2.0, 3.0, 7.0, 5.0);
// Same as: vec2 vectB = vec2(2.0, 7.0);
vec2 vectB = vectA.xz;
Also we have the flexibility to repeat values or rearrange them in a different order within vectors.
vec4 vectA = vec4(2.0, 3.0, 7.0, 5.0);
// Same as: vec3 vectB = vec3(2.0, 2.0, 2.0);
vec3 vectB = vectA.rrr;
// Same as: vec2 vectC = vec2(7.0, 2.0);
vec3 vectC = vectA.br;
Matrices
Quite similar to vectors, a matrix is composed of a certain number of floats. So we have mat2, mat3, and mat4 matrices.
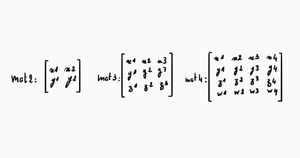
Unlike vectors, matrices can contain different types of values simultaneously. For example, a mat2 could theoretically have 2 integers and 2 booleans. However, these values will be converted automatically into floats.
// Same as: mat2 mat = mat2(1.0, 1.0, 0.0, 0.0);
mat2 mat = mat2(1, 1, false, false);
The elements of a matrix are set in a column-major order. This means that when creating a matrix with code, the elements must be typed in column order.
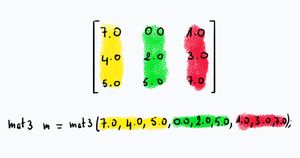
To access the components of a matrix, we use bracket notation. For example, m[0] accesses the first column of a matrix m and returns it as a vector.
mat3 m = mat3(7.0, 4.0, 5.0, 0.0, 2.0, 0.5, 1.0, 3.0, 7.0);
// Same as: vec3 v = vec3(7.0, 4.0, 5.0);
vec3 v = m[0];
To set the last value of a matrix m to 100, you can use double brackets m[2][2].
mat3 m = mat3(7.0, 4.0, 5.0, 0.0, 2.0, 0.5, 1.0, 3.0, 7.0);
m[2][2] = 100.0;
Furthermore, we can combine the dot notation used to get and set vector values with bracket notation for matrices.
mat3 m = mat3(7.0, 4.0, 5.0, 0.0, 2.0, 0.5, 1.0, 3.0, 7.0);
// f value is 4.0
// Same as: float f = m[0][1];
float f = m[0].y;
Of course, we can perform a variety of operations on vectors and matrices just as we do with other types. This includes addition, subtraction, multiplication, and more. For instance, you can add two vectors, multiply a matrix by a vector, or even multiply two matrices together.
Samplers
Another type of variables we have is sampler. Actually we have a couple of them. sampler2D, which you will use most often for 2D textures, and samplerCube, which is used for cube map textures.
In short, a sampler is a type of variable used to store image data in GLSL.
Arrays
Similar to other programming languages, GLSL provides arrays to store collections of data.
To create an array, we need to specify the type and the number of elements in advance.
In the example below, the number 7 does not initialize the array with the value 7; instead, it indicates that the array can hold up to 7 elements.
float arr[7];To access an element of an array, we use bracket notation in the same way as in C or JavaScript.
float arr[7];
// Sets the value of the first element
arr[0] = 20.0;
// Gets the value of the last element
float f = arr[6];
Structures
In addition to the different types of variables we've seen, GLSL also allows us to create our own custom types.
To create custom types, we use the keyword struct, followed by a name and a pair of opening and closing curly braces. Within these braces, we specify the components of our structure, defining our custom type.
struct myType {
    int c1;
    vec3 c2;
};
Once we've defined the structure of our custom type, creating a variable of that type is done in the same way as with other variable types.
struct myType {
    int c1;
    vec3 c2;
};

myType a;
To access the components of a variable of a custom type, whether to get or set their values, we use the dot notation, similar to how we access components of vectors.
struct myType {
    int c1;
    vec3 c2;
};

myType a;

// Sets the value of c1
a.c1 = 10;
// Gets the value of c2
vec3 v = a.c2;
Control Flow Statements
Again similar to other programming languages, we have control flow statements such as if-else statements, switch cases, for loops, and while loops.
if(condition1) {
    // Do something
} else if(condition2) {
    // Do something else
} else {
    // Do something else
}for(int i = 0; i < 10; i++) {
// Do something
}Functions
A function in GLSL, like a variable, must have a type. If a function returns a value, its type must match the type of the returned value. However, if a function doesn't return anything, its type must be set to void.
void funcA() {
    // Stuff to do
}

float funcB() {
    // Stuff to do
    return 1.0;
}
It is also necessary to specify the types of parameters for a function.
float func(vec3 v) {
    return v.x;
}
It's crucial to note that function definitions must be placed outside the main function. More on the main function later on.
float func(vec3 v) {
    return v.x;
}

void main() {
    // Stuff to do
}
In GLSL, the order of function definition and calling matters. Functions need to be defined before they are called.
// This works
int func() {
    return 5;
}

void main() {
    int five = func();
}
// This won't work!
void main() {
int five = func();
}
int func() {
return 5;
}That said, we can actually do something to bypass this rule.
To do that, we can set what is called the prototype of the function at the top of the code. A prototype is essentially the definition of the function without its body. We can then call the function and provide its full definition at the bottom of the code base.
// This is the prototype of the function
vec2 func(float x, float y);

void main() {

    vec2 v = func(2.0, 3.0);

}

vec2 func(float x, float y) {
    return vec2(x, y);
}
GLSL provides a wealth of built-in functions. For comprehensive documentation on these functions, be sure to visit shaderific.com. There, you'll find brief documentation for any built-in function you might need.
Storage Qualifiers
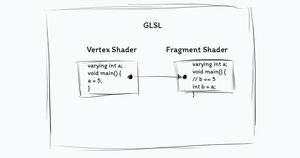
There are four storage qualifiers. We have already encountered one of them: const. The other three are attribute, uniform, and varying.
I believe it would be easier for you to fully understand the purpose of these qualifiers if you learn a bit of pure WebGL. However, here’s a brief explanation in the meantime.
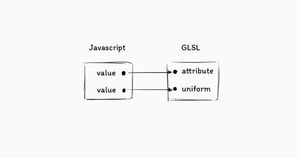
Attribute and uniform variables, are variables that receive data from the outside of the GLSL code, from the Javascript side of the application code more precisely.
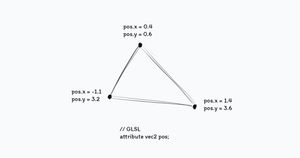
The difference between the two is that an attribute variable holds data that varies from one vertex to another. A vertex, by the way, is a point. For instance, the positions of vertices that form a triangle should be passed as attributes because each vertex has a unique set of coordinates.
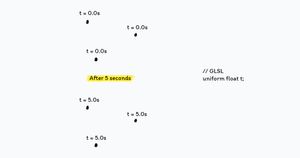
In contrast, time should be passed as a uniform variable because all vertices share the same time value. For example, if 5 seconds have passed for one vertex, 5 seconds have passed for all other vertices as well; the time value is uniform across all vertices.
Another difference between attributes and uniforms is that the number of attribute variables allowed is less than the number of uniforms. Additionally, attribute variables can only be used in the vertex shader, while uniforms are allowed in both the vertex and fragment shaders. We will discuss shaders in more detail later, so don't worry.
Varying variables, on the other hand, are used to transfer data from the vertex shader to the fragment shader. That's it.
Precision Qualifiers
Precision qualifiers are used to optimize resource consumption, specifically memory usage.
There are three precision qualifiers: lowp, mediump, and highp, with lowp being the least resource-intensive. However, it's important to carefully choose the right precision, as a lower precision can sometimes yield incorrect results.
To set the precision of a variable, simply begin its declaration with the desired precision qualifier.
mediump float f = 5.0;Alternatively, you can set a precision for an entire type of variables by using the keyword precision, followed by the precision qualifier, and then the type.
precision highp int;Shaders
In simple terms, a shader is a small program written in GLSL.
Having said that, there are two types of shaders: the vertex shader and the fragment shader.
Vertex Shader
Every object in 3D, whether it's a point, text, shape, or a 3D model, is composed of a number of vertices. The role of a vertex shader is to handle the positioning of each vertex comprising that mesh in the scene.

The code of a vertex shader must be enclosed within a function named main. This function will be executed once for each vertex that composes the mesh.
void main() {
    // Vertex shader logic
}
For example, if we create an object with 20 vertices, the main function of the vertex shader will be executed 20 times to position each vertex correctly.
Within the main function of the vertex shader, we must assign a value to the built-in variable gl_Position, which indicates the coordinates of each vertex.
void main() {
    // Stuff to do
    gl_Position = projectionMatrix * modelViewMatrix * vec4(position, 1.0);
}
The value of gl_Position here depends on the 3D library you're using. In Three.js the gl_Position value depends on projectionMatrix, modelViewMatrix, and position which are Three.js built-in variables.
The first two variables, projectionMatrix and modelViewMatrix, are related to the camera view and contribute to the calculation of the final value passed to gl_Position. The third variable, position, stores the initial coordinates of a vertex. It's important to note that this may vary if you're working with a different library, such as Babylon.js or Pixi.js.
Fragment Shader
Essentially, the role of a fragment shader is to apply colors to vertices and the meshes they form after they have been positioned by the vertex shader.

The colorization process involves several steps, but as a beginner, you just need to know that the fragment shader breaks down the mesh, created from the vertices positioned by the vertex shader, into small fragments and then colorizes them.
Similar to the vertex shader, a fragment shader's code must be enclosed within the body of a main function. Within this function, we also need to specify a special built-in variable called gl_FragColor.
void main() {
    // Stuff to do
    gl_FragColor = vec4(1.0, 1.0, 1.0, 1.0);
}
As its name suggests, gl_FragColor is where the color of one fragment is stored. This vec4 variable has four components, each representing a color channel: the first value represents the red channel, the second the green channel, the third the blue channel, and the fourth the alpha channel.
Bear in mind that the values of these components range from 0 to 1. Any negative value is treated as 0, and any value exceeding 1 is equivalent to 1.
Using Shaders in a Three.js Application
First, we need a basic Three.js project to implement what we've learned so far. To make things easier for you, I've created a Three.js basic boilerplate (here) that you can use. Instead of creating a whole new project and installing everything from scratch, you can simply follow the instructions provided with the boilerplate and you'll be good to go.
Every object in a Three.js scene has its own vertex and fragment shader. In fact, even the scene itself has a vertex and fragment shader. To apply an effect using shaders, we will replace the existing shaders with the custom ones we write.
Shaders are passed to meshes as custom materials. So to apply a specific effect to a mesh, you need to create a new material with a vertex and fragment shader, then combine this material with the geometry to create the mesh.
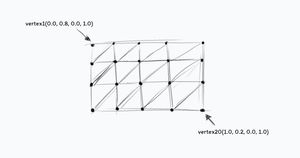
In the upcoming examples, I'll apply some effects to a simple plane. I'll start by creating the plane geometry. Then, to create the custom material, I'll instantiate a new instance of the ShaderMaterial class.
The ShaderMaterial constructor takes an object as an argument, where we specify the code for our vertex and fragment shaders, along with other configurations such as wireframe mode.
Here's how my code looks so far. Feel free to copy and paste it into your editor.
import * as THREE from 'three';
import {OrbitControls} from
'three/examples/jsm/controls/OrbitControls.js';

const renderer = new THREE.WebGLRenderer({antialias: true});
renderer.setSize(window.innerWidth, window.innerHeight);
document.body.appendChild(renderer.domElement);

const scene = new THREE.Scene();
const camera = new THREE.PerspectiveCamera(
    45,
    window.innerWidth / window.innerHeight,
    0.1,
    1000
);

// Sets orbit control to move the camera around
const orbit = new OrbitControls(camera, renderer.domElement);

// Camera positioning
camera.position.set(6, 8, 14);
orbit.update();

const planeGeometry = new THREE.PlaneGeometry(10, 10, 30, 30);
const planeCustomMaterial = new THREE.ShaderMaterial({
    vertexShader: `// Vertex shader code here`,
    fragmentShader: `// Fragment shader code here`,
    wireframe: true
});
const planeMesh = new THREE.Mesh(
    planeGeometry,
    planeCustomMaterial
);
scene.add(planeMesh);

function animate() {
    renderer.render(scene, camera);
}

renderer.setAnimationLoop(animate);

window.addEventListener('resize', function() {
    camera.aspect = window.innerWidth / window.innerHeight;
    camera.updateProjectionMatrix();
    renderer.setSize(window.innerWidth, window.innerHeight);
});
A good practice is to separate your GLSL logic from your JavaScript code for clarity and organization. You can create separate files for the vertex and fragment shaders, or you can place them in the HTML as script tags. For this and many of my upcoming tutorials, I'll use the script tag option.
So this is the index.html file:
<!DOCTYPE html>
<html lang="en">
<head>
    <meta charset="UTF-8">
    <meta http-equiv="X-UA-Compatible" content="IE=edge">
    <meta name="viewport" content="width=device-width, initial-scale=1.0">
    <title>Wael Yasmina Three.js boilerplate</title>
    <style>
        body {
            margin: 0
        }
    </style>
</head>
<body>
    <script id="vertexshader" type="vertex">
        void main() {
            gl_Position = projectionMatrix * modelViewMatrix * vec4(position, 1.0);
        }
    </script>

    <script id="fragmentshader" type="fragment">
        void main() {
            gl_FragColor = vec4(1.0);
        }
    </script>
    <script src="/main.js" type="module"></script>
</body>
</html>
Now we'll pass the values of these script tags to the vertex and fragment shaders properties using their ids.
const planeCustomMaterial = new THREE.ShaderMaterial({
vertexShader: document.getElementById('vertexshader').textContent,
fragmentShader: document.getElementById('fragmentshader').textContent,
wireframe: true
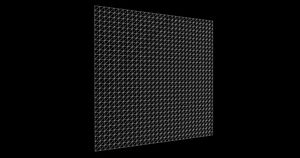
});If you've followed the instructions correctly, this is what you should be seeing now:
Example 1
In the first example, we're going to use the vertex shader to reposition the vertices that form our plane.
To do this, we simply need to update the value of the position variable, which is of type vec since it contains the x, y, and z positions of a vertex. I'll apply the sin() math function here.
<script id="vertexshader" type="vertex">
    void main() {
        // sin() is applied to the x, y, z components of the position vector
        gl_Position = projectionMatrix * modelViewMatrix * vec4(sin(position), 1.0);
    }
</script>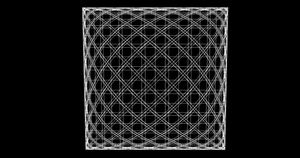
Furthermore, let's apply another math function. This time, I'll use tan(), which stands for tangent.
<script id="vertexshader" type="vertex">
    void main() {
        gl_Position = projectionMatrix * modelViewMatrix * vec4(tan(position), 1.0);
    }
</script>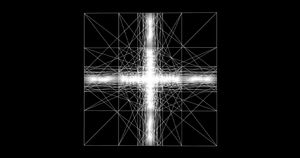
We can also animate the shape by changing the coordinates of the vertices over time. However, unlike JavaScript, GLSL does not have a Date class to get the current time.
So, what we're going to do is pass the time from JavaScript to the vertex shader using a uniform variable, which is one of the four storage qualifiers I explained earlier, if you remember.
So, in the JavaScript code, let's create an object where we will set every uniform variable that we'll use in the vertex and fragment shaders.
Each property of this object represents a uniform variable. Therefore, each property must include a value property that contains the value we want to pass to the shader.
Next, we need to pass the uniforms object to the uniforms property in the shaderMaterial configuration object. Here, we can use the ES6 shorthand since our object has the same name as the property key.
const uniforms = {
    u_time: {value: 0.0}
}

const planeGeometry = new THREE.PlaneGeometry(10, 10, 30, 30);
const planeCustomMaterial = new THREE.ShaderMaterial({
    vertexShader: document.getElementById('vertexshader').textContent,
    fragmentShader: document.getElementById('fragmentshader').textContent,
    wireframe: true,
    uniforms
});
Then, we need to update the value with the elapsed time from the moment the page was loaded in the browser. To do that, we'll create a clock and then update u_time with the value returned by getElapsedTime() from the Clock instance. And that's it for the JavaScript part.
const uniforms = {
    u_time: {value: 0.0}
}

const planeGeometry = new THREE.PlaneGeometry(10, 10, 30, 30);
const planeCustomMaterial = new THREE.ShaderMaterial({
    vertexShader: document.getElementById('vertexshader').textContent,
    fragmentShader: document.getElementById('fragmentshader').textContent,
    wireframe: true,
    uniforms
});
const planeMesh = new THREE.Mesh(
    planeGeometry,
    planeCustomMaterial
);
scene.add(planeMesh);

const clock = new THREE.Clock();
function animate() {
    uniforms.u_time.value = clock.getElapsedTime();
    renderer.render(scene, camera);
}
Now, in the vertex shader, we need to create the uniform variable whose name must be the same as the property name in the uniforms object.
<script id="vertexshader" type="vertex">
    uniform float u_time;
    void main() {
        gl_Position = projectionMatrix * modelViewMatrix * vec4(sin(position), 1.0);
    }
</script>
With that done, we can use the u_time variable to change the x position of the vertices, for example.
<script id="vertexshader" type="vertex">
    uniform float u_time;
    void main() {
        float newX = sin(position.x * u_time) * sin(position.y * u_time);
        vec3 newPosition = vec3(newX, position.y, position.z);
        gl_Position = projectionMatrix * modelViewMatrix * vec4(newPosition, 1.0);
    }
</script>
In the snippet above, I created a variable whose value is calculated using the time, the x position, and the y position of each plane vertex. Then, I created another vec3 variable that represents the new coordinates of a vertex. Essentially, we're changing the x position while preserving the y and z positions. Finally, I replaced the initial position with the new position.
And there we go! You can see how applying a short, random math equation to the x position of a plane's vertices made such a big change to its shape.
Example 2
Let's bring the plane back to its original form and turn off the wireframe mode.
<script id="vertexshader" type="vertex">
    uniform float u_time;
    void main() {
        float newX = sin(position.x * u_time) * sin(position.y * u_time);
        vec3 newPosition = vec3(newX, position.y, position.z);
        //gl_Position = projectionMatrix * modelViewMatrix * vec4(newPosition, 1.0);
        gl_Position = projectionMatrix * modelViewMatrix * vec4(position, 1.0);
    }
</script>
const planeCustomMaterial = new THREE.ShaderMaterial({
vertexShader: document.getElementById('vertexshader').textContent,
fragmentShader: document.getElementById('fragmentshader').textContent,
wireframe: false,
uniforms
});
With that done, let's change the color of the plane using the fragment shader.
So, as I said earlier, the gl_FragColor value is a vec4 whose components represent the RGBA values of one fragment's color. Therefore, altering these values will result in a color change.
<script id="fragmentshader" type="fragment">
    void main() {
        // Changes the color of the plane from white to blue
        gl_FragColor = vec4(0.2, 0.5, 1.0, 1.0);
    }
</script>
We can also create a color animation, and again, talking about animation means time. So, similar to what we did in the vertex shader, we're going to create a uniform variable to get the time and use it to animate the color.
<script id="fragmentshader" type="fragment">
    uniform float u_time;
    void main() {
        gl_FragColor = vec4(0.2, sin(u_time), 1.0, 1.0);
    }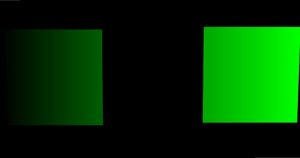
</script>Furthermore, we can change the color of an object depending on its position in the scene. For example, we can make the plane appear greener the closer it is to the right edge of the screen, and darker the closer it is to the left edge.
The problem is that in GLSL, we don't have a way to get the resolution of the screen in order to achieve the gradient color. Therefore, the solution is to provide that information through a uniform variable from JavaScript. So, let's do that.
We'll call this variable u_resolution and the value is going to be a THREE.Vector2, holding the width and the height of the window.
const uniforms = {
    u_time: {value: 0.0},
    u_resolution: {value: new THREE.Vector2(window.innerWidth, window.innerHeight)
                            .multiplyScalar(window.devicePixelRatio)
    }
}
Something to mention here is that I've seen some examples on the internet where developers add this optional portion of code .multiplyScalar(window.devicePixelRatio). Looking at the MDN documentation, it seems that it is useful to achieve better results on HiDPI screens.
Next, we're going to create the uniform variable and use the x component to create the green gradient.
<script id="fragmentshader" type="fragment">
    uniform float u_time;
    uniform vec2 u_resolution;
    void main() {
        gl_FragColor = vec4(0.0, u_resolution.x, 0.0, 1.0);
    }
</script>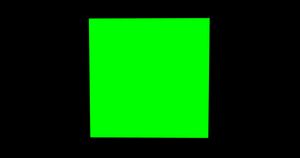
Nothing has changed, and that's because we're passing values that exceed 1. For example, at the middle of the screen, u_resolution.x is equal to 960, which is equivalent to 1. In other words, the green component of gl_FragColor will be set to 1 no matter where the plane is, since we're passing values that are bigger than 1.
The solution to this is to convert the values from the document coordinate system to the fragment shader coordinate system, which ranges from 0 to 1. To achieve this, we simply need to divide the current position gl_FragCoord by the resolution.
<script id="fragmentshader" type="fragment">
    uniform float u_time;
    uniform vec2 u_resolution;
    void main() {
        // gl_FragCoord is built-in variable that holds the position
        // of the current fragment.
        vec2 st = gl_FragCoord.xy / u_resolution;
        gl_FragColor = vec4(0.0, st.x, 0.0, 1.0);
    }
</script>
As you can see now, the closer the plane is to the right side, the greener it gets, and the closer it is to the left, the darker it becomes.
We can also add a vertical gradient using the blue channel.
<script id="fragmentshader" type="fragment">
    uniform float u_time;
    uniform vec2 u_resolution;
    void main() {
        vec2 st = gl_FragCoord.xy / u_resolution;
        gl_FragColor = vec4(0.0, st.x, st.y, 1.0);
    }
</script>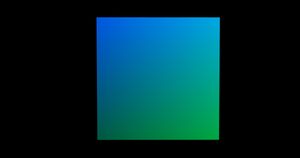
Having done that, we can also create another color animation, this time using the mouse position instead of time.
Once again, GLSL doesn't have a built-in function to track the mouse position. Therefore, we'll pass this information as a vector from the JavaScript side to the fragment shader using a uniform variable.
By the way, I'll convert the mouse position coordinates in JavaScript this time to ensure they fit within the fragment shader's coordinate system.
const uniforms = {
    u_time: {value: 0.0},
    u_resolution: {value: new THREE.Vector2(window.innerWidth, window.innerHeight)
                            .multiplyScalar(window.devicePixelRatio)
    },
    u_mouse: {value: new THREE.Vector2(0.0, 0.0)}
}

window.addEventListener('mousemove', function(e) {
    uniforms.u_mouse.value.set(e.offsetX / this.window.innerWidth,
                            1 - e.offsetY / this.window.innerHeight)
});<script id="fragmentshader" type="fragment">
uniform float u_time;
uniform vec2 u_resolution;
uniform vec2 u_mouse;
void main() {
vec2 st = gl_FragCoord.xy / u_resolution;
gl_FragColor = vec4(0.0, u_mouse.x, u_mouse.y, 1.0);
}
</script>And now, we'll use the data from the u_mouse uniform to set the green and blue channels.
Example 3
Similar to colorization, handling images and texture mapping is done using the fragment shader, as images are essentially collections of colors.
Once again, we'll need to use a uniform variable to pass image data to the fragment shader.
const uniforms = {
    u_time: {value: 0.0},
    u_resolution: {value: new THREE.Vector2(window.innerWidth, window.innerHeight)
                            .multiplyScalar(window.devicePixelRatio)
    },
    u_mouse: {value: new THREE.Vector2(0.0, 0.0)},
    u_texture: {value: new THREE.TextureLoader().load('./assets/kitty.jpg')}
}<script id="fragmentshader" type="fragment">
uniform float u_time;
uniform vec2 u_resolution;
uniform vec2 u_mouse;
uniform sampler2D u_texture;
void main() {
vec2 st = gl_FragCoord.xy / u_resolution;
gl_FragColor = vec4(0.0, u_mouse.x, u_mouse.y, 1.0);
}
</script>We have the image set as a sampler2D variable. To use it for coloring the plane, we need to convert it into a texture first using the texture2D() function.
The first argument must be the sampler2D variable, and the second one represents the space where the image should appear. I'll use the st variable here, which means the entire scene.
Now we need to apply the texture colors to the plane by taking the texture's RGB channels and assigning them to the corresponding components of the gl_FragColor vector.
<script id="fragmentshader" type="fragment">
    uniform float u_time;
    uniform vec2 u_resolution;
    uniform vec2 u_mouse;
    uniform sampler2D u_texture;
    void main() {
        vec2 st = gl_FragCoord.xy / u_resolution;
        vec4 texture = texture2D(u_texture, st);
        gl_FragColor = vec4(texture.r, texture.g, texture.b, 1.0);
    }
</script>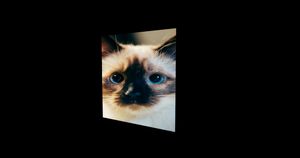
In case you want to map the entire texture to the plane, you need to use a varying variable to hold the positions of the vertices that form the plane. This assignment has to be done in the vertex shader, of course.
<script id="vertexshader" type="vertex">
    uniform float u_time;
    varying vec2 vUv;
    void main() {
        // uv is a predefined variable
        vUv = uv;
        float newX = sin(position.x * u_time) * sin(position.y * u_time);
        vec3 newPosition = vec3(newX, position.y, position.z);
        //gl_Position = projectionMatrix * modelViewMatrix * vec4(newPosition, 1.0);
        gl_Position = projectionMatrix * modelViewMatrix * vec4(position, 1.0);
    }
</script>
Next, as we've seen earlier, we need to create another varying variable in the fragment shader, ensuring it has the same name as the one in the vertex shader. Then, we pass this variable as the second argument to the texture2D function instead of st.
<script id="fragmentshader" type="fragment">
    uniform float u_time;
    uniform vec2 u_resolution;
    uniform vec2 u_mouse;
    uniform sampler2D u_texture;
    varying vec2 vUv;
    void main() {
        vec2 st = gl_FragCoord.xy / u_resolution;
        vec4 texture = texture2D(u_texture, vUv);
        gl_FragColor = vec4(texture.r, texture.g, texture.b, 1.0);
    }
</script>
And again, we can create some effects using time, for example.
<script id="fragmentshader" type="fragment">
    uniform float u_time;
    uniform vec2 u_resolution;
    uniform vec2 u_mouse;
    uniform sampler2D u_texture;
    varying vec2 vUv;
    void main() {
        vec2 st = gl_FragCoord.xy / u_resolution;
        vec4 texture = texture2D(u_texture, vUv);
        // abs returns the absolute value
        float effect = abs(sin(texture.r + u_time));
        gl_FragColor = vec4(vec3(effect), 1.0);
    }
</script>Final Thoughts
In conclusion, GLSL opens up a world of creative possibilities for rendering stunning visual effects in web applications.
Through this article, we've explored the fundamentals of GLSL syntax, delved into the intricacies of shaders, and demonstrated how to apply a few effects using vertex and fragment shaders.
While some aspects may initially appear complex, with practice, you'll develop the skills to transform your ideas into captivating visual experiences. Remember, the key lies in understanding the mathematical underpinnings and experimenting with different techniques.
So, roll up your sleeves, dive into the world of GLSL, and let your creativity shine!