How to Create a Dynamic Camera Movement Effect in Three.js
Published on 08 Sep, 2024 | ~4 min read | Demo
Adding a simple, smooth camera movement effect can greatly enhance the user experience of your app, even if it's only for displaying a model.
With that in mind, this article will walk you through creating a dynamic camera effect, seamlessly controlled by mouse movement.
Here's How
First, you need to have a Three.js project set up. If you don’t have one, you can use my Three.js boilerplate to get started.
Next, add some elements to the scene to visualize the effect. Personally, I'll include the model used in the demo.
Now, ensure that no camera controls are added. If you're using my boilerplate, be sure to remove the OrbitControls.
Here’s what my code looks like at the moment:
import * as THREE from 'three';
import { GLTFLoader } from 'three/examples/jsm/loaders/GLTFLoader';
const renderer = new THREE.WebGLRenderer({ antialias: true });
renderer.setSize(window.innerWidth, window.innerHeight);
document.body.appendChild(renderer.domElement);

renderer.setClearColor(0xffffff);

const scene = new THREE.Scene();
const camera = new THREE.PerspectiveCamera(
  45,
  window.innerWidth / window.innerHeight,
  0.1,
  1000
);

camera.position.set(0, 0, 10);

const light = new THREE.AmbientLight(0xffffff, 1);
scene.add(light);

const loader = new GLTFLoader();

let mixer;
loader.load('/model.glb', function (glb) {
  const model = glb.scene;
  model.scale.set(0.03, 0.03, 0.03);
  model.position.y = -2;
  scene.add(model);
  const animations = glb.animations;
  mixer = new THREE.AnimationMixer(model);
  const clip = animations[1];
  const action = mixer.clipAction(clip);
  action.play();
});

const clock = new THREE.Clock();
function animate() {
  // This needed for the model animation.
  // If you're not using an animated model
  // get rid of this line.
  if (mixer) mixer.update(clock.getDelta());

  renderer.render(scene, camera);
}

renderer.setAnimationLoop(animate);

window.addEventListener('resize', function () {
  camera.aspect = window.innerWidth / window.innerHeight;
  camera.updateProjectionMatrix();
  renderer.setSize(window.innerWidth, window.innerHeight);
});
With the preparation complete, I'll now start implementing the effect by creating a couple of variables for horizontal and vertical camera movement.
let mouseX = 0;
let mouseY = 0;

document.addEventListener('mousemove', function (e) {
  mouseX = (e.clientX - window.innerWidth) / 100;
  mouseY = (e.clientY - window.innerHeight) / 100;
});
mouseX and mouseY determine how far the camera should move in response to horizontal and vertical cursor movements, respectively.
Next, in the animate() function, we'll use these values to reposition the camera.
function animate() {
  if (mixer) mixer.update(clock.getDelta());

  camera.position.x += (mouseX - camera.position.x);
  camera.position.y += (-mouseY - camera.position.y);

  renderer.render(scene, camera);
}
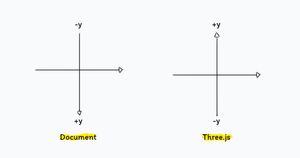
Note that I reversed the sign of mouseY because the positive direction of the Y-axis in the document's coordinate system is opposite to that in Three.js.

So, if you save and check the result, you'll see that the camera movement is working. However, the camera is mispositioned and only properly centered when the cursor is at the right edge of the document.
What we want is for the camera to follow the cursor's position. If the mouse is at the center of the document, the camera should be centered in the scene. Conversely, if the mouse is at the left edge of the document, the camera should be positioned at the left side of the scene.
To fix this, I'll subtract half of the document’s width and height from the cursor’s horizontal and vertical positions, respectively.
document.addEventListener('mousemove', function (e) {
  const windowHalfX = window.innerWidth / 2;
  const windowHalfY = window.innerHeight / 2;
  mouseX = (e.clientX - windowHalfX) / 100;
  mouseY = (e.clientY - windowHalfY) / 100;
});
Things should be looking better now, but we still need to address a couple of issues.
First, we need to make the camera rotate toward the center of the scene when it moves left or right.
To achieve this, I'll use the camera.lookAt(scene.position) method, with scene.position representing the origin of the scene (the point (0,0,0)).
camera.position.x += (mouseX - camera.position.x);
camera.position.y += (-mouseY - camera.position.y);
camera.lookAt(scene.position);
The second and final adjustment is to add inertia. I’ll accomplish this by multiplying the camera position values by an arbitrary factor, such as 0.05.
camera.position.x += (mouseX - camera.position.x) * 0.05;
camera.position.y += (-mouseY - camera.position.y) * 0.05;Conclusion
And that's it! I hope you enjoyed this short tutorial.
Until next time, see you!
