How to Create a Minimap for Interactive Three.js Apps and Games
Published on 15 Dec, 2024 | ~14 min read | Demo
As the title suggests, this step-by-step guide walks you through creating a minimap for your large landscape apps and strategy games, using a variety of handy features and techniques.
Creating the Minimap
First, you'll need a Three.js project set up. Get one ready, and if you want to save time, feel free to use my Three.js boilerplate.
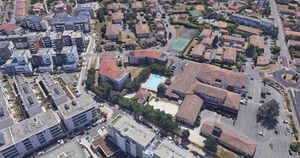
Next, we'll load the map, which is simply a 3D model.
I highly recommend using the same model I'm using so we can stay on the same page. You can find the link to this and the other models we'll be using later in the resources section below.
Additionally, we’ll add a couple of light sources.
That said, here’s what the codebase looks like right now.
import * as THREE from 'three';
import { OrbitControls } from 'three/examples/jsm/controls/OrbitControls.js';
import { GLTFLoader } from 'three/examples/jsm/loaders/GLTFLoader';

const renderer = new THREE.WebGLRenderer({ antialias: true });
renderer.setSize(window.innerWidth, window.innerHeight);
document.body.appendChild(renderer.domElement);

// Sets the color of the background.
renderer.setClearColor(0xfefefe);

const scene = new THREE.Scene();
const camera = new THREE.PerspectiveCamera(
  45,
  window.innerWidth / window.innerHeight,
  0.1,
  1000
);

// Sets orbit control to move the camera around.
const orbit = new OrbitControls(camera, renderer.domElement);

// Camera positioning.
camera.position.set(6, 8, 14);
// Has to be done everytime we update the camera position.
orbit.update();

const aLight = new THREE.AmbientLight(0xffffff, 1);
scene.add(aLight);

const dLight = new THREE.DirectionalLight(0xffffff, 1);
dLight.position.y = 10;
scene.add(dLight);

const loader = new GLTFLoader();
loader.load('/sporting_village.glb', function (glb) {
  const model = glb.scene;
  scene.add(model);
});

function animate() {
  renderer.render(scene, camera);
}

renderer.setAnimationLoop(animate);

window.addEventListener('resize', function () {
  camera.aspect = window.innerWidth / window.innerHeight;
  camera.updateProjectionMatrix();
  renderer.setSize(window.innerWidth, window.innerHeight);
});
Next, we'll use different camera controls, as OrbitControls isn’t ideal for this type of app.
In this case, we'll be using MapControls.
// import { OrbitControls } from 'three/examples/jsm/controls/OrbitControls.js';
import { MapControls } from 'three/examples/jsm/controls/MapControls.js';
// const orbit = new OrbitControls(camera, renderer.domElement);
const controls = new MapControls(camera, renderer.domElement);
controls.enableDamping = true;
controls.dampingFactor = 0.05;
controls.enableZoom = false;
// camera.position.set(6, 8, 14);
// orbit.update();
camera.position.set(0, 8, -5);
camera.lookAt(0, 0, 0);function animate() {
controls.update();
renderer.render(scene, camera);
}
Displaying the Minimap
Now, let’s get to the real deal—creating the placeholder or container for the minimap on the page.
So, we’ll create a 300x300 pixel <div> and position it in the bottom-right corner using simple CSS.
index.html:
<!DOCTYPE html>
<html lang="en">
  <head>
    <meta charset="UTF-8" />
    <meta http-equiv="X-UA-Compatible" content="IE=edge" />
    <meta name="viewport" content="width=device-width, initial-scale=1.0" />
    <title>Minimap - Wael Yasmina</title>
    <style>
      body {
        margin: 0;
      }

      #mini_map {
        position: absolute;
        right: 2rem;
        bottom: 2rem;
        width: 300px;
        height: 300px;
        box-shadow: 1px 1px 5px 3px rgba(0, 0, 0, 0.5);
      }
    </style>
  </head>
  <body>
    <div id="mini_map"></div>
    <script src="/main.js" type="module"></script>
  </body>
</html>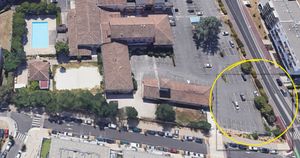
Next, we’ll create a second renderer and attach it to the container we just created.
const miniMap = document.getElementById('mini_map');
const miniMapRenderer = new THREE.WebGLRenderer();
miniMapRenderer.setSize(miniMap.offsetWidth, miniMap.offsetHeight);
miniMap.appendChild(miniMapRenderer.domElement);
Then, we’ll create a second camera to capture the scene from above.
const miniMapCamera = new THREE.PerspectiveCamera(
  45,
  miniMap.offsetWidth / miniMap.offsetHeight,
  0.1,
  100
);

miniMapCamera.position.set(0, 50, 0);
miniMapCamera.lookAt(0, 0, 0);
And of course, a second renderer means a second animate() function.
function animate2() {
  miniMapRenderer.render(scene, miniMapCamera);
}

miniMapRenderer.setAnimationLoop(animate2);

window.addEventListener('resize', function () {
  camera.aspect = window.innerWidth / window.innerHeight;
  camera.updateProjectionMatrix();
  renderer.setSize(window.innerWidth, window.innerHeight);

  miniMapCamera.aspect = miniMap.offsetWidth / miniMap.offsetHeight;
  miniMapCamera.updateProjectionMatrix();
  miniMapRenderer.setSize(miniMap.offsetWidth, miniMap.offsetHeight);
});
And there we go—we’ve got our map displayed! However, there’s an issue we need to fix before moving on: the map is upside down.
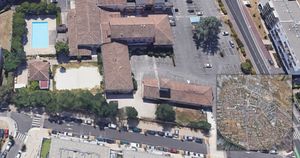
To fix this, we’ll simply rotate the minimap’s camera.
miniMapCamera.rotation.z = Math.PI;Making the Minimap Interactive
Right now, we have a minimap that displays the entire city. But honestly, it’s still not very useful—or at least we could achieve the same result with less complexity.
That is, unless we add some functionality—like making the main camera move to the position where the user clicks on the minimap, similar to what you’d see in strategy games, if you’ve ever played one.
So, first things first, we need to set up the raycaster for that.
const raycaster = new THREE.Raycaster();
const mousePosition = new THREE.Vector2();
miniMap.addEventListener('click', function (e) {
  const rect = miniMapRenderer.domElement.getBoundingClientRect();
  const x = e.clientX - rect.left;
  const y = e.clientY - rect.top;
  mousePosition.x = (x / miniMap.clientWidth) * 2 - 1;
  mousePosition.y = -(y / miniMap.clientHeight) * 2 + 1;

  raycaster.setFromCamera(mousePosition, miniMapCamera);
  const intersects = raycaster.intersectObject(scene);
});
Next, we'll set the mouse click position as the coordinates for the main camera.
const raycaster = new THREE.Raycaster();
const mousePosition = new THREE.Vector2();
miniMap.addEventListener('click', function (e) {
  const rect = miniMapRenderer.domElement.getBoundingClientRect();
  const x = e.clientX - rect.left;
  const y = e.clientY - rect.top;
  mousePosition.x = (x / miniMap.clientWidth) * 2 - 1;
  mousePosition.y = -(y / miniMap.clientHeight) * 2 + 1;

  raycaster.setFromCamera(mousePosition, miniMapCamera);

  const intersects = raycaster.intersectObject(scene);
  if (intersects.length > 0) {
    camera.position.set(intersects[0].point.x, 8, intersects[0].point.z);
  }
});
Even though our attempt seems successful, that’s not the case.
Keep clicking on the minimap, and you'll notice the camera’s direction getting stranger with each click.
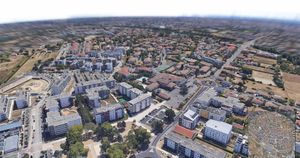
The reason for this is that while we’re repositioning the camera, its target remains fixed at the center of the scene.
An easy fix for this is to direct the camera toward its new position.
if (intersects.length > 0) {
  camera.position.set(intersects[0].point.x, 8, intersects[0].point.z);
  controls.target.set(intersects[0].point.x, 0, intersects[0].point.z);
}
The solution should work fine, but there’s still one more thing we need to fix.
When you click on the minimap, the main camera’s direction gets reversed.
To fix this, we just need to add 1 to the z-coordinate of the target.
controls.target.set(intersects[0].point.x, 0, intersects[0].point.z + 1);Optimizing the App
What we have now are two renderers and cameras displaying the same scene from two different angles.
This means we're rendering twice the number of vertices in the scene.
This can lead to serious performance issues. I mean, the city model alone has 435,000 vertices—imagine adding more complex objects to the scene.
That said, to optimize this, we'll do the following.
First we'll have the minimap camera display a top-down view of the city mapped onto a plane.
To get a top-down view of the city, right-click on the minimap and save the image to the public folder.
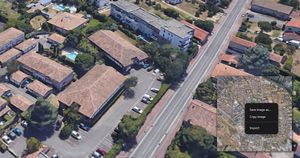
Next, we'll create a plane and map the texture onto it.
const map = new THREE.TextureLoader().load('/map.png');
map.colorSpace = THREE.SRGBColorSpace;
const planeMat = new THREE.MeshBasicMaterial({ map });
const planeGeo = new THREE.PlaneGeometry(40, 40);
const planeMesh = new THREE.Mesh(planeGeo, planeMat);
planeMesh.rotation.x = -Math.PI / 2;
scene.add(planeMesh);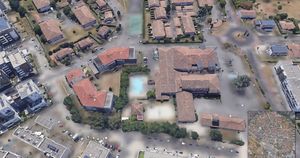
That done, now we'll make the plane visible only to the minimap's camera along with the other components that we'll add to the minimap in the upcoming sections.
To do this, we'll use layers. If you're not familiar with layers, make sure to check out this article.
These four lines will remove the minimap camera and the plane from layer 0 and assign them to layer 1.
miniMapCamera.layers.disableAll();
miniMapCamera.layers.enable(1);
planeMesh.layers.disable(0);
planeMesh.layers.enable(1);
Placing Objects and Linking Them to Minimap Icons
Placing Objects in the Scene
The first thing we’ll do is place the towers, so we’ll start by loading the tower model.
let tower;
loader.load('/telecommunication_tower_low-poly_free.glb', function (glb) {
  const model = glb.scene;
  model.scale.set(0.1, 0.1, 0.1);
  tower = model;
});
As you can see, we have a global variable holding a reference to the loaded model, which we’ll use to create tower clones.
Speaking of clones, we need to import the SkeletonUtils module. This will help us create copies of the tower model.
import * as SkeletonUtils from 'three/examples/jsm/utils/SkeletonUtils';Now, here’s the plan: we want a tower to be added to the scene whenever we press the T key on the keyboard. The tower’s position will be set based on the cursor's location.
That means we need to constantly track the mouse position by updating the mousePosition vector every time a mouse move event is detected.
window.addEventListener('mousemove', function (e) {
  mousePosition.x = (e.clientX / this.window.innerWidth) * 2 - 1;
  mousePosition.y = -(e.clientY / this.window.innerHeight) * 2 + 1;
});
Now we’ll use the raycaster to create a group containing 4 objects, with the first one being a copy of the tower model.
window.addEventListener('keydown', function (e) {
  if (e.key === 't' && tower) {
    raycaster.setFromCamera(mousePosition, camera);
    const intersects = raycaster.intersectObject(scene);

    if (intersects.length > 0) {
      const group = new THREE.Group();
      scene.add(group);

      const t = SkeletonUtils.clone(tower);
      group.add(t);

      group.position.set(intersects[0].point.x, 0, intersects[0].point.z);
    }
  }
});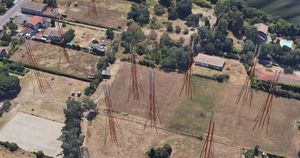
Now that’s done, we’re going to add the animated green area around the towers.
To do that, we’ll simply create a plane with a custom shader material, which I explained in the 8th example of this article.
const uniforms = {
  u_transition: {
    value: new THREE.TextureLoader().load('/radar texture.png'),
  },
  u_time: { value: 0.0 },
};

const rangeMaterial = new THREE.ShaderMaterial({
  uniforms,
  vertexShader: document.getElementById('vertexshader').textContent,
  fragmentShader: document.getElementById('fragmentshader').textContent,
});

rangeMaterial.transparent = true;
const clock = new THREE.Clock();
function animate() {
controls.update();
uniforms.u_time.value = clock.getElapsedTime();
renderer.render(scene, camera);
}<div id="mini_map"></div>
<script id="vertexshader" type="vertex">
varying vec2 vUv;
void main() {
vUv = uv;
gl_Position = projectionMatrix * modelViewMatrix * vec4(position, 1.0);
}
</script>
<script id="fragmentshader" type="fragment">
mat2 rotate(float angle) {
return mat2(cos(angle), -sin(angle),
sin(angle), cos(angle)
);
}
uniform float u_time;
uniform sampler2D u_transition;
varying vec2 vUv;
void main() {
vec2 vUv = vUv;
vUv -= vec2(0.5);
vUv *= rotate(u_time);
vUv += vec2(0.5);
vec4 transitionTexel = texture2D(u_transition, vUv);
gl_FragColor = vec4(vec3(0.0, 1.0, 0.0), transitionTexel.r);
}
</script>Now, we’ll create a mesh using the custom shader and add it to the group.
const rangeGeometry = new THREE.CircleGeometry(5, 60);

window.addEventListener('keydown', function (e) {
  if (e.key === 't' && tower) {
    raycaster.setFromCamera(mousePosition, camera);
    const intersects = raycaster.intersectObject(scene);

    if (intersects.length > 0) {
      const group = new THREE.Group();
      scene.add(group);

      const t = SkeletonUtils.clone(tower);
      group.add(t);

      const rangeMesh = new THREE.Mesh(rangeGeometry, rangeMaterial);
      rangeMesh.rotation.x = -Math.PI / 2;
      rangeMesh.position.y = 0.05;
      group.add(rangeMesh);

      group.position.set(intersects[0].point.x, 0, intersects[0].point.z);
    }
  }
});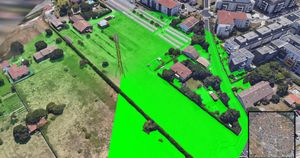
Placing many ranges close to each other will result in a planefighting.
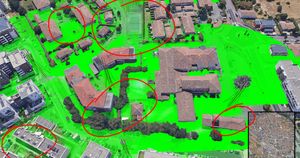
One way to fix that is by setting a random value, still close to zero, to the y-position of the group.
group.position.set(
  intersects[0].point.x,
  // 0,
  Math.random() * 0.001,
  intersects[0].point.z
);
Now that we’re done with the animated ranges, let’s add the distance controller using the CSS2DRenderer.
Speaking of CSS2DRenderer, I’ve made a detailed tutorial on it—check it out if you’re not familiar with how it works.
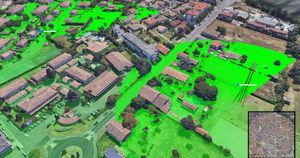
Basically, we’ll create a range element and add it to the group, then use it to scale the range mesh.
That said, let’s start by adding the basic setup for the CSS2DRenderer.
import {
  CSS2DRenderer,
  CSS2DObject,
} from 'three/examples/jsm/renderers/CSS2DRenderer';
const labelRenderer = new CSS2DRenderer();
labelRenderer.setSize(window.innerWidth, window.innerHeight);
labelRenderer.domElement.style.position = 'absolute';
labelRenderer.domElement.style.top = '0px';
labelRenderer.domElement.style.pointerEvents = 'none';
document.body.appendChild(labelRenderer.domElement);function animate() {
controls.update();
uniforms.u_time.value = clock.getElapsedTime();
labelRenderer.render(scene, camera);
renderer.render(scene, camera);
}window.addEventListener('resize', function () {
camera.aspect = window.innerWidth / window.innerHeight;
camera.updateProjectionMatrix();
renderer.setSize(window.innerWidth, window.innerHeight);
miniMapCamera.aspect = miniMap.offsetWidth / miniMap.offsetHeight;
miniMapCamera.updateProjectionMatrix();
miniMapRenderer.setSize(miniMap.offsetWidth, miniMap.offsetHeight);
labelRenderer.setSize(this.window.innerWidth, this.window.innerHeight);
});Next, we’ll use the CSS2DObject to create the range element and, of course, add an event listener to link the element to the mesh’s scale property.
window.addEventListener('keydown', function (e) {
  if (e.key === 't' && tower) {
  //...
  const slider = this.document.createElement('input');
  slider.type = 'range';
  slider.min = 1;
  slider.max = 3;
  slider.value = 0.5;
  slider.step = 0.1;
  const sliderLabel = new CSS2DObject(slider);
  sliderLabel.position.set(0, 1, 0);
  slider.style.pointerEvents = 'auto';
  group.add(sliderLabel);

  slider.addEventListener('input', function () {
    rangeMesh.scale.set(slider.value, slider.value, slider.value);
  });
  //...
});
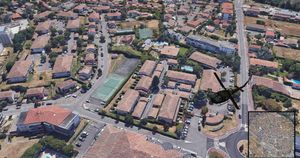
Now, let’s add an animated object—specifically the helicopter, like in the demo.
First, we’ll load the model and play the animation. For a detailed explanation of loading and animating models, check out this article.
let mixer;
loader.load('/bell_huey_helicopter.glb', function (glb) {
  const model = glb.scene;
  model.scale.set(0.2, 0.2, 0.2);
  model.position.y = 1;
  scene.add(model);

  mixer = new THREE.AnimationMixer(model);
  const clips = glb.animations;
  const clip = THREE.AnimationClip.findByName(clips, 'Rotation');
  const action = mixer.clipAction(clip);
  action.play();
});
function animate() {
controls.update();
uniforms.u_time.value = clock.getElapsedTime();
labelRenderer.render(scene, camera);
if (mixer) {
mixer.update(clock.getDelta() * 100);
}
renderer.render(scene, camera);
}Note: you’ll notice that the helicopter's blade animation is a bit off, but don’t worry—the issue comes from the model itself, not the code.
Now, to move the helicopter along a path, we’ll use the technique explained in this tutorial.
let helicopter;
let mixer;
loader.load('/bell_huey_helicopter.glb', function (glb) {
  const model = glb.scene;
  model.scale.set(0.2, 0.2, 0.2);
  model.position.y = 1;
  scene.add(model);

  mixer = new THREE.AnimationMixer(model);
  const clips = glb.animations;
  const clip = THREE.AnimationClip.findByName(clips, 'Rotation');
  const action = mixer.clipAction(clip);
  action.play();

  helicopter = model;
});

const points = [
  new THREE.Vector3(-10, 1, 10),
  new THREE.Vector3(-5, 1, 5),
  new THREE.Vector3(0, 1, 0),
  new THREE.Vector3(5, 1, 5),
  new THREE.Vector3(10, 1, 10),
];

const path = new THREE.CatmullRomCurve3(points, true);

const pathGeometry = new THREE.BufferGeometry().setFromPoints(
  path.getPoints(50)
);
const pathMaterial = new THREE.LineBasicMaterial({ color: 0xff0000 });
const pathObject = new THREE.Line(pathGeometry, pathMaterial);
scene.add(pathObject);
function animate(time) {
controls.update();
uniforms.u_time.value = clock.getElapsedTime();
labelRenderer.render(scene, camera);
if (mixer) {
mixer.update(clock.getDelta() * 100);
const t = ((time / 2000) % 6) / 6;
const position = path.getPointAt(t);
const tangent = path.getTangentAt(t).normalize();
helicopter.position.copy(position);
helicopter.lookAt(position.clone().add(tangent));
}
renderer.render(scene, camera);
}
Connecting Scene Objects to Minimap Symbols
Let’s start with static icons for the communication towers.
We’ll simply load the icon, map it onto a plane, and add it to the group.
const towerSymbol = new THREE.TextureLoader().load('/tower.png');
towerSymbol.colorSpace = THREE.SRGBColorSpace;
const tSymbolMat = new THREE.MeshBasicMaterial({
  map: towerSymbol,
  transparent: true,
});
const tSymbolGeo = new THREE.PlaneGeometry(3, 3);window.addEventListener('keydown', function (e) {
if (e.key === 't' && tower) {
//...
const tSymbolMesh = new THREE.Mesh(tSymbolGeo, tSymbolMat);
tSymbolMesh.rotation.set(-Math.PI / 2, 0, Math.PI);
tSymbolMesh.position.y = 0.1;
group.add(tSymbolMesh);
//...
});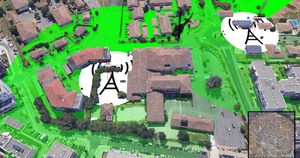
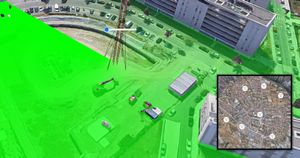
As you can see, the symbols are being added to the main scene instead of the minimap, which is expected since, by default, objects belong to layer 0.
In our case, we’re reserving layer 0 for the first camera and objects of the main scene, and layer 1 for the second camera and the components of the minimap.
That being said, we’ll simply move the symbol meshes from layer 0 to layer 1.
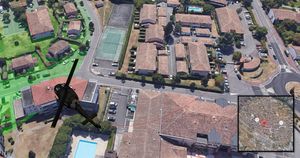
The final thing we’ll do is associate an animated icon with the helicopter.
So, for this one, I’ve chosen a pulsating red circle to give it that enemy vehicle vibe, like in games.
To achieve this, we’ll use the same technique we used to create the towers’ animated ranges. However, this time we’ll use a different custom shader, which I explained in the third example of this article.
So, we’ll create a mesh with the custom shader, place it in layer 1, and remove it from layer 0.
<script id="fragmentshader2" type="fragment">
  uniform float u_time;
  varying vec2 vUv;

  void main() {
      vec2 vUv = vUv;
      float distance = distance(vec2(0.5), vUv);
      float color = fract(distance * 10. - u_time) / distance / 40.;
      gl_FragColor = vec4(vec3(1.0, 0.0, 0.0), color);
  }
</script>
const circleMaterial = new THREE.ShaderMaterial({
uniforms,
vertexShader: document.getElementById('vertexshader').textContent,
fragmentShader: document.getElementById('fragmentshader2').textContent,
});
circleMaterial.transparent = true;
const circleGeo = new THREE.CircleGeometry(10);
const circle = new THREE.Mesh(circleGeo, circleMaterial);
circle.rotation.x = -Math.PI / 2;
scene.add(circle);
circle.position.y = 1;
circle.layers.enable(1);
circle.layers.disable(0);So far, we’ve created and displayed the icon on the map. Lastly, we’ll link its position to the helicopter’s by making it copy the model’s position vector.
if (mixer) {
  mixer.update(clock.getDelta() * 100);
  const t = ((time / 2000) % 6) / 6;
  const position = path.getPointAt(t);
  const tangent = path.getTangentAt(t).normalize();
  helicopter.position.copy(position);
  helicopter.lookAt(position.clone().add(tangent));

  circle.position.copy(helicopter.position);
}
Last Words
And that’s it for this tutorial!
I know it might feel a bit overwhelming, especially in the second part where we combined multiple techniques. But as long as you take the time to go through the tutorials dedicated to each feature and technique, you’ll be just fine.
See you!
Credits and Resources
- SPORTING VILLAGE by Stéphane Agullo
- Telecommunication Tower Low-Poly Free by Nicholas-3D
- Bell Huey helicopter by Duane's Mind
Related Content
-
Create a minimap for a Three.js scene
-
Manage Object Visibility in Three.js with Layers
-
9 Hands-On GLSL Examples for Shader Newbies
-
How to Integrate HTML Elements into a Three.js Scene
-
How to Make an Object Follow a Path in Three.js
-
All You Need to Know About Loading and Animating Models in Three.js
-
How to Clone Meshes and Models in Three.js
