How to Integrate HTML Elements into a Three.js Scene
Published on 08 Dec, 2024 | ~7 min read | Demo
Adding a form alongside your Three.js app with elements like a progress bar and radio inputs is one of the most common approaches developers use to create interactivity.
However, in some cases, integrating these elements directly into the app can greatly enhance the user experience. And this is exactly what you'll learn in this article.
CSS2DRenderer
The idea behind this feature is to create a layer or container on top of the scene, holding HTML elements linked to objects within the scene.
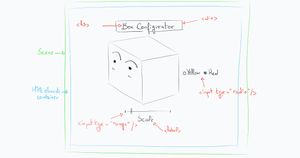
Start by setting up a Three.js project. If you want to save time, feel free to use my Three.js boilerplate. Then, add a simple mesh to your scene—or just copy the code below to follow along more easily.
import * as THREE from 'three';
import { OrbitControls } from 'three/examples/jsm/controls/OrbitControls.js';

const renderer = new THREE.WebGLRenderer({ antialias: true });
renderer.setSize(window.innerWidth, window.innerHeight);
document.body.appendChild(renderer.domElement);

// Sets the color of the background.
renderer.setClearColor(0xfefefe);

const scene = new THREE.Scene();
const camera = new THREE.PerspectiveCamera(
  45,
  window.innerWidth / window.innerHeight,
  0.1,
  1000
);

// Sets orbit control to move the camera around.
const orbit = new OrbitControls(camera, renderer.domElement);

// Camera positioning.
camera.position.set(0, 1, 8);
// Has to be done everytime we update the camera position.
orbit.update();

const dLight = new THREE.DirectionalLight(0xffffff, 1);
dLight.position.set(-3, 10, 0);
scene.add(dLight);

const light = new THREE.AmbientLight(0xffffff, 0.5);
scene.add(light);

const sphereGeometry = new THREE.SphereGeometry(1.9, 50, 50);
const sphereMaterial = new THREE.MeshPhongMaterial({ color: 'lime' });
const sphere = new THREE.Mesh(sphereGeometry, sphereMaterial);
scene.add(sphere);
sphere.position.y = -0.5;

function animate() {
  renderer.render(scene, camera);
}

renderer.setAnimationLoop(animate);

window.addEventListener('resize', function () {
  camera.aspect = window.innerWidth / window.innerHeight;
  camera.updateProjectionMatrix();
  renderer.setSize(window.innerWidth, window.innerHeight);
});
Now, we'll create what I referred to as "the container" by importing the CSS2DRenderer class, creating an instance of it, and setting its size.
import { CSS2DRenderer } from 'three/examples/jsm/renderers/CSS2DRenderer';const labelRenderer = new CSS2DRenderer();
labelRenderer.setSize(window.innerWidth, window.innerHeight);
document.body.appendChild(labelRenderer.domElement);When you do that, the first thing you'll notice is the appearance of scrollbars. If you open the inspector tool, you'll see that a new <div> has been added to the DOM.
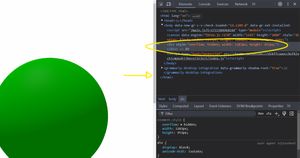
Next, we'll apply some CSS properties, specifically position and top, to position the container over the canvas rather than leaving it at the bottom.
labelRenderer.domElement.style.position = 'absolute';
labelRenderer.domElement.style.top = '0px';
After that, we'll call render() inside the animate() function and adjust the size again when the window is resized.
function animate() {
  labelRenderer.render(scene, camera);

  renderer.render(scene, camera);
}

renderer.setAnimationLoop(animate);

window.addEventListener('resize', function () {
  camera.aspect = window.innerWidth / window.innerHeight;
  camera.updateProjectionMatrix();

  labelRenderer.setSize(window.innerWidth, window.innerHeight);

  renderer.setSize(window.innerWidth, window.innerHeight);
});
One last thing to note is that camera control actions won’t work, as the mouse events will be captured on the newly added <div> instead of directly on the scene.
To fix this, we'll simply prevent the container from capturing mouse events with this line
labelRenderer.domElement.style.pointerEvents = 'none';CSS2DObject
Now that we've created the container, it's time to add HTML elements to it. Next, we'll create the objects in the scene and link them to the corresponding HTML elements.
Creating and Adding HTML Elements to the Container
First, we’ll create the three color pickers, just like in the demo, using JavaScript.
We'll start by creating a wrapper flex <div> to arrange the three color pickers horizontally.
Note: feel free to create and style the elements in a way that feels easiest and most logical to you.
const wrapper = document.createElement('wrapper');
wrapper.className = 'wrapper';
As you can see, I’ve assigned the wrapper class to the div. Now, we’ll use some CSS to set its display mode to flex.
index.html
<style>
  body {
    margin: 0;
  }

  .wrapper {
    display: flex;
    gap: 10px;
  }
</style>
Next, we’ll create and style the three color pickers, then attach them to the wrapper.
const blueDiv = document.createElement('div');
blueDiv.className = 'color-picker';
blueDiv.id = 'blue';

const redDiv = document.createElement('div');
redDiv.className = 'color-picker';
redDiv.id = 'red';

const greenDiv = document.createElement('div');
greenDiv.className = 'color-picker';
greenDiv.id = 'green';
.color-picker {
width: 50px;
height: 50px;
border-radius: 50%;
-webkit-box-shadow: 0px 0px 65px -17px rgba(0, 0, 0, 0.75);
-moz-box-shadow: 0px 0px 65px -17px rgba(0, 0, 0, 0.75);
box-shadow: 0px 0px 65px -17px rgba(0, 0, 0, 0.75);
cursor: pointer;
}
.color-picker:hover {
border: 2px solid white;
margin: -2px;
}
#blue {
background-color: deepskyblue;
}
#red {
background-color: crimson;
}
#green {
background-color: lime;
}wrapper.appendChild(blueDiv);
wrapper.appendChild(redDiv);
wrapper.appendChild(greenDiv);Linking the HTML Elements to the Scene
So far, we've created the elements, but they don't appear in the app. And you probably know why, right?
Yes, we've created the HTML wrapper and its children, but we still haven't injected them into the page. And hey, don't even think about adding them manually with appendChild()!
Instead, we'll use CSS2DObject, a special object linked to an HTML element. This allows us to control the position of the linked HTML element using Three.js positioning methods and properties.
So, let's import the class.
import {
  CSS2DRenderer,
  CSS2DObject,
} from 'three/examples/jsm/renderers/CSS2DRenderer';
Next, we'll create an instance of CSS2DObject, pass the element we want to attach to it as an argument in the constructor, and add it to the scene.
const wrapperObject = new CSS2DObject(wrapper);
scene.add(wrapperObject);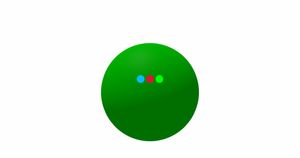
To position the wrapper div, we just need to apply some translations using the wrapperObject properties and methods.
wrapperObject.position.set(0, -2, 0);
wrapperObject.position.x = 3;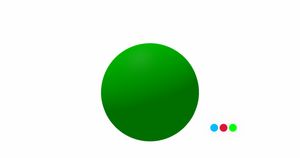
Now if we want to make the wrapper follow the position of the sphere, we'll add it to the sphere instead of adding it directly to the scene.
Note: adding the wrapperObject to the sphere makes its coordinates relative to the sphere's local coordinate system, rather than the global coordinate system (the scene's coordinate system).
const wrapperObject = new CSS2DObject(wrapper);
// scene.add(wrapperObject);
// wrapperObject.position.set(0, -2, 0);
// wrapperObject.position.x = 3;
wrapperObject.position.set(0, 2.2, 0);
sphere.add(wrapperObject);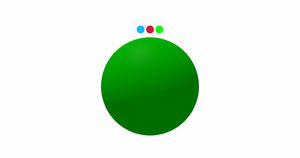
Common Problems You Might Face and How to Fix Them
Pointer Events
To change the sphere's color based on the selected color picker, we'll add an event listener to each div and update the material's color. It's a pretty straightforward task.
blueDiv.addEventListener('click', function () {
  sphere.material.color.setColorName('deepskyblue');
});

redDiv.addEventListener('click', function () {
  sphere.material.color.setColorName('crimson');
});

greenDiv.addEventListener('click', function () {
  sphere.material.color.setColorName('lime');
});
Now, if you try this, the color won’t change, even though the code is correct.
The reason for this is that we disabled mouse events on the container earlier to ensure the camera controls work.
To fix this, we'll simply enable mouse events for the color picker divs only.
.color-picker {
  width: 50px;
  height: 50px;
  border-radius: 50%;
  -webkit-box-shadow: 0px 0px 65px -17px rgba(0, 0, 0, 0.75);
  -moz-box-shadow: 0px 0px 65px -17px rgba(0, 0, 0, 0.75);
  box-shadow: 0px 0px 65px -17px rgba(0, 0, 0, 0.75);
  cursor: pointer;

  pointer-events: auto;
}CSS Transforms
Try applying a geometric transformation to the wrapper using CSS.
.wrapper {
  display: flex;
  gap: 10px;

  transform: scaleX(50%);
}
You'll notice that this, along with any CSS transform, won't work.
This happens because Three.js already uses transforms to position the elements.
So, instead of applying the transforms directly to the wrapper div, we'll add another div inside it and move the other child elements into this new div.
const transformDiv = document.createElement('div');
transformDiv.className = 'transformDiv';
wrapper.appendChild(transformDiv);

transformDiv.appendChild(blueDiv);
transformDiv.appendChild(redDiv);
transformDiv.appendChild(greenDiv);
Then, we'll apply the CSS transforms to this new div.
.wrapper {
  /* display: flex;
  gap: 10px; */
}

.transformDiv {
  display: flex;
  gap: 10px;
  transform: scaleX(50%);
}
Wrap Up
And that’s how you add interactive HTML elements to your Three.js app.
As long as you don’t overwhelm your app with buttons and inputs, and instead place them strategically, this will be a huge upgrade to your 3D web applications.
Happy coding!
