How to Make an Object Rotate Around Another Object in Three.js
Published on 18 Jun, 2024 | ~10 min read | Demo
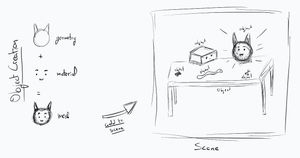
In this tutorial, we'll explore how to make objects in a Three.js scene rotate around other objects and understand the parent-child relationship between them. To put these concepts into practice, we'll create a 3D imitation of the solar system.
Before we start, it's important to have a basic knowledge of Three.js. If you're not familiar with the fundamentals of the library, be sure to check out this article first: the fundamentals of three.js.
The Base of Our Project
Let's begin with a basic Three.js scene using my Three.js boilerplate, to which I've added the necessary textures for the background and the planets. And as you'll see in the code base below I stored the textures in an array to iterate through and apply the color space to each texture.
import * as THREE from 'three';
import {OrbitControls} from
'three/examples/jsm/controls/OrbitControls.js';

const textures = [];
const textureLoader = new THREE.TextureLoader();
const cubeTextureLoader = new THREE.CubeTextureLoader();

const starsTexture = cubeTextureLoader.load([
    'https://i.imgur.com/gLGNnkp.jpeg',
    'https://i.imgur.com/gLGNnkp.jpeg',
    'https://i.imgur.com/gLGNnkp.jpeg',
    'https://i.imgur.com/gLGNnkp.jpeg',
    'https://i.imgur.com/gLGNnkp.jpeg',
    'https://i.imgur.com/gLGNnkp.jpeg'
]);
const sunTexture = textureLoader.load('https://i.imgur.com/zU5oOjt.jpeg');
const mercuryTexture = textureLoader.load('https://i.imgur.com/TJO6Te3.jpeg');
const venusTexture = textureLoader.load('https://i.imgur.com/xeaPIjD.jpeg');
const earthTexture = textureLoader.load('https://i.imgur.com/vflkkqF.jpeg');
const marsTexture = textureLoader.load('https://i.imgur.com/U6upjrv.jpeg');
const jupiterTexture = textureLoader.load('https://i.imgur.com/4APG00k.jpeg');
const saturnTexture = textureLoader.load('https://i.imgur.com/YKw0m4x.jpeg');
const saturnRingTexture = textureLoader.load('https://i.imgur.com/u0muMiZ.png');
const uranusTexture = textureLoader.load('https://i.imgur.com/olpgGMo.jpeg');
const uranusRingTexture = textureLoader.load('https://i.imgur.com/F1y9Ve4.png');
const neptuneTexture = textureLoader.load('https://i.imgur.com/pycXdLM.jpeg');
const plutoTexture = textureLoader.load('https://i.imgur.com/YNsmmHV.jpeg');

textures.push(
    starsTexture,
    sunTexture,
    mercuryTexture,
    venusTexture,
    earthTexture,
    marsTexture,
    jupiterTexture,
    saturnTexture,
    saturnRingTexture,
    uranusTexture,
    uranusRingTexture,
    neptuneTexture,
    plutoTexture
);

textures.forEach(function(texture) {
    texture.colorSpace = THREE.SRGBColorSpace;
});

const renderer = new THREE.WebGLRenderer({antialias: true});
renderer.setSize(window.innerWidth, window.innerHeight);
document.body.appendChild(renderer.domElement);

const scene = new THREE.Scene();
const camera = new THREE.PerspectiveCamera(
    45,
    window.innerWidth / window.innerHeight,
    0.1,
    1000
);

// Sets orbit control to move the camera around
const orbit = new OrbitControls(camera, renderer.domElement);

// Camera positioning
camera.position.set(-90, 140, 140);
orbit.update();

scene.background = starsTexture;

function animate() {
    renderer.render(scene, camera);
}

renderer.setAnimationLoop(animate);

window.addEventListener('resize', function() {
    camera.aspect = window.innerWidth / window.innerHeight;
    camera.updateProjectionMatrix();
    renderer.setSize(window.innerWidth, window.innerHeight);
});
Now let's create the center of our solar system, the Sun. We'll do this by creating a sphere geometry and setting its material and texture. Nothing special here.
const sunGeo = new THREE.SphereGeometry(16, 30, 30);
const sunMat = new THREE.MeshBasicMaterial({
    map: sunTexture
});
const sun = new THREE.Mesh(sunGeo, sunMat);
scene.add(sun);
Having done that, to make the Sun spin, we need to go to the animate() function and call the rotateY() method.
function animate() {
    sun.rotateY(0.004);
    renderer.render(scene, camera);
}
To make an object rotate around itself, we need to call the rotate() method and choose the axis for the rotation. However, to make an object rotate around another object rather than its own center, we need to do more than that.
The Parent/Child Hierarchy Between Objects and Rotations
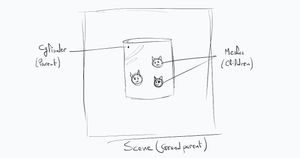
In this article, we learned that to display something on the screen, we need to create it and then add it to the scene. Another way to express this is that the scene acts as a parent node, and all the objects we add to it, like lights and meshes, are its child nodes.
Having said that, these child nodes can also be parents to other child nodes. This means we can create an object and add it to the scene, then create one or more additional objects and append them to that first object.
But what does that have to do with rotation? you might be asking.
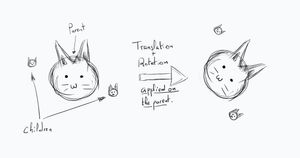
Well, the parent-child relationship between objects means that the children's positions are relative to their parent's position.
If we translate or rotate the parent, the children will move accordingly. Essentially, the parent and children form a composite object, with the children's positions and transformations depending on the parent.
Making the Planets Orbit the Sun
Now, back to our code. Let's create our first planet.
Instead of adding the mesh directly to the scene, we're going to add it to the Sun's mesh.
We'll also add some distance between the Sun and Mercury because its default position is 0 on the x-axis, which places it right at the center of the Sun, making it invisible.
const mercuryGeo = new THREE.SphereGeometry(3.2, 30, 30);
const mercuryMat = new THREE.MeshBasicMaterial({
map: mercuryTexture
});
const mercury = new THREE.Mesh(mercuryGeo, mercuryMat);
sun.add(mercury);
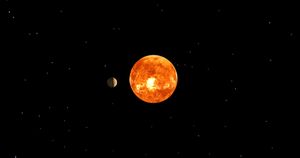
mercury.position.x = 28;And there we go, Mercury is now orbiting the Sun!
As you know, planets also spin. To achieve this, we'll simply call the rotateY() method again, but this time on the planet's mesh.
function animate() {
    sun.rotateY(0.004);
    mercury.rotateY(0.004);
    renderer.render(scene, camera);
}Now you see that the planet is not affected by the Sun's light, which is expected since the Sun doesn't emit light and the material used in the creation of Mercury is the MeshBasicMaterial.
That said, let's add a light source and change the material of the planet to MeshStandardMaterial.
In this case, we're going to create a point light, which emits light in all directions from its source. And we'll position it right at the center of the Sun.
The PointLight constructor takes four arguments, but we'll set only three: the first is the color of the light, the second is the intensity, and the third is the maximum distance the light can reach.
Also, adding some ambient lighting would be a good enhancement to the scene.
const ambientLight = new THREE.AmbientLight(0x333333, 5);
scene.add(ambientLight);

const pointLight = new THREE.PointLight(0xffffff, 10000, 300);
scene.add(pointLight);
// const mercuryMat = new THREE.MeshBasicMaterial({
// map: mercuryTexture
// });
const mercuryMat = new THREE.MeshStandardMaterial({
map: mercuryTexture
});
Now, even though we have our planet rotating correctly around the Sun, we still have a problem.
In reality, planets don't have the same orbiting speed. As you may have guessed, in our scene, the orbiting speed of the planets depends on the spinning speed of the parent object, which is the Sun.
In this setup, we lack control over the speed of individual planets; the sole parameter we can adjust is the rotation speed of the Sun. Consequently, adding more planets results in all of them orbiting the sun at the same speed.
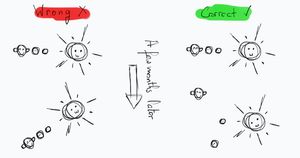
Solving this problem is straightforward. Instead of rotating the planets around the Sun directly, we'll create a separate parent object for each planet, position them at the sun's coordinates, and then rotate each planet individually at its own speed. That's all there is to it!
That said, we don't need to create a geometry and add a material for each parent. Instead, we will create an instance of the Object3D class, which serves as the base class for all objects in Three.js. Think of it as an invisible object that can be added to the scene.
This approach is more performant because we don't need to create a material and mesh for each individual object.
So, we'll create an instance of the Object3D class, append the mercury mesh to it instead of the Sun, and then add this object to the scene
const mercuryObj = new THREE.Object3D();
scene.add(mercuryObj);

// sun.add(mercury);
mercuryObj.add(mercury);
mercury.position.x = 28;
At this point, Mercury will not orbit because its parent object isn't rotating. To make it orbit, we'll apply the rotateY() method to the parent object within the animate() function.
function animate() {
    sun.rotateY(0.004);
    mercuryObj.rotateY(0.04);
    mercury.rotateY(0.004);
    renderer.render(scene, camera);
}Now we'll apply the same concept to create other planets, particularly those like Saturn that have rings around them.
We'll create a mesh for the planet and another one for the ring. Then, we'll add both meshes as children to an instance of the Object3D class and add that instance to the scene.
const saturnGeo = new THREE.SphereGeometry(10, 30, 30);
const saturnMat = new THREE.MeshStandardMaterial({
    map: saturnTexture
});
const saturn = new THREE.Mesh(saturnGeo, saturnMat);

const saturnObj = new THREE.Object3D();
scene.add(saturnObj);

saturnObj.add(saturn);
saturn.position.x = 138;

const saturnRingGeo = new THREE.RingGeometry(10, 20, 32);
// I used MeshBasicMaterial to make it more visible
const saturnRingMat = new THREE.MeshBasicMaterial({
    map: saturnRingTexture,
    side: THREE.DoubleSide
});
const saturnRing = new THREE.Mesh(saturnRingGeo, saturnRingMat);

saturnObj.add(saturnRing);
saturnRing.position.x = 138;
saturnRing.rotation.x = -0.5 * Math.PI;

function animate() {
    sun.rotateY(0.004);
    mercuryObj.rotateY(0.04);
    mercury.rotateY(0.004);
    saturn.rotateY(0.038);
    saturnObj.rotateY(0.0009);
    renderer.render(scene, camera);
}Optimizing the Code Base
Given that our solar system comprises 9 planets, it's clear that we'll need to replicate these code blocks several times.
To manage this effectively, we'll use a function. This approach ensures our code remains tidy and avoids the pitfalls of extensive repetition, which can lead to complexity, tedium, and inefficiency.
Our function should accept parameters for various constructors and properties. Specifically, it will take parameters for the sphere's radius, texture, and mesh position.
In addition, this function should return an object with properties for both the parent and the child mesh because we require these for the rotations.
function createPlanet(size, texture, position) {
    const geo = new THREE.SphereGeometry(size, 30, 30);
    const mat = new THREE.MeshStandardMaterial({
      map: texture
    });
    const mesh = new THREE.Mesh(geo, mat);
    const obj = new THREE.Object3D();
    obj.add(mesh);

    scene.add(obj);
    mesh.position.x = position;
    return {mesh, obj};
}
After defining the function, creating a planet is as simple as calling createPlanet() and passing the three required arguments.
const mercury = createPlanet(3.2, mercuryTexture, 28);
const venus = createPlanet(5.8, venusTexture, 44);
const earth = createPlanet(6, earthTexture, 62);
const mars = createPlanet(4, marsTexture, 78);
const jupiter = createPlanet(12, jupiterTexture, 100);
const saturn = createPlanet(10, saturnTexture, 138);
const uranus = createPlanet(7, uranusTexture, 176);
const neptune = createPlanet(7, neptuneTexture, 200);
const pluto = createPlanet(2.8, plutoTexture, 216);
Now to make a planet spin, we'll call the rotateY() method on the mesh property. To rotate it around the Sun, we'll call rotateY() on the obj property.
function animate() {
    //Self-rotation
    sun.rotateY(0.004);
    mercury.mesh.rotateY(0.004);
    venus.mesh.rotateY(0.002);
    earth.mesh.rotateY(0.02);
    mars.mesh.rotateY(0.018);
    jupiter.mesh.rotateY(0.04);
    saturn.mesh.rotateY(0.038);
    uranus.mesh.rotateY(0.03);
    neptune.mesh.rotateY(0.032);
    pluto.mesh.rotateY(0.008);

    //Around-sun-rotation
    mercury.obj.rotateY(0.04);
    venus.obj.rotateY(0.015);
    earth.obj.rotateY(0.01);
    mars.obj.rotateY(0.008);
    jupiter.obj.rotateY(0.002);
    saturn.obj.rotateY(0.0009);
    uranus.obj.rotateY(0.0004);
    neptune.obj.rotateY(0.0001);
    pluto.obj.rotateY(0.00007);
    renderer.render(scene, camera);
}We encounter a special scenario when a planet includes a ring around it. To accommodate this, we'll extend the createPlanet() function with a fourth parameter, an object containing all the required values to define the ring.
Subsequently, we'll incorporate a conditional check based on this fourth argument. If it's provided, indicating the presence of ring parameters, the function will proceed to create and integrate the ring into the parent object's structure.
function createPlanet(size, texture, position, ring) {
    const geo = new THREE.SphereGeometry(size, 30, 30);
    const mat = new THREE.MeshStandardMaterial({
      map: texture
    });
    const mesh = new THREE.Mesh(geo, mat);
    const obj = new THREE.Object3D();
    obj.add(mesh);
    if (ring) {
      const ringGeo = new THREE.RingGeometry(
        ring.innerRadius,
        ring.outerRadius,
        32
      );
      const ringMat = new THREE.MeshBasicMaterial({
        map: ring.texture,
        side: THREE.DoubleSide
      });
      const ringMesh = new THREE.Mesh(ringGeo, ringMat);
      obj.add(ringMesh);
      ringMesh.position.x = position;
      ringMesh.rotation.x = -0.5 * Math.PI;
    }
    scene.add(obj);
    mesh.position.x = position;
    return { mesh, obj };
}
const saturn = createPlanet(10, saturnTexture, 138, {
innerRadius: 10,
outerRadius: 20,
texture: saturnRingTexture
});
const uranus = createPlanet(7, uranusTexture, 176, {
innerRadius: 7,
outerRadius: 12,
texture: uranusRingTexture
});Summary
In this article, we explored how to make objects rotate around other objects in Three.js, using a solar system model as an example.
We covered key concepts like parent-child relationships, positioning geometries, and applying transformations to simulate realistic orbital motion. Starting with a basic scene, we added the sun, planets, and Saturn’s ring, learning to control rotations independently for accurate orbits.
These techniques are fundamental for creating dynamic 3D scenes in Three.js.