How to Subdivide a Plane into Selectable Tiles in Three.js
Published on 04 May, 2025 | ~11 min read | Demo
Have you ever thought about making a checkers, chess, or RPG-style game where the player moves or summons characters on a grid of hoverable squares?
If the answer is yes, this article will provide the necessary information on creating the grid and placing your objects on it.
Breaking Down the Idea
The idea is simple.
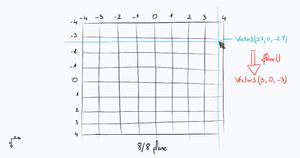
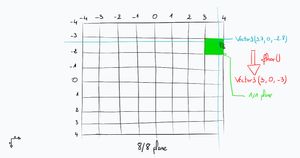
First, we use the Raycaster to get the coordinates of the point where the cursor intersects with the plane.
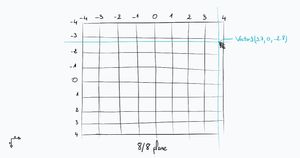
Next, we'll call the floor() method on the position vector to get the largest integer less than or equal to each one of its components.
Next, we’ll create a 1x1 plane to serve as an indicator of the square the cursor is hovering over, positioning it using the values returned by floor().
One thing to keep in mind is that when we add or position an object in the scene, it gets placed at the center of the indicated coordinates, which shifts the square by half of its size.
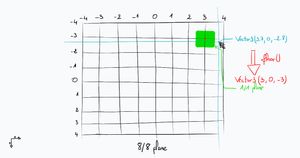
To fix this, we’ll simply add half of the plane’s width and height to the values returned by floor().
And that pretty much sums up what we'll be doing in the next section.
Making It Work
First, you’ll need a Three.js project. If you already have one, just copy and paste the code below. If not, clone this Three.js boilerplate, and you’ll be good to go.
main.js:
import * as THREE from 'three';
import { OrbitControls } from 'three/examples/jsm/controls/OrbitControls.js';

const renderer = new THREE.WebGLRenderer({ antialias: true });
renderer.setSize(window.innerWidth, window.innerHeight);
document.body.appendChild(renderer.domElement);

// Sets the color of the background.
renderer.setClearColor(0xfefefe);

const scene = new THREE.Scene();
const camera = new THREE.PerspectiveCamera(
  45,
  window.innerWidth / window.innerHeight,
  0.1,
  1000
);

// Sets orbit control to move the camera around.
const orbit = new OrbitControls(camera, renderer.domElement);

// Camera positioning.
camera.position.set(6, 8, 14);
// Has to be done everytime we update the camera position.
orbit.update();

// Creates a 12 by 12 grid helper.
const gridHelper = new THREE.GridHelper(12, 12);
scene.add(gridHelper);

// Creates an axes helper with an axis length of 4.
const axesHelper = new THREE.AxesHelper(4);
scene.add(axesHelper);

function animate() {
  renderer.render(scene, camera);
}

renderer.setAnimationLoop(animate);

window.addEventListener('resize', function () {
  camera.aspect = window.innerWidth / window.innerHeight;
  camera.updateProjectionMatrix();
  renderer.setSize(window.innerWidth, window.innerHeight);
});
Creating the Highlighting Square
Now that we're all set, we'll create a simple 20x20 plane and update the grid to match its size.
const gridHelper = new THREE.GridHelper(20, 20);
scene.add(gridHelper);

// const axesHelper = new THREE.AxesHelper(4);
// scene.add(axesHelper);

const planeMesh = new THREE.Mesh(
  new THREE.PlaneGeometry(20, 20),
  new THREE.MeshBasicMaterial({
    side: THREE.DoubleSide,
  })
);
planeMesh.rotateX(-Math.PI / 2);
scene.add(planeMesh);
Next, we'll create the highlight square—another plane mesh, but this time 1x1 in size.
const highlightMesh = new THREE.Mesh(
  new THREE.PlaneGeometry(1, 1),
  new THREE.MeshBasicMaterial({
    side: THREE.DoubleSide,
    color: 0xffea00,
  })
);
highlightMesh.rotateX(-Math.PI / 2);
scene.add(highlightMesh);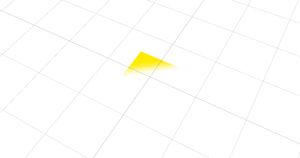
We haven't done much yet, but we already have a couple of issues.
The z-fighting problem occurs when two meshes overlap. To fix it, we'll slightly raise the highlight mesh by increasing its position.y value.
The second problem was already covered in the previous section—we'll now apply the solution in code.
highlightMesh.position.set(0.5, 0.001, 0.5);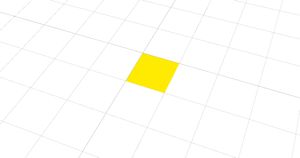
"Wait, didn't you say you were going to use floor()?"
Yes, I hardcoded the x and z values here just for the initial position. We'll use floor() and addScale() when the highlight's position is controlled by the cursor.
That being said, let's set up the Raycaster.
const mousePosition = new THREE.Vector2();
const raycaster = new THREE.Raycaster();

window.addEventListener('mousemove', function (e) {
  mousePosition.x = (e.clientX / window.innerWidth) * 2 - 1;
  mousePosition.y = -(e.clientY / window.innerHeight) * 2 + 1;
  raycaster.setFromCamera(mousePosition, camera);
  const intersects = raycaster.intersectObject(planeMesh);
  if (intersects.length > 0) {
    // Stuff to do
  }
});
Here, we’ll trigger an event only when the cursor intersects with the plane, which will handle both the movement of the highlight mesh and the creation of an object at the highlighted intersection.
if (intersects.length > 0) {
  const highlightPos = new THREE.Vector3()
    .copy(intersects[0].point)
    .floor()
    .addScalar(0.5);
  highlightMesh.position.set(highlightPos.x, 0.001, highlightPos.z);
}
highlightPos is a Vector3, and its value is copied from intersect.point, which is also a Vector3 containing the coordinates of the intersection point between the mouse and the plane.
The role of the floor() function has already been explained.
addScalar() adds 0.5 (half of the highlight mesh's width and height) to the components of the vector returned by floor().
By the way, it's not necessary to use addScalar() to add the values. You can directly add 0.5 to the components of the final vector instead.
const highlightPos = new THREE.Vector3().copy(intersects[0].point).floor();
  // .addScalar(0.5);
  highlightMesh.position.set(
    highlightPos.x + 0.5,
    0.001,
    highlightPos.z + 0.5
);Placing Objects in Highlighted Areas
First, let's create a mesh which we'll make a copy from and place on the grid whenever a mouse click event occurs.
window.addEventListener('mousemove', function (e) {...});

const sphereMesh = new THREE.Mesh(
  new THREE.SphereGeometry(0.4, 4, 2),
  new THREE.MeshBasicMaterial({
    wireframe: true,
    color: 0x212121,
  })
);
Next, of course, we need to set up the event listener for the click. And instead of recreating the Raycaster code, we’ll reuse the existing one by turning the intersects array into a global variable. This way, we can check whether the cursor is on the grid using that variable.
let intersects;

window.addEventListener('mousemove', function (e) {
  mousePosition.x = (e.clientX / window.innerWidth) * 2 - 1;
  mousePosition.y = -(e.clientY / window.innerHeight) * 2 + 1;
  raycaster.setFromCamera(mousePosition, camera);

  // const intersects = raycaster.intersectObject(planeMesh);
  intersects = raycaster.intersectObject(planeMesh);

  if (intersects.length > 0) {
    const highlightPos = new THREE.Vector3()
      .copy(intersects[0].point)
      .floor()
      .addScalar(0.5);
    highlightMesh.position.set(highlightPos.x, 0.001, highlightPos.z);
  }
});

const sphereMesh = new THREE.Mesh(
  new THREE.SphereGeometry(0.4, 4, 2),
  new THREE.MeshBasicMaterial({
    wireframe: true,
    color: 0x212121,
  })
);

window.addEventListener('mousedown', function () {
  if (intersects.length > 0) {
    // Stuff to do
  }
});
If the plane exists in the intersects array, then a copy will be created by calling the clone() method on the sphereMesh object.
In addition, we'll use copy() to set the position of the sphereMesh clone in the scene.
if (intersects.length > 0) {
  const sphereClone = sphereMesh.clone();
  sphereClone.position.copy(highlightMesh.position);
  scene.add(sphereClone);
}
Avoiding Duplicate Object Placement on a Tile
An object will be created at the same spot every time you click, but this won't be noticeable.
That said, we'll log the number of objects in our scene just to confirm that we’ve fixed the problem.
window.addEventListener('mousedown', function () {
  if (intersects.length > 0) {
    const sphereClone = sphereMesh.clone();
    sphereClone.position.copy(highlightMesh.position);
    scene.add(sphereClone);
  }

  console.log(scene.children.length);

});
Now, whenever you place a new object, you'll see that the number of scene children increases, which is expected.

The number starts at 4 because we already have the grid, the plane, the highlighting mesh, and the first object created after your initial click.
To solve that, we'll create an array that contains references to the objects added to the scene. Then, whenever a mouse click occurs, we'll check each object in the array to see if its position matches that of the highlight mesh.
In the end, creating a new object will depend on the outcome of the search.
const objectsAdded = [];
window.addEventListener('mousedown', function () {
  const objectExist = objectsAdded.find(function (object) {
    return (
      object.position.x === highlightMesh.position.x &&
      object.position.z === highlightMesh.position.z
    );
  });

  if (!objectExist) {
    if (intersects.length > 0) {
      const sphereClone = sphereMesh.clone();
      sphereClone.position.copy(highlightMesh.position);
      scene.add(sphereClone);
      objectsAdded.push(sphereClone);
    }
  }
  console.log(scene.children.length);
});
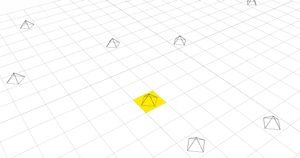
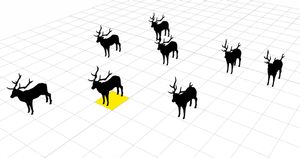
Placing Models on Tiles
First, we'll import the loader and the SkeletonUtils module to load the model and create clones.
import { GLTFLoader } from 'three/examples/jsm/loaders/GLTFLoader.js';
import * as SkeletonUtils from 'three/examples/jsm/utils/SkeletonUtils.js';
Next, we'll load the model and create a global variable that holds a reference to it, which we'll use to clone from whenever a mouse click occurs on an empty tile.
And of course, we'll comment out the code of the previous objects since we won't be placing them anymore.
// const sphereMesh = new THREE.Mesh(
//   new THREE.SphereGeometry(0.4, 4, 2),
//   new THREE.MeshBasicMaterial({
//     wireframe: true,
//     color: 0x212121,
//   })
// );

const loader = new GLTFLoader();
let stag;
loader.load('/Stag.gltf', function (gltf) {
  const model = gltf.scene;
  model.scale.set(0.3, 0.3, 0.3);
  stag = model;
});
Now, instead of adding a sphere, we'll simply create a clone of the model and add it to the objects array when a click event occurs.
if (!objectExist) {
  if (intersects.length > 0) {
    // const sphereClone = sphereMesh.clone();
    // sphereClone.position.copy(highlightMesh.position);
    // scene.add(sphereClone);
    // objectsAdded.push(sphereClone);
    const stagClone = SkeletonUtils.clone(stag);
    stagClone.position.copy(highlightMesh.position);
    scene.add(stagClone);
    objectsAdded.push(stagClone);
  }
}
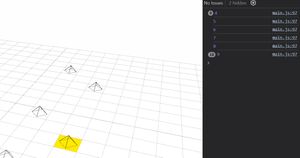
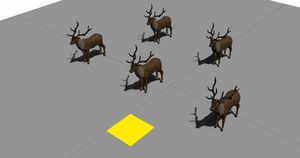
As you can see, the clones appear completely black because there's no light source in the scene—so let's add one, and we'll make sure it casts shadows.
const planeMesh = new THREE.Mesh(
  new THREE.PlaneGeometry(20, 20),
  // Changed from MeshBasicMaterial since
  // it's not affected by light.
  new THREE.MeshStandardMaterial({
    side: THREE.DoubleSide,
  })
);
planeMesh.rotateX(-Math.PI / 2);
scene.add(planeMesh);
// Activiates the shadow on the plane.
planeMesh.receiveShadow = true;

// Activates the shadow in the scene.
renderer.shadowMap.enabled = true;
const ambientLight = new THREE.AmbientLight(0x333333);
scene.add(ambientLight);

const directionalLight = new THREE.DirectionalLight(0xffffff, 1);
scene.add(directionalLight);
directionalLight.position.set(10, 20, 3);
directionalLight.castShadow = true;

// These properties are explained in
// my Three.js for total beginners article.
directionalLight.shadow.camera.left = -15;
directionalLight.shadow.camera.right = 15;
directionalLight.shadow.camera.bottom = -15;
directionalLight.shadow.camera.top = 15;
directionalLight.shadow.mapSize.width = 2048;
directionalLight.shadow.mapSize.height = 2048;
And of course, we'll enable shadows on the models as well.
loader.load('/Stag.gltf', function (gltf) {
  const model = gltf.scene;
  model.scale.set(0.3, 0.3, 0.3);

  model.traverse(function (node) {
    if (node.isMesh) node.castShadow = true;
  });

  stag = model;
});
If you're not familiar with the traverse() method, check out this article.
Animations
Let’s start by animating the highlight mesh.
That said, let's make it blink like in the example by having its opacity change over time.
To do that, we'll need to enable the material's transparency, then use a bit of math in the animate() function to update its opacity value.
const highlightMesh = new THREE.Mesh(
  new THREE.PlaneGeometry(1, 1),
  new THREE.MeshBasicMaterial({
    side: THREE.DoubleSide,
    color: 0xffea00,

    transparent: true,
  })
);
function animate(time) {
highlightMesh.material.opacity = 1 + Math.sin(time / 120);
renderer.render(scene, camera);
}We'll also update the highlight to turn red when the user tries to place an object on a tile that already has one—this signals that the action isn't allowed.
So, we'll change the highlight color whenever an empty tile is clicked.
window.addEventListener('mousedown', function () {
  // ...

  if (!objectExist) {
    if (intersects.length > 0) {
      // const sphereClone = sphereMesh.clone();
      // sphereClone.position.copy(highlightMesh.position);
      // scene.add(sphereClone);
      // objectsAdded.push(sphereClone);
      const stagClone = SkeletonUtils.clone(stag);
      stagClone.position.copy(highlightMesh.position);
      scene.add(stagClone);
      objectsAdded.push(stagClone);

      highlightMesh.material.color.setHex(0xff0000);
    }

  //...
Then we'll update the color when a tile is hovered, depending on whether it's empty or already occupied.
To do that, we'll use the same technique we used in the click listener to check if a tile is empty, then change the color based on the result.
window.addEventListener('mousemove', function (e) {
  // ...

  const objectExist = objectsAdded.find(function (object) {
    return (
      object.position.x === highlightMesh.position.x &&
      object.position.z === highlightMesh.position.z
    );
  });

  if (!objectExist) highlightMesh.material.color.setHex(0xffea00);
  else highlightMesh.material.color.setHex(0xff0000);
});Now, to animate the models, we'll create a global variable and assign it the animations from the loaded .glb file.
const loader = new GLTFLoader();
let stag;

let clips;

loader.load('/Stag.gltf', function (gltf) {
  const model = gltf.scene;
  model.scale.set(0.3, 0.3, 0.3);
  model.traverse(function (node) {
    if (node.isMesh) node.castShadow = true;
  });
  stag = model;

  clips = gltf.animations;
});
Next, we'll create an array where each element is an animation mixer tied to a specific object placed on the tileset.
const objectsAdded = [];

const mixers = [];

window.addEventListener('mousedown', function () {
  // ...

  if (!objectExist) {
    if (intersects.length > 0) {
      // ...

      const mixer = new THREE.AnimationMixer(stagClone);
      const clip = THREE.AnimationClip.findByName(clips, 'Idle_2');
      const action = mixer.clipAction(clip);
      action.play();
      mixers.push(mixer);
    }
  }
  console.log(scene.children.length);
});
Finally, we'll create a Clock instance and use its delta value to update the mixers inside the animate() function.
const clock = new THREE.Clock();

function animate(time) {
  highlightMesh.material.opacity = 1 + Math.sin(time / 120);

  const delta = clock.getDelta();
  mixers.forEach(function (mixer) {
    mixer.update(delta);
  });

  renderer.render(scene, camera);
}
Wrap Up
And that’s it, folks! I hope you found this tutorial helpful and insightful.
Happy coding!