Instanced Rendering in Three.js
Published on 20 Nov, 2024 | ~11 min read | Demo
Instancing is a crucial topic to understand when it comes to optimizing the performance of 3D applications.
So, if your scene contains thousands of meshes and you're concerned about performance, this article is exactly what you need.
What Is Instancing in the First Place?
"Instancing is a technique where we draw many (equal mesh data) objects at once with a single render call, saving us all the CPU -> GPU communications each time we need to render an object."
This quote from learnopengl.com might be the clearest and most concise definition of instancing—assuming you're familiar with the concept of a render call.
You know, when you want to create and display a mesh with Three.js, there's actually a lot of complex stuff going on behind the scenes.
Basically, when you create an instance of the geometry and material for the mesh and add it to the scene with just a couple of lines of code, you're actually telling the CPU to send commands and data to the GPU so it renders the mesh.
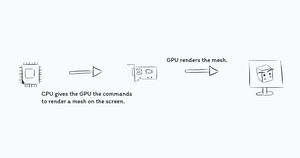
This process is called a render call, and it occurs as many times as there are objects you want to display in your scene.
So, if you want to render 4 objects, for example, 4 render calls will take place.
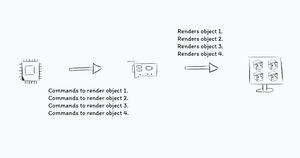
That being said, the more render calls your app makes, the less performant it will be. And we're talking about large numbers of render calls—many thousands, or even hundreds of thousands, not just a few dozen.
Rendering a huge number of objects can be problematic, not because of the GPU—since GPUs these days are powerful enough to handle that with ease—but because it's the communication between the CPU and the GPU that slows down the whole process.
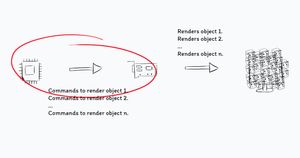
In some cases, you might want that many objects in your scene. A good example of this is a particle system or a grass model that covers a large terrain in a game.
Using a classic for loop to create the meshes means thousands of render calls, which, again, results in low performance.
That brings us to the solution, which is the main subject of this article: instancing, or instanced rendering.
To understand how this technique is helpful, let's revisit the definition we saw earlier.
"Instancing is a technique where we draw many (equal mesh data) objects at once with a single render call, saving us all the CPU -> GPU communications each time we need to render an object."
With instancing, we can render hundreds of thousands, or even millions, of meshes with a single render call— but only if the meshes share the same geometry and material.
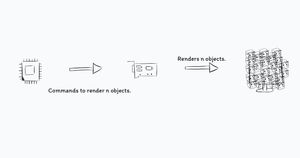
Since we have the same data for all the objects we want to render, we can pass that data to the GPU just once and let it render everything at once, without having to repeat the communication phase between the CPU and GPU.
The Implementation
First and foremost, create a Three.js project. If you don't have one already, save time by cloning this boilerplate.
Next, create a mesh with a geometry and material of your choice.
import * as THREE from 'three';
import { OrbitControls } from 'three/examples/jsm/controls/OrbitControls.js';

const renderer = new THREE.WebGLRenderer({ antialias: true });
renderer.setSize(window.innerWidth, window.innerHeight);
document.body.appendChild(renderer.domElement);

// Sets the color of the background.
renderer.setClearColor(0xfefefe);

const scene = new THREE.Scene();
const camera = new THREE.PerspectiveCamera(
  45,
  window.innerWidth / window.innerHeight,
  0.1,
  1000
);

// Sets orbit control to move the camera around.
const orbit = new OrbitControls(camera, renderer.domElement);

// Camera positioning.
camera.position.set(6, 8, 14);
// Has to be done everytime we update the camera position.
orbit.update();

const ambientLight = new THREE.AmbientLight(0x333333);
scene.add(ambientLight);

const directionalLight = new THREE.DirectionalLight(0xffffff, 1);
directionalLight.position.set(0, 10, 10);
scene.add(directionalLight);

const geometry = new THREE.IcosahedronGeometry();
const material = new THREE.MeshPhongMaterial({ color: 0xffea00 });

function animate() {
  renderer.render(scene, camera);
}

renderer.setAnimationLoop(animate);

window.addEventListener('resize', function () {
  camera.aspect = window.innerWidth / window.innerHeight;
  camera.updateProjectionMatrix();
  renderer.setSize(window.innerWidth, window.innerHeight);
});
With that done, we'll create an instance of the InstancedMesh class instead of Mesh. Pass the geometry and material as the first two arguments, and include a third argument specifying the number of instances to add to the scene.
const mesh = new THREE.InstancedMesh(geometry, material, 10000);
scene.add(mesh);
Now, if we look at the result, we can see the 10k instances, but they're stacked on top of each other, which is why it looks like there's only one.

So, to apply those transformations, we can't simply pass a value to the position or rotation properties like we usually do. Instead, we'll need to use a transformation matrix.
That being said, to iterate over all the instances, we'll use a for... loop.
for (let i = 0; i < 10000; i++) {

}
The next thing we'll do is create an Object3D instance and use its matrix to apply the transformation values to each of our objects.
const dummy = new THREE.Object3D();
for (let i = 0; i < 10000; i++) {

}
To position each object randomly in our scene, we'll use a bit of math.
const dummy = new THREE.Object3D();
for (let i = 0; i < 10000; i++) {
  dummy.position.x = Math.random() * 40 - 20;
  dummy.position.y = Math.random() * 40 - 20;
  dummy.position.z = Math.random() * 40 - 20;
}
Next, we'll need to update the matrix of our object.
dummy.updateMatrix();Then, we'll call setMatrixAt() to apply the matrix to the object at index i.
mesh.setMatrixAt(i, dummy.matrix);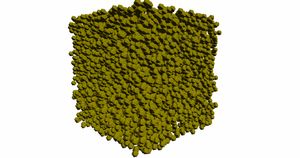
We can apply rotation and scale in the same way we did with positioning the meshes.
const dummy = new THREE.Object3D();
for (let i = 0; i < 10000; i++) {
  dummy.position.x = Math.random() * 40 - 20;
  dummy.position.y = Math.random() * 40 - 20;
  dummy.position.z = Math.random() * 40 - 20;

  dummy.rotation.x = Math.random() * 2 * Math.PI;
  dummy.rotation.y = Math.random() * 2 * Math.PI;
  dummy.rotation.z = Math.random() * 2 * Math.PI;

  dummy.scale.x = dummy.scale.y = dummy.scale.z = Math.random();

  dummy.updateMatrix();
  mesh.setMatrixAt(i, dummy.matrix);
}
Another property we can change is the color of the instances, and we do this by calling the setColorAt() method, which takes the index of the object and an instance of the Color class.
mesh.setColorAt(i, new THREE.Color(Math.random() * 0xFFFFFF));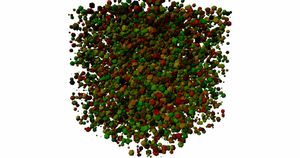
Now, how about applying a rotational animation to the instances?
To do that, we'll apply the transformation through a matrix, just like we did earlier.
function animate() {
  for (let i = 0; i < 10000; i++) {
    dummy.rotation.x = Math.random() * 2 * Math.PI;
    dummy.rotation.y = Math.random() * 2 * Math.PI;
    dummy.rotation.z = Math.random() * 2 * Math.PI;

    dummy.updateMatrix();
    mesh.setMatrixAt(i, dummy.matrix);
  }

  renderer.render(scene, camera);
}
The next step is to create a Matrix4 instance, which we'll fill with the transformation matrix of an object during each iteration by calling getMatrixAt().
const matrix = new THREE.Matrix4();
function animate() {
  for (let i = 0; i < 10000; i++) {
    mesh.getMatrixAt(i, matrix);
    dummy.rotation.x = Math.random() * 2 * Math.PI;
    dummy.rotation.y = Math.random() * 2 * Math.PI;
    dummy.rotation.z = Math.random() * 2 * Math.PI;

    dummy.updateMatrix();
    mesh.setMatrixAt(i, dummy.matrix);
  }

  renderer.render(scene, camera);
}
Next, we'll call decompose() to extract the values of position, rotation, and scale.
// Getting the old values so we re-use them again
// since they'll keep in updating each frame
matrix.decompose(dummy.position, dummy.rotation, dummy.scale);
Then, we'll use time to update the rotation values.
function animate(time) {
  for (let i = 0; i < 10000; i++) {
    mesh.getMatrixAt(i, matrix);
    // Getting the old values so we re-use them again
    // since they'll keep in updating each frame
    matrix.decompose(dummy.position, dummy.rotation, dummy.scale);

    dummy.rotation.x = ((i / 10000) * time) / 1000;
    dummy.rotation.y = ((i / 10000) * time) / 500;
    dummy.rotation.z = ((i / 10000) * time) / 1200;

    dummy.updateMatrix();
    mesh.setMatrixAt(i, dummy.matrix);
  }

  renderer.render(scene, camera);
}
The final step is to add the following line outside the for... loop, as it is crucial for the animation to work.
mesh.instanceMatrix.needsUpdate = true;We also have the ability to apply rotation to the entire set of objects by altering the rotation property, just like we would with any Object3D. There's no need for a matrix here.
mesh.rotation.y = time / 10000;Instancing Models
We can use instancing to create multiple clones of a loaded model.
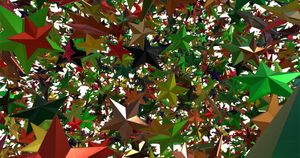
In the next example, we'll create 10,000 copies of this star.
First, add the loader(s) you'll need to load the model and the envionment map in case you need one for your model.
rgbeLoader.load('/rosendal_plains_1_1k.hdr', function (texture) {
  texture.mapping = THREE.EquirectangularReflectionMapping;
  scene.environment = texture;

  gltfLoader.load('/star.glb', function (glb) {

  });
});
Next, comment out all the code we wrote to create and animate the icosahedrons.
Now, we'll follow almost the same steps we used earlier to create the icosahedron instances.
We'll extract the mesh that composes the model by calling getObjectByName(). You can find the name by using the editor on the Three.js website.
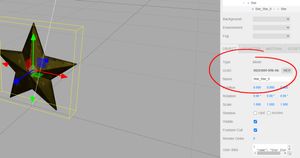
const mesh = glb.scene.getObjectByName('Star_Star_0');Next, we'll extract the geometry of the mesh and clone it.
const geometry = mesh.geometry.clone();The next step is to extract the material of the mesh.
const material = mesh.material;And now that we have the geometry and the material we're simply going to set them as arguments to the InstancedMesh constructor.
Now that we have the geometry and material, we'll simply set them as arguments to the InstancedMesh constructor. Then, we’ll follow the exact same steps to apply transformations to the instances.
gltfLoader.load('/star.glb', function (glb) {
  const mesh = glb.scene.getObjectByName('Star_Star_0');
  const geometry = mesh.geometry.clone();
  const material = mesh.material;

  const starMesh = new THREE.InstancedMesh(geometry, material, 10000);
  scene.add(starMesh);

  const dummy = new THREE.Object3D();
  for (let i = 0; i < 10000; i++) {
    dummy.position.x = Math.random() * 40 - 20;
    dummy.position.y = Math.random() * 40 - 20;
    dummy.position.z = Math.random() * 40 - 20;

    dummy.rotation.x = Math.random() * 2 * Math.PI;
    dummy.rotation.y = Math.random() * 2 * Math.PI;
    dummy.rotation.z = Math.random() * 2 * Math.PI;

    dummy.scale.x = dummy.scale.y = dummy.scale.z = 0.04 * Math.random();

    dummy.updateMatrix();
    starMesh.setMatrixAt(i, dummy.matrix);
    starMesh.setColorAt(i, new THREE.Color(Math.random() * 0xffffff));
  }
});
Finally, if you want to animate the objects, make the instancedMesh (starMesh) and dummy global variable accessible so you can use them in the animate() function.
let starMesh;
const dummy = new THREE.Object3D();

rgbeLoader.load('/rosendal_plains_1_1k.hdr', function (texture) {
  texture.mapping = THREE.EquirectangularReflectionMapping;
  scene.environment = texture;

  gltfLoader.load('/star.glb', function (glb) {
    const mesh = glb.scene.getObjectByName('Star_Star_0');
    const geometry = mesh.geometry.clone();
    const material = mesh.material;

    starMesh = new THREE.InstancedMesh(geometry, material, 10000);
    scene.add(starMesh);

    for (let i = 0; i < 10000; i++) {
      dummy.position.x = Math.random() * 40 - 20;
      dummy.position.y = Math.random() * 40 - 20;
      dummy.position.z = Math.random() * 40 - 20;

      dummy.rotation.x = Math.random() * 2 * Math.PI;
      dummy.rotation.y = Math.random() * 2 * Math.PI;
      dummy.rotation.z = Math.random() * 2 * Math.PI;

      dummy.scale.x = dummy.scale.y = dummy.scale.z = 0.04 * Math.random();

      dummy.updateMatrix();
      starMesh.setMatrixAt(i, dummy.matrix);
      starMesh.setColorAt(i, new THREE.Color(Math.random() * 0xffffff));
    }
  });
});

const matrix = new THREE.Matrix4();
function animate(time) {
  if (starMesh) {
    for (let i = 0; i < 10000; i++) {
      starMesh.getMatrixAt(i, matrix);
      matrix.decompose(dummy.position, dummy.rotation, dummy.scale);

      dummy.rotation.x = ((i / 10000) * time) / 1000;
      dummy.rotation.y = ((i / 10000) * time) / 500;
      dummy.rotation.z = ((i / 10000) * time) / 1200;

      dummy.updateMatrix();
      starMesh.setMatrixAt(i, dummy.matrix);
    }
    starMesh.instanceMatrix.needsUpdate = true;

    starMesh.rotation.y = time / 10000;
  }

  renderer.render(scene, camera);
}Last Words
Instancing, or instanced rendering, is a great technique for performance optimization in your Three.js apps, but it's definitely not the only one.
If you're interested in learning more, make sure to check out this article: Enhancing Three.js App Performance with LOD.
Happy coding!
Credits and Resources
- Gold Star by AnshiNoWara
- ELI5:What are draw call and what dose it do for gamers?
- Instancing
- How do I extract instancedMesh rotations, to increment them, and update them once done?
