Interactive Object Creation in Three.js with Mouse Clicks
Published on 25 Nov, 2024 | ~5 min read | Demo
Adding objects to a Three.js scene with mouse clicks might seem easy at first, but things can get more complicated than you'd expect.
In this tutorial, we'll explore how to use the raycaster and some of its advanced features to achieve this task.
The Idea
What makes this task tricky is that Three.js doesn't have a built-in function to convert the mouse position from window coordinates to the scene's coordinate system.
That said, the solution is as follows.
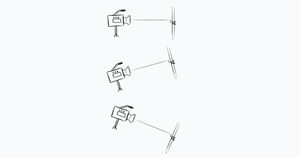
We need to create a plane that always faces the camera, and this should be updated every time the mouse moves.

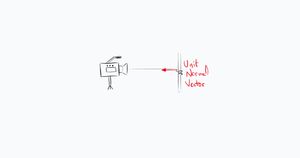
To achieve this, we need to use the setFromNormalAndCoplanarPoint() method. This method requires two things to create a plane: a unit normal vector to define the plane's direction and a point on the plane.
That said, since we need the plane to always face the camera, the unit normal vector must point towards the camera's position, and the point will be the origin of the scene's coordinate system.

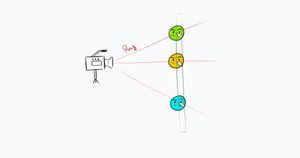
Next, we need to create an object at the position where the plane intersects with the ray cast between the camera and the cursor on a mouse click.

The Implementation
First and foremost, create a Three.js project or simply clone my Three.js boilerplate.
import * as THREE from 'three';
import {OrbitControls} from 'three/examples/jsm/controls/OrbitControls.js';

const renderer = new THREE.WebGLRenderer({antialias: true});
renderer.setSize(window.innerWidth, window.innerHeight);
document.body.appendChild(renderer.domElement);

// Sets the color of the background.
renderer.setClearColor(0xFEFEFE);

const scene = new THREE.Scene();
const camera = new THREE.PerspectiveCamera(
    45,
    window.innerWidth / window.innerHeight,
    0.1,
    1000
);

// Sets orbit control to move the camera around.
const orbit = new OrbitControls(camera, renderer.domElement);

// Camera positioning.
camera.position.set(6, 8, 14);
// Has to be done everytime we update the camera position.
orbit.update();

// Creates a 12 by 12 grid helper.
const gridHelper = new THREE.GridHelper(12, 12);
scene.add(gridHelper);

// Creates an axes helper with an axis length of 4.
const axesHelper = new THREE.AxesHelper(4);
scene.add(axesHelper);

function animate() {
    renderer.render(scene, camera);
}

renderer.setAnimationLoop(animate);

window.addEventListener('resize', function() {
    camera.aspect = window.innerWidth / window.innerHeight;
    camera.updateProjectionMatrix();
    renderer.setSize(window.innerWidth, window.innerHeight);
});
Now, let's create six variables.
const mouse = new THREE.Vector2();
const intersectionPoint = new THREE.Vector3();
const planeNormal = new THREE.Vector3();
const plane = new THREE.Plane();
const raycaster = new THREE.Raycaster();
const sphereGeometry = new THREE.SphereGeometry(0.3);- mouse: the normalized position of the cursor, which we'll need for the raycaster.
- intersectionPoint: it's where we store the coordinates where the ray intersects the plane, specifically the location of the mouse click.
- planeNormal: represents the unit normal vector that indicates the direction of the plane.
- plane: the plane that will be created whenever the cursor position changes.
- raycaster: it emits the ray between the camera and the cursor.
- sphereGeometry: the geometry we'll use to create an object when a mouse click occurs.
To update the mouse variable with the normalized coordinates of the current cursor position, we'll use the following snippet.
window.addEventListener('click', function (e) {
  mouse.x = (e.clientX / this.window.innerWidth) * 2 - 1;
  mouse.y = -(e.clientY / this.window.innerHeight) * 2 + 1;

  // The rest of the snippets will be in this block.
});
Next, we need to use the following line to update planeNormal with the unit normal vector values to orient it toward the camera.
planeNormal.copy(camera.position).normalize();The copy() method copies the camera's position coordinates, and calling normalize() on them calculates the unit vector.
The next step is to call setFromNormalAndCoplanarPoint() to create the plane.
For the second argument, we can either explicitly set a (0, 0, 0) vector as the origin or simply use the scene.position property.
plane.setFromNormalAndCoplanarPoint(planeNormal, scene.position);With that done, we'll now create the ray by calling setFromCamera().
Next, we'll call the intersectPlane() method, which takes two arguments: the first is the plane, and the second is the variable where we'll assign the coordinates of the intersection point.
raycaster.ray.intersectPlane(plane, intersectionPoint);With that, we now have the position of the cursor click assigned to the intersectionPoint variable.
Now, we'll create the mesh.
const sphere = new THREE.Mesh(
  sphereGeometry,
  new THREE.MeshBasicMaterial({
    color: Math.random() * 0xffffff,
  })
);
scene.add(sphere);
Finally, we'll use the copy() method again to place the sphere at the correct position by copying the coordinates from the intersectionPoint variable.
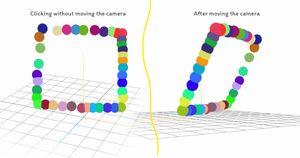
sphere.position.copy(intersectionPoint);If you test this by clicking in a straight line without moving the camera, you'll notice the spheres appear on the same 'imaginary plane'.

If you want your project to match the demo, use an environment map and apply either MeshPhongMaterial, MeshStandardMaterial, or MeshPhysicalMaterial for the meshes.
For smooth zooming, check out this article.
Last Words
And that's it for this tutorial! I hope you found this short read insightful.
Until next time.
