Object Occlusion in Three.js
Published on 22 Jul, 2025 | ~9 min read | Demo
If you’re new to 3D graphics, chances are you’ll hear the term object occlusion sooner or later.
That being said, in this tutorial, we’ll explore what’s behind (pun intended) that fancy term and how to use it to create some cool visual tricks.
Can You Explain What Object Occlusion Is First?
In simple terms, occlusion happens when one object gets in the way of another and hides it from view.
A good example is a hand of cards, where one card is occluding part of another.

That said, in CGI, we can take it a step further by making an invisible object occlude a visible one. Yep, it’s totally doable — and we’ll see how to pull it off and what it looks like in just a moment.
To make this effect work in Three.js, we need to use a couple of properties.
The first one is colorWrite, which makes a mesh invisible by preventing its material from being rendered.
The second property is renderOrder.
In Three.js and WebGL in general, rendering involves a step called the depth test. During this step, the renderer figures out which object is in front and uses its color to render each pixel.
So, let’s say we’ve got a couple of objects we want to display at the same spot.
First, the renderer draws the first object.
Next, it starts rendering the second object. But before drawing each pixel, it checks whether its depth is greater or less than the one already rendered. And by depth, I mean its distance from the camera.
So, if the current object has a greater depth at that pixel, it won’t be rendered. But if its depth is lower, the renderer updates the pixel’s color accordingly.
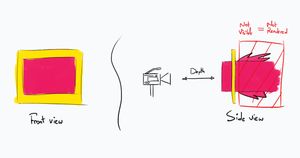
When both have the same depth, you get z-fighting — that glitchy effect where two objects overlap and the renderer can’t decide which one to show.

So, which object gets rendered first? You might be wondering.
By default, the renderer sorts objects based on the order they were created in the code.
However, we can override that behavior by setting the renderOrder property on the objects.
Alright, Enough Talk. Let’s Code!
First and foremost, you need to have a Three.js project up and running.
Alright, now I want you to create three objects lined up in front of each other — or just copy and paste the code below if that’s easier.
import * as THREE from 'three';
import { OrbitControls } from 'three/examples/jsm/controls/OrbitControls.js';
const renderer = new THREE.WebGLRenderer({ antialias: true });
renderer.setSize(window.innerWidth, window.innerHeight);
document.body.appendChild(renderer.domElement);
// Sets the color of the background
renderer.setClearColor(0xfefefe);
const scene = new THREE.Scene();
const camera = new THREE.PerspectiveCamera(
45,
window.innerWidth / window.innerHeight,
0.1,
1000
);
// Sets orbit control to move the camera around
const controls = new OrbitControls(camera, renderer.domElement);
controls.enableDamping = true;
controls.dampingFactor = 0.12;
// Camera positioning
camera.position.set(0, 4, 14);
// Sets a 12 by 12 gird helper
const gridHelper = new THREE.GridHelper(12, 12);
scene.add(gridHelper);
const dLight = new THREE.DirectionalLight(0xffffff, 1);
scene.add(dLight);
dLight.position.set(0, 3, 3);
const ringGeometry = new THREE.RingGeometry(0.75, 2, 64);
const ringMaterial = new THREE.MeshBasicMaterial({
color: 0xed2f75,
side: THREE.DoubleSide,
});
const ring = new THREE.Mesh(ringGeometry, ringMaterial);
scene.add(ring);
ring.position.z = 3;
const boxGeometry = new THREE.BoxGeometry(5, 5);
const boxMaterial = new THREE.MeshBasicMaterial({ color: 0x8431d6 });
const box = new THREE.Mesh(boxGeometry, boxMaterial);
scene.add(box);
box.position.z = 0;
const planeGeometry = new THREE.PlaneGeometry(8, 8);
const planeMaterial = new THREE.MeshBasicMaterial({
color: 0x31d6aa,
side: THREE.DoubleSide,
});
const plane = new THREE.Mesh(planeGeometry, planeMaterial);
scene.add(plane);
plane.position.z = -6;
function animate() {
controls.update();
renderer.render(scene, camera);
}
renderer.setAnimationLoop(animate);
window.addEventListener('resize', function () {
camera.aspect = window.innerWidth / window.innerHeight;
camera.updateProjectionMatrix();
renderer.setSize(window.innerWidth, window.innerHeight);
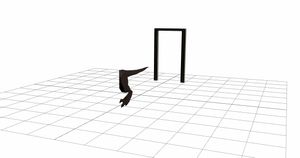
});Let’s omit the ring’s material from rendering and see what happens.
ring.material.colorWrite = false;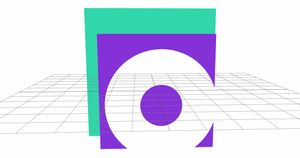
See how it looks like a clipping mask?
That happens because the ring got rendered first and took the scene’s colors before the other two objects showed up behind it.
Then, when it was their turn to be rendered, they failed the depth test because they were behind the ring (farther from the camera).
That said, when you turn the camera, they fully appear because this time they pass the depth test by being closer to the camera than the ring.
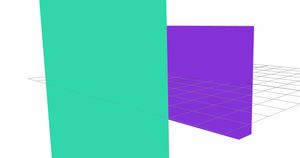
Now, let’s say we want the ring to occlude only the purple box.
The first and most obvious method is to change the order in which the objects are created: start with the plane, then the ring, and finally the box.
const planeGeometry = new THREE.PlaneGeometry(8, 8);
const planeMaterial = new THREE.MeshBasicMaterial({
  color: 0x31d6aa,
  side: THREE.DoubleSide,
});
const plane = new THREE.Mesh(planeGeometry, planeMaterial);
scene.add(plane);
plane.position.z = -6;

const ringGeometry = new THREE.RingGeometry(0.75, 2, 64);
const ringMaterial = new THREE.MeshBasicMaterial({
  color: 0xed2f75,
  side: THREE.DoubleSide,
});
const ring = new THREE.Mesh(ringGeometry, ringMaterial);
scene.add(ring);
ring.position.z = 3;

const boxGeometry = new THREE.BoxGeometry(5, 5);
const boxMaterial = new THREE.MeshBasicMaterial({ color: 0x8431d6 });
const box = new THREE.Mesh(boxGeometry, boxMaterial);
scene.add(box);
box.position.z = 0;

ring.material.colorWrite = false;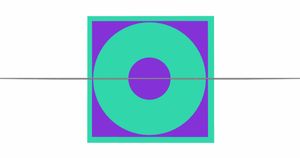
The second method is to use the renderOrder property.
So let’s restore the object creation order to how it was before.
const ringGeometry = new THREE.RingGeometry(0.75, 2, 64);
const ringMaterial = new THREE.MeshBasicMaterial({
  color: 0xed2f75,
  side: THREE.DoubleSide,
});
const ring = new THREE.Mesh(ringGeometry, ringMaterial);
scene.add(ring);
ring.position.z = 3;

const boxGeometry = new THREE.BoxGeometry(5, 5);
const boxMaterial = new THREE.MeshBasicMaterial({ color: 0x8431d6 });
const box = new THREE.Mesh(boxGeometry, boxMaterial);
scene.add(box);
box.position.z = 0;

const planeGeometry = new THREE.PlaneGeometry(8, 8);
const planeMaterial = new THREE.MeshBasicMaterial({
  color: 0x31d6aa,
  side: THREE.DoubleSide,
});
const plane = new THREE.Mesh(planeGeometry, planeMaterial);
scene.add(plane);
plane.position.z = -6;
Next, we’ll update the renderOrder values of the objects.
plane.renderOrder = 0;
ring.renderOrder = 1;
box.renderOrder = 2;Note: The object with the lower renderOrder is rendered first.
Let’s Do an Exercise
Alright, let’s kick things off with a basic project that includes a few models — no object occlusion for now.
Note: you can find the models in the links provided in the resources section below.
import * as THREE from 'three';
import { OrbitControls } from 'three/examples/jsm/controls/OrbitControls.js';
import { GLTFLoader } from 'three/examples/jsm/loaders/GLTFLoader';
import * as SkeletonUtils from 'three/examples/jsm/utils/SkeletonUtils';

const renderer = new THREE.WebGLRenderer({ antialias: true });
renderer.setSize(window.innerWidth, window.innerHeight);
document.body.appendChild(renderer.domElement);

// Sets the color of the background
renderer.setClearColor(0xfefefe);

const scene = new THREE.Scene();
const camera = new THREE.PerspectiveCamera(
  45,
  window.innerWidth / window.innerHeight,
  0.1,
  1000
);

// Sets orbit control to move the camera around
const controls = new OrbitControls(camera, renderer.domElement);
controls.enableDamping = true;
controls.dampingFactor = 0.12;

// Camera positioning
camera.position.set(0, 4, 14);

// Sets a 12 by 12 gird helper
const gridHelper = new THREE.GridHelper(12, 12);
scene.add(gridHelper);

const dLight = new THREE.DirectionalLight(0xffffff, 1);

scene.add(dLight);
dLight.position.set(0, 3, 3);

const loader = new GLTFLoader();

loader.load('./door.glb', function (glb) {
  const model = glb.scene;
  scene.add(model);
  model.scale.set(0.004, 0.004, 0.004);
  model.position.x = -4;

  const modelClone = SkeletonUtils.clone(model);
  scene.add(modelClone);
  modelClone.position.x = 4;
});

let mixer1;
let model1;

loader.load('./Orc.gltf', function (gltf) {
  model1 = gltf.scene;
  scene.add(model1);
  model1.scale.set(0.6, 0.6, 0.6);
  model1.position.x = 6;
  model1.rotation.y = -Math.PI / 2;

  const animations = gltf.animations;
  mixer1 = new THREE.AnimationMixer(model1);
  const clip = THREE.AnimationClip.findByName(animations, 'Run');
  const action = mixer1.clipAction(clip);
  action.play();
});

let mixer2;
let model2;
loader.load('./Chicken.gltf', function (gltf) {
  model2 = gltf.scene;
  scene.add(model2);
  model2.scale.set(0.4, 0.4, 0.4);
  model2.position.x = 0;
  model2.rotation.y = -Math.PI / 2;

  const animations = gltf.animations;
  mixer2 = new THREE.AnimationMixer(model2);
  const clip = THREE.AnimationClip.findByName(animations, 'Walk');
  const action = mixer2.clipAction(clip);
  action.play();
});

let mixer3;
let model3;
loader.load('./Velociraptor.glb', function (gltf) {
  model3 = gltf.scene;
  scene.add(model3);
  model3.scale.set(0.4, 0.4, 0.4);
  model3.position.x = -8;
  model3.rotation.y = -Math.PI / 2;

  const animations = gltf.animations;
  mixer3 = new THREE.AnimationMixer(model3);
  const clip = THREE.AnimationClip.findByName(animations, 'Velociraptor_Run');
  const action = mixer3.clipAction(clip);
  action.play();
});

const clock = new THREE.Clock();

function animate() {
  controls.update();

  if (mixer1 && mixer2 && mixer3) {
    const delta = clock.getDelta();
    mixer1.update(delta);
    mixer2.update(delta);
    mixer3.update(delta);
  }

  renderer.render(scene, camera);
}

renderer.setAnimationLoop(animate);

window.addEventListener('resize', function () {
  camera.aspect = window.innerWidth / window.innerHeight;
  camera.updateProjectionMatrix();
  renderer.setSize(window.innerWidth, window.innerHeight);
});
To get the characters from one side to the other, we’ll just keep decreasing their position.x over time.
if (mixer1 && mixer2 && mixer3) {
    const delta = clock.getDelta();
    mixer1.update(delta);
    mixer2.update(delta);
    mixer3.update(delta);

    model1.position.x -= 0.03;
    model2.position.x -= 0.03;
    model3.position.x -= 0.03;
  }
We’ll also have them snap back to the far right when they hit a certain position.x, so the animation loops.
if (mixer1 && mixer2 && mixer3) {
    const delta = clock.getDelta();
    mixer1.update(delta);
    mixer2.update(delta);
    mixer3.update(delta);

    model1.position.x -= 0.03;
    model2.position.x -= 0.03;
    model3.position.x -= 0.03;

    if (model1.position.x < -10) model1.position.x = 10;
    if (model2.position.x < -10) model2.position.x = 10;
    if (model3.position.x < -10) model3.position.x = 10;
  }
With that done, it’s time to add the occlusion.
To create the illusion that the characters are going through portals, we’ll place boxes on the left side of the left door and the right side of the right door.
const a = new THREE.Mesh(
  new THREE.BoxGeometry(8, 4, 2.2),
  new THREE.MeshBasicMaterial()
);
scene.add(a);
a.position.set(-8.09, 2, 0);

a.material.colorWrite = false;

const b = a.clone();
scene.add(b);
b.position.set(8.09, 2, 0);
Almost there — but notice that the boxes are also occluding the doors, which isn’t exactly what we want.
To fix that, we’re going to adjust the renderOrder of our meshes.
First thing, let’s set the boxes’ renderOrder to 1.
a.renderOrder = 1;
b.renderOrder = 1;
Because the other models have a default renderOrder of 0, the boxes don’t affect them anymore.
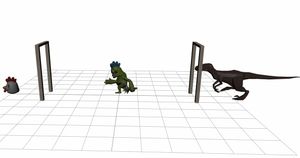
To fix it, we just need to bump up the renderOrder of the meshes that make up the models.
Want to know how to loop through a model’s meshes? Check out this article.
loader.load('./Orc.gltf', function (gltf) {
  // ...

  model1.traverse(function (node) {
    if (node.isMesh) node.renderOrder = 2;
  });
});loader.load('./Chicken.gltf', function (gltf) {
// ...
model2.traverse(function (node) {
if (node.isMesh) node.renderOrder = 2;
});
});loader.load('./Velociraptor.glb', function (gltf) {
// ...
model3.traverse(function (node) {
if (node.isMesh) node.renderOrder = 2;
});
});Wrap Up
That’s a wrap!
Hopefully, this was a fun little discovery, and you’ll use it to build something awesome — maybe even more than just a chicken running from a dinosaur.
Happy coding!

Credits and Resources
- Transparent objects in Three.js
- THREE.js rendering order
- Bathroom Door Frame by RubaQewar
- Ultimate Monsters
- Animated Dinosaur Pack