Pixi.js Tutorial for Complete Beginners
Published on 11 Jul, 2024 | ~31 min read
In this tutorial, we will explore a variety of the fundamental aspects of Pixi.js, including creating and adding components to the canvas, implementing animations, capturing pointer events, and using the Assets package to manage assets such as spritesheets, fonts, and JSON files, among many other features.
Before we dive in, I want to emphasize that Pixi.js leverages WebGL/WebGPU for high-performance 2D rendering in web applications. So if you're interested in understanding the connection between WebGL/WebGPU and libraries like Pixi.js, Three.js, and Babylon.js, I recommend checking out this brief overview.
Setting Up the Project
First things first, create a new folder and open it in your code editor.
Next, open a new terminal by selecting Terminal in the menu bar (assuming you're using VSCode), then choose New Terminal. After that, type the following command: npm init -y.
Now, we have two methods for using Pixi.js. The first method is to include the library via a CDN link. The second method is to install it locally and use a bundler to import it into the project.
Personally, I prefer the second option, so that’s the one I will choose for this tutorial.
That said, we'll use Vite as our bundler. To install it, enter the following command in your terminal: npm install vite --save-dev.
Next, we need to install Pixi.js. To do that, run this command: npm install pixi.js.
The next step is to create an index.html file, which will be watched by the bundler. This means that whenever we update index.html or any file linked to it, Vite will automatically refresh the page to show us the result of our code updates.
With that done, now run this command: npx vite.
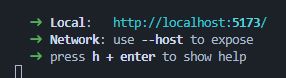
Now, Ctrl + left-click on the link generated by Vite. You'll see a "not so welcoming" blank page, but don't worry; this is where we'll see all the work we'll be doing throughout this tutorial.
Finally, create a JavaScript file named main.js and link it in the index.html file.
Make sure to add the type="module" attribute to the <script> tag linking to the main.js file.
<!DOCTYPE html>
<html lang="en">
<head>
    <meta charset="UTF-8">
    <meta name="viewport" content="width=device-width, initial-scale=1.0">
    <title>Pixi.js Tutorial</title>
</head>
<body>
    <script type="module" src="/main.js"></script>
</body>
</html>
Creating and Preparing the Application
The first thing we're going to do is add an asynchronous IIFE (Immediately Invoked Function Expression). This function will encapsulate our entire application.
main.js:
(async() => {
    // Stuff to do
})();
When we refer to "Application" in the context of Pixi.js, we're talking about the area managed by Pixi.js within the HTML page. Specifically, it's represented as a <canvas> element.
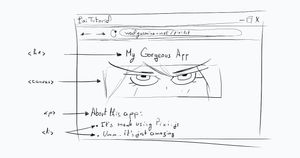
To set up an application, we won't be creating a <canvas> manually; instead, we will follow these steps:
- Import the
Applicationclass. - Create an instance of it.
- Intialize the application.
- Add the application's canvas to the DOM body.
// Step 1
import {Application} from 'pixi.js';
(async() => {
// Step 2
const app = new Application();
// Step 3
await app.init();
// Step 4
document.body.appendChild(app.canvas);
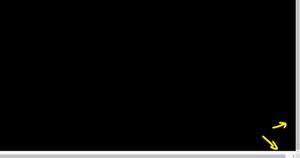
})();Now, if you save and take a look at the page, you'll see that a black rectangle has been added. That's your first Pixi.js application. Kudos!
To make some adjustments to our application, we need to pass a configuration object to the init() method.
For example, if we want to change the size of the canvas, we need to set the desired values for the width and height properties.
await app.init({
    width: 1000,
    height: 500
});
To make the application occupy the entire window, we can do this:
await app.init({
    width: window.innerWidth,
    height: window.innerHeight
});
Alternatively, we can simply use the resizeTo property.
await app.init({
    // width: window.innerWidth,
    // height: window.innerHeight
    resizeTo: window
});
The resizeTo property is incredibly powerful. As its name suggests, it doesn't only make the application occupy the full space of the document, but it also allows the canvas to fit into any specified element.
backgroundAlpha is another useful property as it sets the opacity of the application's background.
await app.init({
    resizeTo: window,
    backgroundAlpha: 0.5
});
We can change the background color using the backgroundColor property.
await app.init({
    resizeTo: window,
    backgroundAlpha: 0.5,
    backgroundColor: 0xffea00
});
We also have the antialias property, which smooths the edges of the application's components. It's deactivated by default for better performance.
One thing you might have noticed after making the application take up the full screen size is the additional scrolling white space vertically and horizontally.
To fix this, we need to set the position of the canvas to absolute.
await app.init({
    resizeTo: window
});

app.canvas.style.position = 'absolute';
Next, ensure the margin of the <body> element is set to 0.
<!DOCTYPE html>
<html lang="en">
<head>
    <meta charset="UTF-8">
    <meta name="viewport" content="width=device-width, initial-scale=1.0">
    <title>Pixi.js Tutorial</title>
    <style>
      body {
        margin: 0
      }
    </style>
</head>
<body>
    <script type="module" src="/main.js"></script>
</body>
</html>
Graphics and Text
Graphics
The Graphics class in Pixi.js offers a variety of shapes for drawing on the canvas and for other purposes like masking. However, since we're in the early stages of learning, we'll focus on using it to draw some basic geometric shapes.
To create a shape, we'll need to create an instance of the Graphics class. Then, we'll transform that instance into the desired shape.
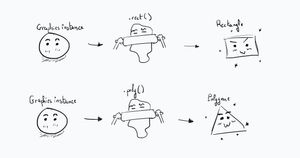
So, let's create a rectangle. To do that, we'll use the following lines of code.
import {Application, Graphics} from 'pixi.js';

(async() => {
  const app = new Application();
  await app.init({
    resizeTo: window,
    antialias: true
  });

  app.canvas.style.position = 'absolute';
  document.body.appendChild(app.canvas);

  const rectangle = new Graphics();

  rectangle.rect(200, 200, 200, 180);

  app.stage.addChild(rectangle);

})();
The rect() method transforms the Graphics instance into a rectangle. Its first two arguments are the x and y coordinates of the rectangle's top-left corner, while the other two are the width and height.
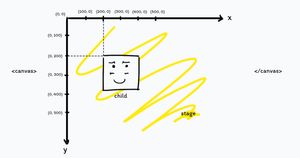
One of the most fundamental concepts you must understand in Pixi.js is the scene graph.
The scene graph represents the relationship between all the components of an application. It's similar to the DOM in HTML, where the <html> element is the root of the document. Meanwhile, the rest of the elements form the rest of the tree structure, with each node potentially having child nodes. In Pixi.js, the root of the application is the stage.
You can think of the Application instance as the real estate within the HTML page, or better yet, as a wrapper for the real application. On the other hand, consider the stage as the actual body of the application.
To introduce shapes or any other type of component, as we'll see later, we'll need to use the addChild() method.
Now, back to our rectangle. You might be confused why it didn't appear even though you copy-pasted the snippet above, right?
Well, even though we created and added the rectangle to the stage, we didn't specify how the rectangle should appear, specifically referring to filling options like color.
To do that, we need to call the fill() method and pass a configuration object as an argument.
const rectangle = new Graphics();

rectangle.rect(200, 200, 100, 150);

rectangle.fill({
    // Sets the color
    color: 0xffea00,
    // Sets the opacity
    alpha: 0.5
});

app.stage.addChild(rectangle);
Additionally, we can use the stroke() method to add a stroke to the rectangle.
const rectangle = new Graphics();

rectangle.rect(200, 200, 100, 150);

rectangle.fill({
    color: 0xffea00,
    alpha: 0.5
});

rectangle.stroke({
    // Sets the thickness of the stroke
    width: 8,
    color: 0x00ff00
});

app.stage.addChild(rectangle);
We can make the code more concise by chaining the methods.
const rectangle = new Graphics()
  .rect(200, 200, 100, 150)
  .fill({
    color: 0xffea00,
    alpha: 0.8
  })
  .stroke({
    width: 8,
    color: 0x00ff00
  });

app.stage.addChild(rectangle);
Important: Make sure you call the shape function before you call fill() or stroke(). Reversing the order will cause the shape to fail to render.
There are various shapes to choose from, and here are a few examples:
const rectangle = new Graphics()
  .rect(200, 200, 100, 150)
  .fill({
    color: 0xffea00,
    alpha: 0.8
  })
  .stroke({
    width: 8,
    color: 0x00ff00
  });
  app.stage.addChild(rectangle);

  const line = new Graphics()
  .moveTo(100, 700)
  .lineTo(900, 400)
  .stroke({
    color: 0x55faff
  });
  app.stage.addChild(line);

  const triangle = new Graphics()
  .poly([
    600, 50,
    720, 400,
    420, 400
  ])
  .fill({
    color: 0x8f5ff2
  })
  .stroke({
    color: 0xf5fa2f
  });
  app.stage.addChild(triangle);

  const star = new Graphics()
  .star(1000, 250, 12, 80, 2)
  .fill({
    color: 0xffffff
  })
  app.stage.addChild(star);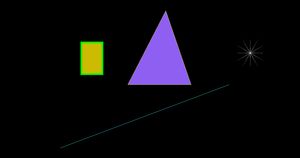
Text
There are three methods for adding text to a Pixi.js application.
The first method, which is the simplest, is to place text content elements such as <h1> and <p> on top of the canvas using CSS layout techniques.
The second and more complex method is using BitmapText.
The third method, which is what I'll focus on in this tutorial, is using the Text object.
It's important to mention that complexity is not the criterion for choosing which method to use for text; rather, it depends on the use case. For more information about this, check out this page.
To introduce some text to the stage, we first need to import the Text class.
import {Application, Graphics, Text} from 'pixi.js';Next, we'll instantiate that class and pass a configuration object to the constructor, which contains the text we want to display.
const text = new Text({
  text: 'Hello Pixi'
});

app.stage.addChild(text);
That should be enough to print some basic text on the canvas. However, if you don't see your text, try changing the background color to something other than black, as the default text color is black.
Speaking of text color, we have a wide variety of styles to apply to the text. These include font family, weight, size, color, shadows, stroke, and more.
const text = new Text({
  text: 'Hello Pixi',
  style: {
    // `fill` is the same as the `color` property
    // in CSS.
    fill: '#ffffff',
    // Make sure you have the font is installed
    // before you use it.
    fontFamily: 'Montserrat Medium',
    fontSize: 72,
    fontStyle: 'italic',
    fontWeight: 'bold',
    stroke: { color: '#4a1850', width: 5 },
    dropShadow: {
        color: '#4a1850',
        blur: 4,
        angle: Math.PI / 6,
        distance: 6,
    },
    wordWrap: true,
    wordWrapWidth: 440
  }
});

app.stage.addChild(text);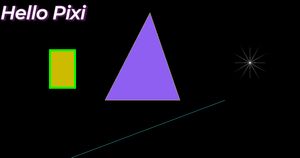
In many cases, you might want to use a font that is not installed by default on your local machine. While you can solve this by installing the font yourself, it's not practical to ask future users of your application to install specific fonts to be able to use it.
That said, what you want to do is link to the font in your HTML code or import it using CSS.
Note: Although these two methods work, they might not be the best way to load fonts. Actually, using the Assets package is the optimal approach. We'll see why later in this article.
Including the font using HTML:
<!-- Embed code in the <head> of your html -->
<link rel="preconnect" href="https://fonts.googleapis.com">
<link rel="preconnect" href="https://fonts.gstatic.com" crossorigin>
<link href="https://fonts.googleapis.com/css2?family=Playwrite+US+Trad:wght@100..400&display=swap" rel="stylesheet">
Including the font using CSS:
/* Make sure this line is at the very top
of your CSS code base. */
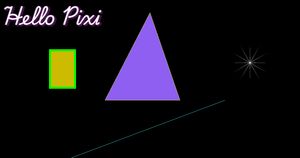
@import url('https://fonts.googleapis.com/css2?family=Playwrite+US+Trad:wght@100..400&display=swap');const text = new Text({
text: 'Hello Pixi',
style: {
fill: '#ffffff',
// fontFamily: 'Montserrat Medium',
fontFamily: 'Playwrite US Trad',
fontSize: 72,
// fontStyle: 'italic',
// fontWeight: 'bold',
stroke: { color: '#4a1850', width: 5 },
dropShadow: {
color: '#4a1850',
blur: 4,
angle: Math.PI / 6,
distance: 6,
},
wordWrap: true,
wordWrapWidth: 440
}
});
Your application probably won't have just a single block of text, meaning you'll need to create a Text object for each text block.
But let's say all those text blocks have the same style. Does that mean you have to write a large amount of code with all those same styling properties for each one?
Well, absolutely not!
Instead of passing the styling properties directly in the Text configuration object, we can use an instance of TextStyle, which functions similarly to a class in CSS.
First, we need to import TextStyle.
import {Application, Graphics, Text, TextStyle} from 'pixi.js';Next, we'll create a TextStyle instance and pass an object with the style properties as an argument to the constructor.
const style = new TextStyle({
  fill: '#ffffff',
  fontFamily: 'Playwrite US Trad',
  fontSize: 72,
  stroke: { color: '#4a1850', width: 5 },
  dropShadow: {
      color: '#4a1850',
      blur: 4,
      angle: Math.PI / 6,
      distance: 6,
  },
  wordWrap: true,
  wordWrapWidth: 440
});
Finally, we'll pass that Style object to the configuration object of the Text object.
const text = new Text({
  text: 'Hello Pixi',
  style
});
Tip: The official Pixi.js website offers a WYSIWYG interface to help you generate TextStyle objects easily.
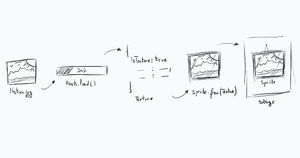
Images, Textures, and Sprites
Displaying an image in a Pixi.js application involves a few steps.
- Loading an image. In this step, we're essentially storing the data of an image into a
Textureobject. This process involves using theAssetspackage, which has a dedicated section in this article. - Creating a sprite. We can't add a
Texturedirectly to the stage; we need to transform it into aSpriteobject first. - Adding the sprite to the stage. Once we have created the
Spriteobject from theTexture, we add it to the stage using theaddChild()method.
Navigate to your project's directory and create a folder named public. Inside public, create another folder named images and place an image file inside it.
Next, import the Assets and Sprite classes.
import {
  Application,
  Graphics,
  Text,
  TextStyle,
  Assets,
  Sprite
} from 'pixi.js';
Next, add these few lines of code:
// Step 1
const texture = await Assets.load('images/logo.svg');

// Step 2
const sprite = Sprite.from(texture);
// Or
const sprite2 = new Sprite(texture);

// Step 3
app.stage.addChild(sprite);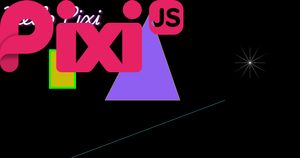
Geometric Transformations
We can set the size of a component using the width and height properties.
sprite.width = 200;
sprite.height = 400;
We can achieve the same result using the scale property. The difference between the two methods is that with the first, we use absolute values in pixels, whereas with scale, we use relative values.
// Sets the width to 0.5 of its original width
sprite.scale.x = 0.5;
// Doubles the height of the sprite
sprite.scale.y = 2;
For more concise code, we can use the scale.set() method.
// Doubles the height of the sprite
// while maintaining the height
sprite.scale.set(2, 1);
To apply translations, we can use the x and y properties, or the position.x and position.y properties. Another option is to call the position.set() method for more concise code.
text.x = 1500;
text.y = 100;

// Or
text.position.x = 1500;
text.position.y = 100;

// Or
text.position.set(1300, 520);
Skew is another geometric transformation that we can apply using skew.x, skew.y, and skew.set().
sprite.skew.x = Math.PI / 4;
// Same as
sprite.skew.set(Math.PI / 4, 0);
To rotate a component, we need to use the rotation property.
sprite.rotation = Math.PI / 4;If you applied that, you might find the result confusing, don't you think?
Well, the reason behind that is that by default, the center of rotation is set to the top-left corner of a component instead of its center.
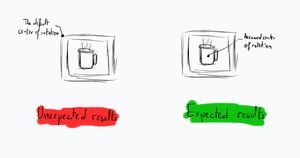
To better visualize the issue, here's an animated example: Animated Demo.
To change the position of the rotation center, we have two options. The first is to set an absolute value to the pivot property. Alternatively, we can set a relative value to the anchor property.
Note: The anchor property is available only for Sprite objects.
sprite.pivot.x = 100;
sprite.pivot.y = 200;

//Or
sprite.pivot.set(100, 200);
Or
sprite.anchor.x = 0.5;
sprite.anchor.y = 0.5;
//Or
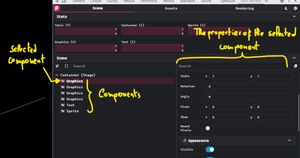
sprite.anchor.set(0.5, 0.5);PixiJS DevTools
PixiJS DevTools is a Chrome extension designed to help you debug your Pixi.js applications. Although it's still in development, it looks very promising.
To get a taste of what this extension is capable of, follow these steps.
First, stop the Vite server by pressing Ctrl + C, then type y and hit Enter. Next, execute the following command: npm install @pixi/devtools --save-dev.
Once installed, restart the server, open your code editor, and import the module as follows.
import {initDevtools} from '@pixi/devtools';Next, initiate the devtools with your application.
initDevtools({
  app
});
full snippet:
import {Application} from 'pixi.js';
import {initDevtools} from '@pixi/devtools';

(async() => {
  const app = new Application();
  await app.init({
    resizeTo: window,
    antialias: true
  });

  initDevtools({
    app,
  });

  app.canvas.style.position = 'absolute';
  document.body.appendChild(app.canvas);

  // The body of the application

})();
Now in Chrome, right-click and select Inspect, or press Ctrl + Shift + I to open the inspector. Then click the double arrows symbol and choose PixiJS DevTools.
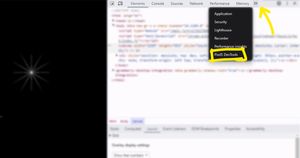
Once opened, you can now test things out and see the changes you make to your stage's components in real time. Pretty cool, huh?
Interaction
Pixi.js offers an event-based system to add interactivity to your applications. This system is similar to traditional DOM event listeners, but it is specifically designed for pointer events.
Pointer events include two types of events: mouse events and touch events.
For example, let's say we want to move a component when it's clicked on.
To do that, we need to call the on() method on that component, pass the event type ('mousedown' or 'pointerdown' in this case), and then pass a callback function specifying what happens when the event is captured.
rectangle.on('pointerdown', moveRectangle);

function moveRectangle() {
  rectangle.position.x -= 10;
  rectangle.position.y += 10;
}
If you tried this and it didn't work, don't worry—it's not supposed to work. But why, you might be asking?
The reason is that, for performance purposes, components are not set to be interactive by default. So unless you explicitly configure a component to be interactive, it won't respond to events.
That being said, to enable interactivity on a component, we need to set its eventMode property to 'static'.
rectangle.eventMode = 'static';Now, if you test this out, the rectangle or sprite you're applying this on should move whenever you click on it.
For a better user experience, you'd probably want to indicate to the user that certain components are interactive by changing the cursor symbol.
To do that, we need to set a valid CSS cursor value to the cursor property of the component.
In our case, to inform the user that the component is clickable, it's appropriate to use the pointer cursor symbol.
rectangle.cursor = 'pointer';So as I mentioned earlier, Pixi.js' interaction system is focused solely on pointer events. If you want to handle keyboard events or other types of events, you'll need to use the classic addEventListener() method provided by JavaScript.
Note that in this scenario, we don't need to set the eventMode property.
Ticker
As you may already know, a video is essentially a sequence of images displayed at a certain frequency. This same principle applies to 2D animations and 3D video games.
For example, say we want to animate a component on a stage so that it moves from the left edge of the canvas to the right. What's going to happen is that the Pixi.js renderer will draw a sequence of images (frames), with the component at a progressively advanced position in each frame.
To achieve this kind of animation in Pixi.js, we need to use the Ticker, which is one of the fundamental components of the library.
A Ticker is simply an object that updates the stage and its components at a certain frame rate (the number of images to be displayed per second).
The frame rate depends on the user's monitor. A commonly used frame rate is 60 frames per second (FPS), which means displaying 60 images per second. However, newer and more capable monitors can support higher frame rates, such as 120 FPS or even 240 FPS.
Let's create a snow effect by rendering white circles at random positions over time. Pretty smart and original, right?
To achieve this, we'll call the add() method from the app.ticker property. This method allows us to register a callback function that defines what actions to perform on each frame update. In our case, we'll use it to continuously create and add white circles (representing snow) to the canvas.
const circle = new Graphics();
app.ticker.add(() => {
  circle.circle(
    // Random x-coordinate
    Math.random() * app.screen.width,
    // Random y-coordinate
    Math.random() * app.screen.height,
    // Circle radius
    5
    )
  .fill({
    color: 0xffffff
  });
  app.stage.addChild(circle);
});The add() method runs the callback function approximately 60 times per second, typically resulting in 60 circles being drawn per second.
app.screen.width and app.screen.height return the width and height of the canvas respectively.
Containers
A Container in Pixi.js is used for masking, filtering, and grouping components.
In this article, we'll focus on the third use case. Therefore, you can consider a Container as a grouping object for now.
To group two or more components within a Container, we first need to create the Container and then add it to the stage using the addChild() method.
const warriorsContainer = new Container();
app.stage.addChild(warriorsContainer);
Next, after creating the components, we need to add them to the Container instead of adding them directly to the stage.
const girlTexture = await Assets.load('/images/girl_warrior.png');
const girlSprite = Sprite.from(girlTexture);
warriorsContainer.addChild(girlSprite);

const guyTexture = await Assets.load('/images/guy_warrior.png');
const guySprite = Sprite.from(guyTexture);
warriorsContainer.addChild(guySprite);
Doing that, you should now have both of your sprites on top of each other since we didn't set their positions. Note that the container's size will match the size of the largest sprite.
That being said, if we reposition one of the sprites, the container's size will adjust to include the translation distance of the sprite.

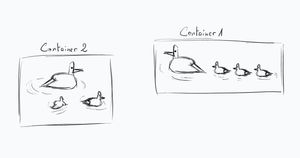
Speaking of positions, Containers have their own coordinate systems. This means the position of a component within one container is entirely different from the position of a component in another container or directly on the stage, even if they overlap.
To better understand this, create a container and position it at (200, 200). Add a sprite to the container, then log the sprite's position.
const container = new Container();
app.stage.addChild(container);
container.position.set(200, 200);

const texture = await Assets.load('/images/girl_warrior.png');
const sprite = Sprite.from(texture);
container.addChild(sprite);

console.log(`x: ${sprite.x}, y: ${sprite.y}`);
I'm no magician but I'm sure you got x: 0, y:0, but why?
When you log the position of the sprite within the container, you'll likely see its position relative to the container's local coordinates, not the global stage coordinates.
If the sprite's position is logged as { x: 0, y: 0 }, it indicates that the sprite is positioned at the top-left corner of the container's local coordinate system.
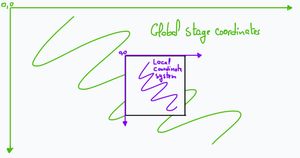
That said, we're still able to get the position of the sprite relative to the global stage coordinates and that's by using the getGlobalPosition() method.
const x = sprite.getGlobalPosition().x;
const y = sprite.getGlobalPosition().y;
// x:200, y:200
console.log(`x: ${x}, y: ${y}`);
Assets
As stated in the documentation, Assets is a resource management solution that downloads, caches, and parses your assets into something you can use.
In simple terms, Assets functions as a repository for your assets (e.g., .json, .ttf, .jpg, .svg, .mp4). For instance, if you need a texture for a sprite, you must first 'store' that .jpg file in Assets before applying it to the sprite.
We have a couple of ways to use the Assets package. The first method involves using the async/await keywords, which is the approach I have been using and will continue to use throughout this tutorial.
// Don't forget to import the Assets module!
const texture = await Assets.load('/images/girl_warrior.png');

const sprite = Sprite.from(texture);
app.stage.addChild(sprite);
The second method involves using promises.
// Don't forget to import the Assets module!
// Start loading right away and create a promise
const texturePromise = Assets.load('/images/guy_warrior.png');

// When the promise resolves, we have the texture
texturePromise.then((resolvedTexture) =>
{
  const sprite2 = Sprite.from(resolvedTexture);
  app.stage.addChild(sprite2);
});
The amazing thing about the Assets package is that it utilizes the browser's cache. For instance, if you load a font, it will be cached after the first load. This means it won't need to be reloaded on subsequent visits, resulting in a faster application hence a better user experience.
That brings me back to the font inclusion methods I mentioned earlier. While both methods seem to work fine, there's an issue.
The problem with those methods is that if the creation process of the text object starts before the font download is completed, the font won't be applied the first time the app runs. This means the text will appear with a different font initially. However, the issue will be resolved when you refresh the page since the font will then be cached by the browser.
So you have two solutions. The first is to instruct your application's users to refresh the page if the text appears "incorrect", which is not a very smart solution, to say the least.
The second and ideal solution is to display the text correctly from the start, which can be achieved by loading the font using Assets.
const font = await Assets.load('/GreatVibes-Regular.ttf');
// This will not be executed unless the font is loaded.
const text = new Text({
text: 'Hello Pixi',
style: {
fill: '#ffffff',
// font.family contains the name of the font
fontFamily: font.family,
fontSize: 72
}
});
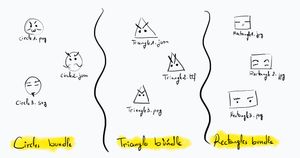
app.stage.addChild(text);Another cool feature provided by the Assets package is that you can load multiple files simultaneously and organize them during the process. This introduces the concept of bundles.
A bundle is simply a collection of assets you want to load together.
To create a bundle we need to call the addBundle() method from Assets which takes 2 arguments, a string as an identifier to the bundle, and an object of the assets you want to load.
Assets.addBundle('ninjas', {
  girl_ninja: '/images/girl_ninja.png',
  guy_ninja: '/images/girl_ninja.png'
});

Assets.addBundle('warriors', {
  girl_warrior: '/images/girl_warrior.png',
  guy_warrior: '/images/guy_warrior.png'
});
At this point, we have prepared the assets. To load them, we use the loadBundle() method and pass the desired bundle identifier as an argument.
const ninjaAssets = await Assets.loadBundle('ninjas');Now to use one of these assets, we just need to do the following:
// ninjaAssets.girl_ninja contains the texture.
const sprite = Sprite.from(ninjaAssets.girl_ninja);
app.stage.addChild(sprite);
Now, as your project grows, so does the list of assets you need to load. This can lead to a large amount of clutter in your codebase, which can be quite cumbersome to manage, and this is when manifest files come in handy.
A manifest file is a .json that contains the lists of bundles/assets you want to load.
Example of a manifest.json file:
{
  "bundles": [
    {
        "name": "ninjas",
        "assets": [
            {
                "alias": "guy_ninja",
                "src": "/images/guy_ninja.png"
            },
            {
                "alias": "girl_ninja",
                "src": "/images/girl_ninja.png"
            }
        ]
    },
    {
        "name": "warriors",
        "assets": [
            {
                "alias": "guy_warrior",
                "src": "/images/guy_warrior.png"
            },
            {
                "alias": "girl_warrior",
                "src": "/images/girl_warrior.png"
            }
        ]
    }
  ]
}
Now within our codebase we need to initialize the Assets with the manifest file we just created.
await Assets.init({manifest: '/manifest.json'});Then, we follow the same process as before to load a specific bundle and utilize the textures or any other assets from it.
const warriorAssets = await Assets.loadBundle('warriors');

const sprite = Sprite.from(warriorAssets.guy_warrior);
app.stage.addChild(sprite);
Spritesheets
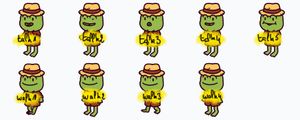
A texture atlas, commonly known as a spritesheet, is where the real fun begins!
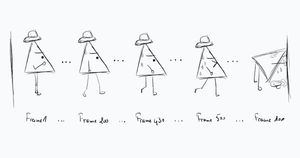
Essentially, a spritesheet contains a character's animation as a series of frames.
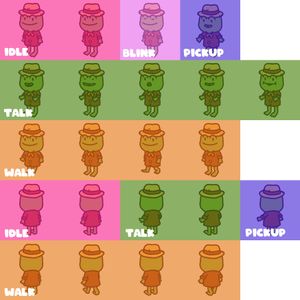
So, let's say we want to turn the spritesheet below into an animated character.
First things first, we need to collect the data of the spritesheet into an object.
// Create object to store sprite sheet data
const atlasData = {
  frames: {
    talk1: {
      frame: {x: 0, y:0, w:350, h:350},
      sourceSize: {w: 350, h: 350},
      spriteSourceSize: {x: 0, y: 0, w: 350, h: 350}
    },
    talk2: {
      frame: {x: 350, y:0, w:350, h:350},
      sourceSize: {w: 350, h: 350},
      spriteSourceSize: {x: 0, y: 0, w: 350, h: 350}
    },
    talk3: {
      frame: {x: 700, y:0, w:350, h:350 },
      sourceSize: {w: 350, h: 350},
      spriteSourceSize: {x: 0, y: 0, w: 350, h: 350}
    },
    talk4: {
      frame: {x: 1050, y:0, w:350, h:350},
      sourceSize: {w: 350, h: 350},
      spriteSourceSize: {x: 0, y: 0, w: 350, h: 350}
    },
    talk5: {
      frame: {x: 1400, y:0, w:350, h:350},
      sourceSize: {w: 350, h: 350},
      spriteSourceSize: {x: 0, y: 0, w: 350, h: 350}
    },
    walk1: {
      frame: {x: 0, y:350, w:350, h:350},
      sourceSize: {w: 350, h: 350},
      spriteSourceSize: {x: 0, y: 0, w: 350, h: 350}
    },
    walk2: {
      frame: {x: 350, y:350, w:350, h:350},
      sourceSize: {w: 350, h: 350},
      spriteSourceSize: {x: 0, y: 0, w: 350, h: 350}
    },
    walk3: {
      frame: {x: 700, y:350, w:350, h:350 },
      sourceSize: {w: 350, h: 350},
      spriteSourceSize: {x: 0, y: 0, w: 350, h: 350}
    },
    walk4: {
      frame: {x: 1050, y:350, w:350, h:350},
      sourceSize: {w: 350, h: 350},
      spriteSourceSize: {x: 0, y: 0, w: 350, h: 350}
    }
  },
  meta: {
    image: '/images/frog.png',
    size: {w: 1750, h: 700}
  },
  animations: {
    // Array of frames by name
    talk: ['talk1', 'talk2', 'talk3', 'talk4', 'talk5'],
    walk: ['walk1', 'walk2', 'walk3', 'walk4']
  }
}
The frames property contains the information about each frame of the spritesheet, organized as an object.
By the way, the keys of the frames, like talk1, talk2, walk1, etc., are arbitrary, unlike the other keys.
With the frame property, we specify the position of the frame within the spritesheet along with its width and height.
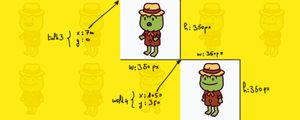
Sometimes you get a spritesheet where some frames are surrounded by empty space, similar to padding in CSS.
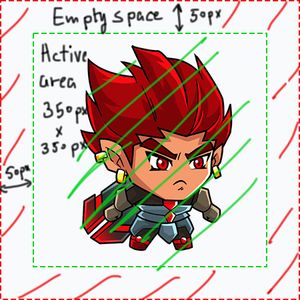
To trim that empty space, we use the spriteSourceSize property. Here, x and y represent the coordinates of the active space, and w and h denote the width and height of the active space.
Keep in mind that all these values are relative to the frame itself, not the entire spritesheet.
Example:
const exampleData = {
  frames: {
    idle2: {
      frame: {x: 300, y: 300, w: 450, h: 450},
      sourceSize: {w: 550, h: 550},
      spriteSourceSize: {x: 50, y: 50, w: 450, h: 450}
    }
  }
}- In the
frameproperty, we define a frame positioned at x: 300, y: 300 with a width and height of 450 pixels. - The
sourceSizeproperty represents the size of the frame, including the empty space. - The
spriteSourceSizeproperty defines the position, width, and height of the active area within a frame. Again, the values are relative to the frame. So x: 50 y:50 means 50 pixels of distance from the top left corner of the frame, not the spritesheet entirely. 450px represents both the width and height of the active area.
Now, although we've spent a few minutes learning about the sourceSize and spriteSourceSize properties, you usually won't need to spend extra time on mental calculations to set them, as spritesheets typically come without significant padding, if any at all.
So, what you'll do is simply pass the same width and height to all three properties, and set x and y to 0 in the spriteSourceSize property.
The meta property defines the metadata of the spritesheet such as the source the path, size, scale, format.
Finally, the animations property contains the list of frames that comprise the animations.
Now that we've made our preparations, it's time to load the spritesheet as a texture.
const texture = await Assets.load(atlasData.meta.image);Next, we need to import the Spritesheet class.
Then, we'll create an instance of that class. The constructor method takes two arguments: the texture and the object we created earlier.
const spritesheet = new Spritesheet(
  texture,
  atlasData
);
Now, to apply all the configuration we defined in the atlasData object, we'll call the parse() method on the Spritesheet instance.
await spritesheet.parse();With that done, it's now time to create a sprite. This time, we need a special type of sprite because it's animated.
So first, let's import the AnimatedSprite class.
import {
  Application,
  Assets,
  Spritesheet,
  AnimatedSprite
} from 'pixi.js';
Next, we'll create an instance of it and pass one of the animations to the constructor.
const animatedSprite =
new AnimatedSprite(spritesheet.animations.talk);
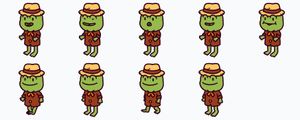
app.stage.addChild(animatedSprite);At this point, you should be able to see your sprite, although it won't be animated yet.
To animate it, simply call the play() method. Voilà!
animatedSprite.play();You might find that the animations are very fast, as I did. To adjust the speed, try setting different values to the animationSpeed property until you find the perfect speed.
animatedSprite.animationSpeed = 0.13;Tiling Sprites
A tiling sprite in Pixi.js is a special type of sprite used to create infinite backgrounds.
To create a tiling sprite, import the TilingSprite class.
Next, we'll load a texture, pass it to the TilingSprite instance's configuration object, and add it to the scene.
Tip: Ensure the texture you use is seamless, meaning that when you place two copies of the same texture next to each other, they appear as a single, continuous image.
const texture = await Assets.load('/images/guy_warrior.png');

const bgSprite = new TilingSprite({
  texture
});

app.stage.addChild(bgSprite);
The size of the tiling sprite matches the original size of the image (.png or other formats). However, you can set a specific size for the tiling sprite by passing width and height values to the configuration object
const bgSprite = new TilingSprite({
  texture,
  width: app.screen.width,
  height: app.screen.height
});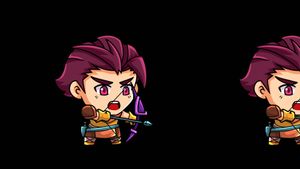
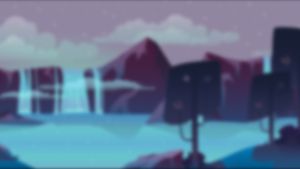
As you can see, when I resized the tiling sprite to fill all the available space on the stage, it placed copies of the texture in the remaining empty space.
Now, if we scale down the size of the texture but keep the tiling sprite's size to cover the full stage, you'll see that multiple copies of the texture are used to fill the entire stage.
const bgSprite = new TilingSprite({
  texture,
  width: app.screen.width,
  height: app.screen.height
});

// Scales down the texture to 1/5 of its original size.
bgSprite.tileScale.set(0.2, 0.2);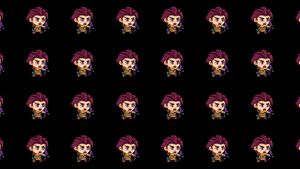
Lastly, we can move the texture over time to create an infinite background animation.
app.ticker.add(function() {
  bgSprite.tilePosition.x -= 1;
});Filters
The beauty of Pixi.js doesn't stop there, as it also offers a collection of visual effects known as filters.
That being said, Pixi.js provides a variety of built-in filters, such as blur and noise, that we can apply to our sprites.
So, to apply a Gaussian blur to the background, we first need to import the blur filter.
import {
  Application,
  Assets,
  TilingSprite,
  BlurFilter
} from 'pixi.js';
Next, we'll create a new instance of the BlurFilter and assign it to the filters property of the background sprite.
bgSprite.filters = new BlurFilter({
  strength: 15
});
Furthermore, we can apply multiple filters simultaneously.
Let's add a noise filter. To do that, we'll need to import the filter of course.
import {
  Application,
  Assets,
  TilingSprite,
  BlurFilter,
  NoiseFilter
} from 'pixi.js';
Next, we'll assign an array to the filters property of the background sprite, which includes every filter we want to apply to it.
bgSprite.filters = [
  new BlurFilter({strength: 15}),
  new NoiseFilter({noise: 1})
];
Audio
Pixi.js does not include built-in support for adding and managing audio. However, this isn't a major issue because there are plenty of excellent libraries available that can fill this gap effectively.
In this tutorial, I'm going to use Howler. To install it, type the following command in the command line: npm install howler.
Next import the Howl class.
import {Howl} from 'howler';Then, create an instance of the Howl class, passing the source file you want to play to the configuration object.
const sound = new Howl({
  src: ['/Alone in the Chamber.ogg']
});
Finally, call the play() method. That's it!
sound.play();If the audio doesn’t play and you receive the warning message below, add an event to trigger the audio, such as the click event on the window.
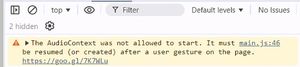
window.addEventListener('click', function () {
  sound.play();
});
Final Thoughts
In conclusion, Pixi.js emerges as a powerful tool for building rich and interactive web experiences with speed and efficiency.
From creating stunning animations to developing immersive games and applications, Pixi.js empowers developers to unleash their creativity without compromising on performance.
With its intuitive API and robust features, mastering Pixi.js opens doors to endless possibilities in web development.
Thank you for reading, and I hope to see you in my future articles!

Credits and Resources
- Playwrite USA Traditional
- Great Vibes
- 2D Game Avatars
- Isometric frog character
- Free horizontal game backgrounds
- Alone in the Chamber