Post-Processing with Three.js - The What and How
Published on 05 Sep, 2024 | ~6 min read | Demo
Do you feel unsatisfied with the overall look of your Three.js scenes, thinking that something is missing or that a final touch is needed, but you're not quite sure what it is? Well, let me tell you: it's post-processing.
If you're unfamiliar with post-processing, this article will guide you through understanding what it is and how to implement it with a practical example.
What Is Post-Processing?
To put it simply, post-processing is a fancy term for applying filters or effects to an image, a video, or, in our case, a Three.js scene.
So when you take a selfie using Instagram, for example, and apply a filter to it, you're essentially performing post-processing on your photo.

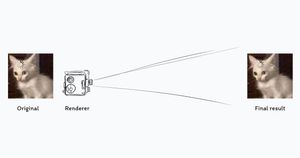
In a typical Three.js app, without post-processing, the renderer displays the scene directly on the screen.
On the other hand, if post-processing is involved, we need to set up a manager to handle a series of passes (effects or filters) before displaying the final scene. This manager is known as the EffectComposer.
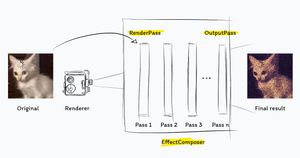
The first pass represents the original colors of the scene—meaning no filters are applied. This is referred to as the RenderPass.
The final pass is the OutputPass, which handles sRGB color space conversion and tone mapping.
The remaining passes are the filters we want to apply to the scene.
Keep in mind that the order in which we add these passes is matters. If we set the RenderPass as the last or second-to-last pass, we won't see any effects applied to the scene, because the base colors are displayed after the filters, which obviously doesn't make any sense.
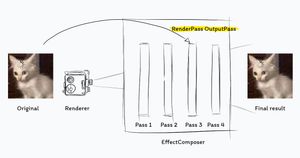
This is similar to the concept of layers in Photoshop.
Applying the Unreal Bloom and Glitch Passes
First and foremost, you should have a basic Three.js app ready. If you don't want to spend time setting one up, feel free to use my Three.js boilerplate.
Note: you don't need to use the same model I'm using—in fact, you don't even need a model to achieve the effects we'll create. However, if you'd like to replicate the exact demo I made, you can download this model. For the animation, refer to this full animation guide. I'll also provide the complete project code at the end of this section.
Next, we need to set up the EffectComposer. To do this, import the RenderPass, OutputPass and, of course, the EffectComposer classes.
import { RenderPass } from 'three/examples/jsm/postprocessing/RenderPass';
import { OutputPass } from 'three/examples/jsm/postprocessing/OutputPass';
import { EffectComposer } from 'three/examples/jsm/postprocessing/EffectComposer';
The next step is to create an instance of RenderPass and pass the scene and camera as arguments to its constructor.
camera.position.set(0, 25, 0);
camera.lookAt(scene.position);

const renderScene = new RenderPass(scene, camera);
Next, create an instance of EffectComposer and pass the renderer as an argument.
const composer = new EffectComposer(renderer);Next, we need to call addPass() from the EffectComposer instance and add the RenderPass instance.
composer.addPass(renderScene);Additionally, we need to create an instance of OutputPass and call the addPass() method to add it to the composer.
const outputPass = new OutputPass();
composer.addPass(outputPass);
Now, we need to modify the animate() function.
If you've been following my tutorials, you know I don't use the classic requestAnimationFrame(), which you've probably seen in many tutorials and examples online.
That being said, when it comes to post-processing, we need to use requestAnimationFrame(), as setAnimationLoop() isn't yet compatible with post-processing.
What we'll do here is call requestAnimationFrame(), remove or comment out the setAnimationLoop() method, and then call the animate() function.
function animate() {
  // Needed for the Orbit controls.
  controls.update();
  // Used to animate the model.
  // Get rid of this  line if you
  // don't have a model with animations.
  if (mixer) mixer.update(clock.getDelta());
  renderer.render(scene, camera);
  requestAnimationFrame(animate);
}
//renderer.setAnimationLoop(animate);
animate();
Next, we no longer call render() from the renderer. Instead, call it from the EffectComposer.
composer.render();
requestAnimationFrame(animate);
Additionally, we need to update the size of the EffectComposer when a resize event occurs. To do this, add the following line to the addEventListener callback
composer.setSize(window.innerWidth, window.innerHeight);Now, if you look at the scene, you'll see that it’s displayed but hasn’t changed. This is because we haven’t added any passes to the EffectComposer except for the RenderPass, which, as mentioned earlier, represents the base colors of the scene, and the OutputPass, which performs sRGB color conversion.
To apply the bloom filter, we need to import the UnrealBloomPass and create an instance of it.
import { UnrealBloomPass } from 'three/examples/jsm/postprocessing/UnrealBloomPass';const bloomPass = new UnrealBloomPass(
new THREE.Vector2(window.innerWidth, window.innerHeight),
1.6,
0.1,
0.1
);The first argument of the constructor is a Vector2 representing the scene's resolution. The second argument is the intensity of the effect, the third is the bloom radius, and the last determines which pixels emit the bloom. The final parameter may require some experimentation to fully understand its effect.
Next, add the pass to the composer, and ensure it is placed before the OutputPass, which must always be the last one.
Now, the result should show the model with glowing colors.

As you can see, the colors are too bright. To adjust this, experiment with the different properties of the pass.
bloomPass.strength = 0.4;
bloomPass.radius = 1.2;
bloomPass.threshold = 0.1;
The brightness looks good now, but there's still room for color correction. To adjust this, add the following lines and feel free to experiment with the values.
renderer.toneMapping = THREE.LinearToneMapping;
renderer.toneMappingExposure = 3;
If you're unsure what these lines do, this article will provide the insights you need.
Now it’s time to add the glitch effect. To do this, import the GlitchPass, instantiate it, and add it to the composer. That’s all there is to it.
import { GlitchPass } from 'three/examples/jsm/postprocessing/GlitchPass';const glitchPass = new GlitchPass();
composer.addPass(glitchPass);Note: As mentioned earlier, the order of adding passes is important. Adding the glitch after the bloom will result in a dramatically different effect. Actually, I recommend trying both sequences to see the big difference in results.
Conclusion
And this wraps up the article. But hey, Three.js offers more than just two passes for creating cool effects and giving your scenes an edgy style. So, be sure to experiment with them and have fun exploring the possibilities.
Have fun!