Searching and Iterating through Objects in Three.js
Published on 23 Sep, 2024 | ~7 min read | Demo
Are you looking to create a configurator that lets users change the colors of different parts of a model, like a car or a character? Or perhaps you've tried enabling shadows on a loaded model, but it didn't work for some unknown reason.
Well, you're in the right place! In this article, we'll explore a couple of Three.js methods designed to address these exact questions.
Targeting Nodes in the Scene Graph
As you know, Three.js uses a scene graph where the scene acts as the parent of all nodes. Furthermore, these nodes can also have zero or multiple children.
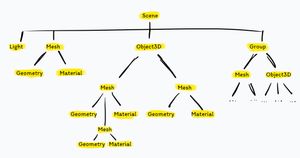
With that in mind, there are a handful of methods for targeting any node within the scene graph.
Before exploring these methods, set up a Three.js project with a few meshes. Feel free to use my Three.js boilerplate.
Full code:
import * as THREE from 'three';
import { OrbitControls } from 'three/examples/jsm/controls/OrbitControls.js';

const renderer = new THREE.WebGLRenderer({ antialias: true });
renderer.setSize(window.innerWidth, window.innerHeight);
document.body.appendChild(renderer.domElement);

renderer.setClearColor(0xa3a3a3);

const scene = new THREE.Scene();
const camera = new THREE.PerspectiveCamera(
  45,
  window.innerWidth / window.innerHeight,
  0.1,
  1000
);

const orbit = new OrbitControls(camera, renderer.domElement);

camera.position.set(10, 10, 10);
orbit.update();

const gridHelper = new THREE.GridHelper(12, 12);
scene.add(gridHelper);

const boxGeo = new THREE.BoxGeometry(3, 3, 3);
const boxMaterial = new THREE.MeshBasicMaterial({ color: 0x00ffaa });
const boxMesh = new THREE.Mesh(boxGeo, boxMaterial);
scene.add(boxMesh);
boxMesh.position.x = 4;

const sphereGeo = new THREE.SphereGeometry(2);
const sphereMaterial = new THREE.MeshBasicMaterial({ color: 0xa02f55 });
const sphereMesh = new THREE.Mesh(sphereGeo, sphereMaterial);
scene.add(sphereMesh);
sphereMesh.position.x = -4;

const childSphereGeo = new THREE.SphereGeometry(0.5);

const childSphereMaterial = new THREE.MeshBasicMaterial({ color: 0xa020a5 });
const childSphereMesh = new THREE.Mesh(childSphereGeo, childSphereMaterial);
sphereMesh.add(childSphereMesh);
childSphereMesh.position.x = -4;

const childSphere2Material = new THREE.MeshBasicMaterial({ color: 0x0e20af });
const childSphere2Mesh = new THREE.Mesh(childSphereGeo, childSphere2Material);
sphereMesh.add(childSphere2Mesh);
childSphere2Mesh.position.y = 4;

const childSphere3Material = new THREE.MeshBasicMaterial({ color: 0x5f200f });
const childSphere3Mesh = new THREE.Mesh(childSphereGeo, childSphere3Material);
sphereMesh.add(childSphere3Mesh);
childSphere3Mesh.position.y = -4;

function animate() {
  renderer.render(scene, camera);
}

renderer.setAnimationLoop(animate);

window.addEventListener('resize', function () {
  camera.aspect = window.innerWidth / window.innerHeight;
  camera.updateProjectionMatrix();
  renderer.setSize(window.innerWidth, window.innerHeight);
});
traverse()
To iterate through the entire scene and change the color of every mesh object, we need to use the traverse() method.
scene.traverse(function (node) {
  if (node.isMesh) node.material.color.setHex(0xffea00);
});
This changes the material color of every mesh to yellow. So, we're essentially iterating through the scene, checking if the current node is a mesh. If it is, its color is updated to yellow.
Note: a node refers to one of the scene's children, though it isn't necessarily a direct child of the scene.
We can apply the same approach to a node's children instead of the entire scene. For example, we can change the color of only the children of sphereMesh.
sphereMesh.traverse(function (node) {
  if (node.isMesh) node.material.color.setHex(0x257725);
});
This changes the color of the spheres; however, it also affects the parent's color because the parent node itself is assigned to the node variable.
getObjectById()
Every single object in a scene is assigned a unique ID when created, and we can use this ID to target it and its children.
To target the box, for example, we'll store its id in a constant, then use that id as a search criterion by passing it as an argument to the getObjectById() method.
const boxMeshId = boxMesh.id;
scene.getObjectById(boxMeshId).material.color.setHex(0x00bfff);
getObjectByName()
Similar to ids, an object can also have a name, which can be used to target it.
To target the second child of the sphere, we'll assign it a name and then pass that name as an argument to the getObjectByName() method.
childSphere2Mesh.name = 'child2';
sphereMesh.getObjectByName('child2').material.wireframe = true;
getObjectByProperty()
getObjectByProperty() searches through an object and returns the first object that matches the criteria set by the method's arguments. The first argument is the property, and the second is its exact value.
scene.getObjectByProperty('isMesh', true).material.wireframe = true;This activates the wireframe mode on the box, as it is the first mesh added to the scene.
getObjectsByProperty()
getObjectsByProperty()—note the 's' in 'Objects'—returns an array containing all objects that meet the criteria.
const meshes = sphereMesh.getObjectsByProperty('isMesh', true);
meshes.forEach((mesh) => {
  mesh.material.color.setHex(0xffea00);
});
Practical Use Cases
Depending on its complexity, a model is often not created as a single unit; instead, it is composed of a set of meshes, each forming a part of the whole model.
Making a Model Cast Shadow
Based on the information I provided at the beginning of this section, you should now understand why it didn't work when you tried to set the castShadow property directly on the model (I know you did).
The solution is quite simple: iterate through the model using the traverse() method to set the castShadow property for every mesh that composes the model.
Before I provide the snippet, please download a model (check the credits section if you'd like to use the same one I'm using, which I highly recommend) and place it in the public folder of your project.
And here’s the code, which includes the animation part. Speaking of animation, I have a fully dedicated article on the topic if you’re interested.
main.js
import * as THREE from 'three';
import { OrbitControls } from 'three/examples/jsm/controls/OrbitControls.js';
import { GLTFLoader } from 'three/examples/jsm/loaders/GLTFLoader.js';

const renderer = new THREE.WebGLRenderer({ antialias: true });

renderer.shadowMap.enabled = true;

renderer.setSize(window.innerWidth, window.innerHeight);

document.body.appendChild(renderer.domElement);

const scene = new THREE.Scene();

const camera = new THREE.PerspectiveCamera(
  45,
  window.innerWidth / window.innerHeight,
  0.1,
  1000
);

renderer.setClearColor(0xa3a3a3);

const orbit = new OrbitControls(camera, renderer.domElement);

camera.position.set(10, 10, 10);
orbit.update();

const grid = new THREE.GridHelper(30, 30);
scene.add(grid);

const planeGeo = new THREE.PlaneGeometry(30, 30);
const planeMat = new THREE.MeshPhongMaterial();
const plane = new THREE.Mesh(planeGeo, planeMat);
plane.rotation.x = -Math.PI / 2;
plane.receiveShadow = true;
scene.add(plane);

const ambientLight = new THREE.AmbientLight(0xededed, 0.8);
scene.add(ambientLight);

const directionalLight = new THREE.DirectionalLight(0xffffff, 1);
scene.add(directionalLight);
directionalLight.position.set(10, 11, 7);
directionalLight.castShadow = true;

const assetLoader = new GLTFLoader();
let mixer;
assetLoader.load('/Donkey.gltf', function (gltf) {
  const model = gltf.scene;
  scene.add(model);

  mixer = new THREE.AnimationMixer(model);
  const clips = gltf.animations;

  const clip = THREE.AnimationClip.findByName(clips, 'Idle');
  const action = mixer.clipAction(clip);
  action.play();
});

const clock = new THREE.Clock();
function animate() {
  if (mixer) mixer.update(clock.getDelta());
  renderer.render(scene, camera);
}

renderer.setAnimationLoop(animate);

window.addEventListener('resize', function () {
  camera.aspect = window.innerWidth / window.innerHeight;
  camera.updateProjectionMatrix();
  renderer.setSize(window.innerWidth, window.innerHeight);
});
And here’s the magical snippet that will make the donkey's shadow appear.
model.traverse(function (node) {
  if (node.isMesh) node.castShadow = true;
});
Targeting Specific Parts of a Model
To target the objects and change their material colors, we'll use the getObjectByName() method.
But wait, how will we know the names of those meshes, you might be wondering?
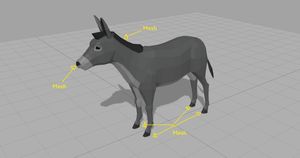
While we can import the model into Blender, a much easier and less time-consuming solution is to simply drag and drop the model into the Three.js editor to examine the model manually and find the names of the meshes.
In this example, the hair mesh is named Cube_4. To change its color, we'll simply use this snippet:
model.getObjectByName('Cube_4').material.color.setHex(0xffea00);Here’s the full demo code if you'd like to integrate the GUI.
Wrap Up
Now that you’ve unlocked a new achievement in your Three.js learning journey, consider the following homework: download a new model and create a color configurator for it.
Happy coding!