Three.js Tutorial for Absolute Beginners
Last updated on 15 Dec, 2024 | ~37 min read
In this guide, I'll cover how to set up your development environment, understand core concepts, and build your first Three.js application from scratch. Whether you're a beginner or seeking to expand your web development skills, this tutorial will provide you with a solid foundation in 3D web graphics.
Before we begin, make sure to check out this short read, where we discuss WebGL/WebGPU and their relationship with Three.js. If you're unfamiliar with these concepts, it'll provide some helpful context for what we're about to cover.
Setting Up the Project
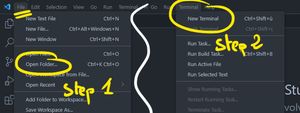
Begin by creating a folder and opening it in Visual Studio Code. Then, navigate to the terminal in the navigation menu and select New Terminal.
Once the terminal is open, type the following command: npm init -y. This command will generate a package.json file without requiring you to input any data manually.
After that, we'll need to install a bundler. Although not mandatory, using a bundler is highly recommended for cleaner project organization and easier maintenance in the long run.
In this tutorial, we'll use Vite for its zero-configuration setup. To install it, run the following command: npm install vite --save-dev.
Then, create an index.html page to contain our app.
Something important to keep in mind is that we need to use the type attribute and set its value to module if we know we're going to use the import statement in the JavaScript file we're linking to. Since I know we're going to do that, I'm adding it here.
<!DOCTYPE html>
<html lang="en">
<head>
    <meta charset="UTF-8">
    <meta http-equiv="X-UA-Compatible" content="IE=edge">
    <meta name="viewport" content="width=device-width, initial-scale=1.0">
    <title>My 1st Three.js App!</title>
</head>
<body>
    <script src="/main.js" type="module"></script>
</body>
</html>
Next, create a file named main.js
Now that our project files are ready, let's install Three.js by typing the following command npm install three.
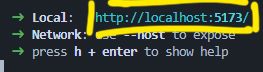
That done, enter this command npx vite to instruct Vite to bundle the files and automatically refresh the page whenever we make any updates to our code.
To view our app, simply press Ctrl and left-click on the URL generated on the command line after running the server.
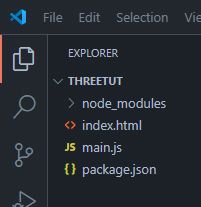
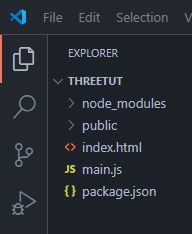
And with this we come to the end of this first section. And so far your project directory should look like this:
The Fundamental Building Blocks of Every Three.js Application
Coordinate System
First, when we discuss 3D concepts, we're referring to a coordinate system comprised of three axes: X, Y, and Z. These axes provide values used to define the coordinates, or location, of a point within the 3D space.
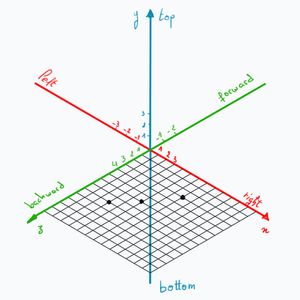
The first axis is known as the x-axis and it represents the horizontal placement of a point on the graph. The left side contains negative values while the right side contains positive values.
The second axis is known as the y-axis and it represents the vertical placement of a point on the graph. The bottom side contains negative values while the top side contains positive values.
The third axis is known as the z-axis and represents depth. Negative values indicate forward distance, while positive values indicate backward distance.
So, again, this is how 3D works in general; it's not something specific to Three.js.
Scene
Now let's talk about placing elements on the HTML canvas in Three.js and let's begin with a simple analogy.
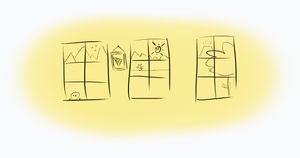
Say we want to record a show; obviously, we need the right place to record, A.K.A the scene. We also need a camera. Then, we need to add the components after preparing them outside the scene. By components, I mean the lights, scene objects, and the actors. By preparations, I mean choosing the right lens for the camera and selecting the appropriate objects for the background, etc...
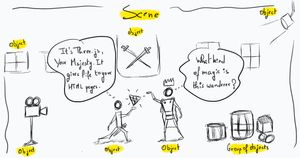
These exact same things need to be done using Three.js. First, we create a scene by instantiating the Scene class. Then, we choose the appropriate type of camera and create an instance of it. Once these 2 essential parts are ready, we can then introduce elements to the scene.
Cameras
As I mentioned, there are a handful of types of cameras in Three.js, but as a beginner, you only need to focus on two.
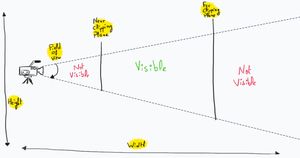
The first type is the perspective camera, which functions similarly to real-life cameras, making it suitable for most projects.
To create a perspective camera in Three.js we need 4 values.
- Field of view. It is the maximum angle of what can be seen through the lens of the camera.
- Aspect ratio. This one represents the proportion of the width and height of the image captured by the camera. And it is usually calculated by dividing the canvas width by the canvas height.
- Near and far clipping planes. These 2 represent the bounds of what can be seen and thus rendered. Anything in the scene that has a position closer to the camera than the near clipping plane won't be rendered. In addition to that anything farther than the far clipping plane won't be rendered.
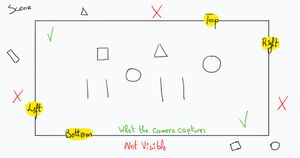
The second type of camera is the orthographic camera.
An orthographic camera is utilized to render 3D scenes in a 2D perspective, as depth is not considered in this scenario. I'll make a comparison between the two types of cameras shortly, but first, let's explore the components of an orthographic camera.
An orthographic camera is defined by 6 values.
- Left, right, top, and bottom. These are the edges or limits of what can a camera picture out of the scene.
- Near and far clipping planes. I've already explained these 2.
Here's an example to better understand the difference between a Perspective and an Orthographic camera.
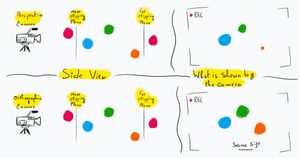
With a perspective camera, the size of objects changes based on their distance from the camera. An object appears larger when closer to the camera and smaller when farther away.
On the other hand, with an orthographic camera, the size of objects remains consistent regardless of their distance from the camera, as depth is not a factor in this case.
Creating a Basic Scene
In main.js, we'll create a namespace named THREE and import all Three.js functionalities into it.
import * as THREE from 'three';Next, we'll create an instance of the WebGLRenderer. At this stage, think of the renderer as the tool Three.js uses to allocate space on a webpage where we can display and manipulate 3D content
Having said that, to set the size of the rendering space, we need to call the setSize() method and pass the width and height as arguments. In this case, I want the space to cover the entire page by using the window.innerWidth and window.innerHeight properties.
const renderer = new THREE.WebGLRenderer();
renderer.setSize(window.innerWidth, window.innerHeight);
The next thing we need to do is to inject that space we've just created which is basically a <canvas> element into the page.
document.body.appendChild(renderer.domElement);Now, when you view the page, you'll notice a white screen with scrollable space both vertically and horizontally. This indicates that our code setup is correct. However, you might want to remove the scrollable space as it's not part of the canvas; it's added by default by the browser. To remove it, we need to set the CSS margin of the <body> element to 0.
<!DOCTYPE html>
<html lang="en">
<head>
    <meta charset="UTF-8">
    <meta http-equiv="X-UA-Compatible" content="IE=edge">
    <meta name="viewport" content="width=device-width, initial-scale=1.0">
    <title>My 1st Three.js App!</title>
    <style>
        body {
            margin: 0;
        }
    </style>
</head>
<body>
    <script src="/main.js" type="module"></script>
</body>
</html>
Now, it's time to put our theoretical knowledge into practice. Let's begin by creating the scene.
const scene = new THREE.Scene();Next, we need to add a camera by instantiating the PerspectiveCamera class. Its constructor takes four arguments, each representing one of the properties we discussed earlier.
const camera = new THREE.PerspectiveCamera(
    75,
    window.innerWidth / window.innerHeight,
    0.1,
    1000
);- The field of view depends on the specific project, but typically values between 40 and 80 are sufficient.
- The aspect ratio is calculated by dividing the width of the window by its height, as our canvas matches the size of the window.
- We'll set the near and far clipping planes to 0.1 and 1000, respectively. It's important to note that the range between these two values inversely affects the performance of your app. A smaller range typically results in better performance, while a larger range may reduce performance.
With that complete, we link the scene to the camera using the renderer's render() method, passing the Scene and Camera instances as arguments to render the scene from the camera's perspective.
Ensure this instruction is placed at the bottom of your code.
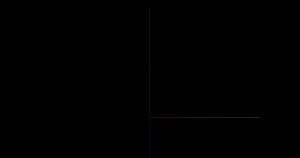
renderer.render(scene, camera);Performing this last step will result in your canvas turning black, indicating that your code is functioning correctly.
This is how your code should appear at this stage:
import * as THREE from 'three';

const renderer = new THREE.WebGLRenderer();
renderer.setSize(window.innerWidth, window.innerHeight);
document.body.appendChild(renderer.domElement);

const scene = new THREE.Scene();

const camera = new THREE.PerspectiveCamera(
    75,
    window.innerWidth / window.innerHeight,
    0.1,
    1000
);

// The body of the app

renderer.render(scene, camera);
Helpers
As you can see, the scene is currently empty because we haven't added anything to it yet. Let's start by displaying a couple of helpers.
A helper is a tool that serves as a guide. In this section, we'll discover a couple of helpers, and we'll use more later. Additional info about the rest of the helpers can be found in the documentation.
AxesHelper
As its name suggests, this helper visualizes the 3D coordinate system in the scene.
// 5 here represents the length of the axes.
const axesHelper = new THREE.AxesHelper(5);
Now that we've prepared the AxesHelper, we add it to the scene using the add() method.
This is how we add objects to the scene in Three.js: we create an instance of the object, then introduce it to the scene with the add() method.
scene.add(axesHelper);Don't worry if you don't see anything new; the camera is initially positioned at the origin of the scene (point with the coordinates (0, 0, 0)) and looks at the same point. To view the helper, we need to move the camera.
I'll pull the camera back by setting its z-position value to 5, allowing us to see the helper in our scene.
camera.position.z = 5;While the helper appeared, it only displays two axes instead of three. This is because the camera is positioned to face directly along the z-axis. To reveal the third axis, we need to adjust the camera's x or y value.
camera.position.z = 5;
camera.position.y = 2;
Now that we've adjusted the camera position, we can now see all three axes clearly.
By the way, we can change the position of the camera or any element in the scene with a single line of code by calling the set() method. The first argument refers to the x-axis, the second to the y-axis, and the third to the z-axis.
camera.position.set(0, 2, 5);GridHelper
In Three.js, a GridHelper is a type of helper object used to create a grid in a 3D scene. This grid can be helpful for visualizing spatial relationships, aligning objects, or providing a reference for positioning and scaling.
const gridHelper = new THREE.GridHelper();
scene.add(gridHelper);
The grid generated by the code above is 10 units by 10 units. To change its size, we can pass the desired size value to the constructor
const gridHelper = new THREE.GridHelper(15);We can also pass a second argument to the constructor to divide the grid into smaller squares if needed.
const gridHelper = new THREE.GridHelper(15, 50);Animation Loop
Let's add a box to the scene. I won't explain the steps right now, as there is an entire section dedicated to this subject coming up later.
const geometry = new THREE.BoxGeometry();
const material = new THREE.MeshBasicMaterial({color: 0x00FF00});
const box = new THREE.Mesh(geometry, material);
scene.add(box);
Now that we have our box, we can perform geometric transformations on it. An example of such a transformation is rotation. In this case, let's perform a 5-radian rotation on both the x and y axes.
box.rotation.x = 5;
box.rotation.y = 5;
As you may know, an animation consists of a sequence of transformations that occur over time. Therefore, to animate this box, we need to apply the rotation automatically over time.
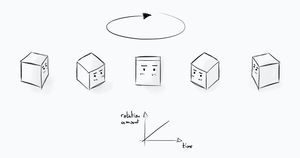
We'll create a function named animate to encapsulate the rotation code, ensuring that the rotation values increase multiple times per second.
Additionally, we need to render the scene after each transformation operation. We'll achieve this by calling render() inside the animate() function.
function animate() {
    box.rotation.x += 0.01;
    box.rotation.y += 0.01;
    renderer.render(scene, camera);
}
Essentially, this means that every second, the cube will rotate by 0.01 radians along both the x and y axes.
With that done, we need to pass animate() as an argument to the setAnimationLoop() method.
// This will create a loop
// that causes the renderer to draw the scene
// every time the screen is refreshed.
// On a typical screen this means 60 times per second
renderer.setAnimationLoop(animate);
Keep in mind that we have a time input to have more control over the speed of the animation. This time parameter represents the time elapsed since the animation loop started and is automatically provided by Three.js as part of the animation loop mechanism.
function animate(time) {
    box.rotation.x = time / 1000;
    box.rotation.y = time / 1000;
    renderer.render(scene, camera);
}
And this is the full code base at this stage.
import * as THREE from 'three';

const renderer = new THREE.WebGLRenderer();
renderer.setSize(window.innerWidth, window.innerHeight);
document.body.appendChild(renderer.domElement);

const scene = new THREE.Scene();

const camera = new THREE.PerspectiveCamera(
    75,
    window.innerWidth / window.innerHeight,
    0.1,
    1000
);

const axesHelper = new THREE.AxesHelper(5);
scene.add(axesHelper);

camera.position.set(0, 2, 5);

const gridHelper = new THREE.GridHelper(15, 50);
scene.add(gridHelper);

const geometry = new THREE.BoxGeometry();
const material = new THREE.MeshBasicMaterial({color: 0x00FF00});
const box = new THREE.Mesh(geometry, material);
scene.add(box);

function animate(time) {
    box.rotation.x = time / 1000;
    box.rotation.y = time / 1000;
    renderer.render(scene, camera);
}

renderer.setAnimationLoop(animate);
Camera Controls
In Three.js, camera controls are utilities or classes that enable users to interactively control the position, orientation, and movement of the camera within a 3D scene. They are essential for allowing users to navigate and explore a scene from different viewpoints in real-time.
There are several types of camera controls available in Three.js, including OrbitControls, DragControls, FlyControls, etc...
FirstPersonControls
FirstPersonControls simulate a first-person flying experience, allowing users to control the camera's position and orientation using keyboard inputs or mouse movements. This control scheme is often used in flight simulation or exploration applications.
To use FirstPersonControls we need to import it first as it doesn't make part of the core of Three.js.
import {FirstPersonControls} from
'three/examples/jsm/controls/FirstPersonControls.js';
Then we instantiate the FirstPersonControls class, passing two arguments to its constructor: the camera and the renderer's canvas.
// Ensure this line comes after the instantiation of the camera.
const fPControls =
new FirstPersonControls(camera, renderer.domElement);
Now, since we're discussing movement, particularly the movement of the camera, we once again rely on time. In this case, we'll introduce the Clock utility. This class is used for tracking the time elapsed between frames in an animation loop.
I understand this might seem a bit confusing at the moment, but bear with me. All you need to know for now is that to use the FirstPersonControls, you'll also need to utilize the Clock utility.
const clock = new THREE.Clock();
function animate(time) {
    fPControls.update(clock.getDelta());
    box.rotation.x = time / 1000;
    box.rotation.y = time / 1000;
    renderer.render(scene, camera);
}
The update() method updates the controls, and clock.getDelta() returns the time elapsed between frames.
And with that, you should be able to fly around in the scene either by holding the left and right mouse buttons or by using the arrow or WASD keys, similar to a first-person shooter game.
OrbitControls
This control scheme allows users to orbit around a target point in the scene. By dragging the mouse, users can rotate the camera around the target, zoom in and out, and pan horizontally and vertically.
So what I want you to do now is to remove the code related to FirstPersonControls, import the OrbitControls class, and create an instance of it in the same manner as we did with the FirstPersonControls, as both have the same arguments for their constructor methods.
import * as THREE from 'three';
import {OrbitControls} from
'three/examples/jsm/controls/OrbitControls';

const renderer = new THREE.WebGLRenderer();
renderer.setSize(window.innerWidth, window.innerHeight);
document.body.appendChild(renderer.domElement);

const scene = new THREE.Scene();

const camera = new THREE.PerspectiveCamera(
    75,
    window.innerWidth / window.innerHeight,
    0.1,
    1000
);

const orbitControls =
new OrbitControls(camera, renderer.domElement);

camera.position.set(0, 2, 5);
orbitControls.update();

const axesHelper = new THREE.AxesHelper(5);
scene.add(axesHelper);

const gridHelper = new THREE.GridHelper(15, 50);
scene.add(gridHelper);

const geometry = new THREE.BoxGeometry();
const material = new THREE.MeshBasicMaterial({color: 0x00FF00});
const box = new THREE.Mesh(geometry, material);
scene.add(box);

function animate(time) {
    box.rotation.x = time / 1000;
    box.rotation.y = time / 1000;
    renderer.render(scene, camera);
}

renderer.setAnimationLoop(animate);
Calling the update() method is not necessary with OrbitControls unless you reposition the camera, which I did here, so I called the update() right after it.
Another case where you definitely have to call the update() method is when you enable some of its properties, such as autoRotate and enableDamping. In this case you need to call update() inside the animate() function.
Geometries, Materials, and Meshes
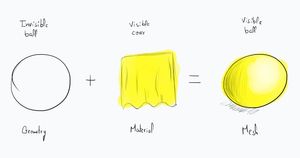
The creation of an object in Three.js happens in 3 phases.
- This phase involves creating the geometry, which serves as the skeleton of the object we want to add to the scene.
- This phase involves creating the material, which essentially acts as the skin or cover of the object. There are various materials available, but it's important to choose carefully because some may require more resources than others due to additional features and more demanding algorithms.
- In this phase, we apply the material to the geometry, effectively covering it and creating an object ready to be introduced to the scene.
Note: In the 3D field, objects are often referred to as meshes. These can be various shapes such as cubes, circles, or characters created using 3D softwares.
Geometries
In the block of code below, which we've already used to create the box, the first line represents the first phase. We create an instance of the BoxGeometry class, which, as the name suggests, defines the skeleton of a box.
It's worth noting that the constructor takes several arguments, including width, height, and depth, as well as width and height segments, which we'll discuss later on.
The second line represents the second phase. We create an instance of the MeshBasicMaterial, which doesn't require light to appear in the scene. As you can see, we have a configuration object that contains a color property, which obviously represents the color of the material.
The third line represents the third phase, which involves merging the geometry and the material.
The 4th line you should be familiar with by now, it adds the mesh to the scene.
const geometry = new THREE.BoxGeometry();
const material = new THREE.MeshBasicMaterial({color: 0x00FF00});
const box = new THREE.Mesh(geometry, material);
scene.add(box);
Three.js has more geometries that we can create not only boxes, so let's use some of them.
Let's create a plane, for example. We can achieve this by creating an instance of the PlaneGeometry class and passing the width and height of the plane as arguments. Then, we need to create a material, merge it with the geometry into a mesh, and finally add it to the scene.
const planeGeometry = new THREE.PlaneGeometry(15, 15);
const planeMaterial = new THREE.MeshBasicMaterial();
const planeMesh = new THREE.Mesh(planeGeometry, planeMaterial);
scene.add(planeMesh);
// This rotates the plane to match the grid.
planeMesh.rotation.x = -0.5 * Math.PI;
Looking at the plane from the bottom makes it disappear as only its face is rendered. To change that we need to add the side property to the material and set its value to THREE.DoubleSide.
const planeMaterial = new THREE.MeshBasicMaterial({
    side: THREE.DoubleSide
});
To create a sphere we're going to create an instance of the SphereGeometry class and pass the radius as an argument. The rest is pretty much the same as we did with the box and the plane.
const sphereGeometry = new THREE.SphereGeometry(2);
const sphereMaterial = new THREE.MeshBasicMaterial({
    color: 0x0000FF
});
const sphereMesh =
new THREE.Mesh(sphereGeometry, sphereMaterial);
scene.add(sphereMesh);
We have added a sphere to the scene, but upon closer inspection, you can notice that it is not perfectly rounded.
To clearly visualize this, we can display the shape of the sphere in its wireframe form. This involves adding another property to the material called wireframe and setting its value to true.
const sphereMaterial = new THREE.MeshBasicMaterial({
    color: 0x0000FF,
    wireframe: true
});
As you can see, the sphere is constructed from lines, points, and triangles, just like anything else in 3D. Additionally, the quality of the mesh depends on the number of faces created from these entities.
Now, let's try to reduce the number of the width and height segments of this sphere.
// The default values for the horizontal segments is 32
// and 16 for the vertical segments
// THREE.SphereGeometry(2) is same as
// THREE.SphereGeometry(2, 32, 16)
const sphereGeometry = new THREE.SphereGeometry(2, 10, 10);
The sphere should look way less rounded now as a result of the reduction of the segments.
On the other hand, if we try to increase the number of segments the sphere will look perfect.
const sphereGeometry = new THREE.SphereGeometry(2, 50, 50);Of course these are not the only geometries we can create, so make sure to check out the documentation for the other possibilities.
Materials
As mentioned earlier, we used the MeshBasicMaterial for the meshes because it allows them to appear without requiring a light source in the scene. Now, let's try using another material and observe how the sphere will look.
const sphereGeometry = new THREE.SphereGeometry(2, 50, 50);
// Using the MeshStandardMaterial now
const sphereMaterial = new THREE.MeshStandardMaterial({
    color: 0x0000FF,
    //wireframe: true
});
const sphereMesh =
new THREE.Mesh(sphereGeometry, sphereMaterial);
scene.add(sphereMesh);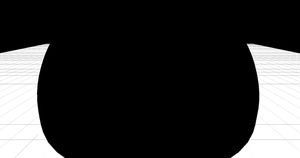
MeshStandardMaterial without lightAs you can see, the sphere is covered in black color because we have not yet added a light source to the scene. This mirrors real life, where you wouldn't be able to see anything without light, right?
The same applies to other materials like MeshPhongMaterial and MeshPhysicalMaterial; they require light to be visible. Be sure to consult the documentation for a comprehensive list of materials and their properties.
Geometric Transformations
Applying geometric transformations to objects in Three.js can be achieved through method calls or by directly modifying the values of their properties.
Translation
To change the position of an object, we can set values directly to its position.x, position.y, or position.z properties. Alternatively, we can use the position.set() method or the translateX(), translateY(), or translateZ() methods.
This places the object at 5 units along the x-axis.
box.position.x = 5;This sets the object at 5 units along the x-axis and 0 units along the Y and Z axes. Here, we're required to set values for all axes.
box.position.set(5, 0, 0);This translates the box 5 units along the x-axis. If the box is at position 0, this updates its x position to 5. If the box is at position 7, this will move it to position 12 along the x-axis
box.translateX(5);Rotation
To rotate an object, we can set values directly to its rotation.x, rotation.y, or rotation.z properties. Alternatively, we can use the rotation.set() method or the rotateX(), rotateY(), or rotateZ() methods to specify the rotation angles.
Note: The rotation unit is radian not degrees.
This sets the rotation of the object -π / 3 radians along the z-axis.
box.rotation.z = -Math.PI / 3;This sets the rotation to π along the y-axis and 0 along the X and Z axes. Again, we're required to set values for the three axes.
box.rotation.set(0, Math.PI, 0);This adds π / 2 radians rotation along the x-axis to the initial rotation of the box.
box.rotateX(Math.PI / 2);Scale
To scale the size of an object up or down, we can set values directly to its scale.x, scale.y, or scale.z properties. Alternatively, we can use the scale.set() method.
This scales up the box 4 times along the x-axis.
box.scale.x = 4;This scales up the object 2 times along the y-axis and leaves the initial scale along the Y and Z axes.
box.scale.set(1, 2, 1);There are more advanced techniques for applying geometric transformations, such as using matrices and quaternions for rotations, but let's save those for another article. The methods we've covered here should suffice for your current needs.
Data Input with lil-gui
Debugging and adjusting values to achieve the perfect position or color of an element can be time-consuming. A common solution to this challenge is to use a small-sized interface dedicated solely to that purpose.
We could develop such a solution from scratch, but many developers prefer to use an open-source interface designed specifically for this purpose. This interface is highly popular among developers working with Three.js.
The module's name is lil-gui. To install it, first stop Parcel by pressing Ctrl + C, then type the following command: npm install lil-gui. Afterward, restart Parcel once the installation is complete.
Next, import everything from the module, then create an instance of the gui class.
import { GUI } from 'lil-gui';// You can place this anywhere in your code
// except within the animate() function of course.
const gui = new GUI();Color Palette
Now, let's say we want to change the color of the sphere by adding a color palette on top of our canvas. To achieve this, we need to create an object that will hold the interface elements, including the color of the sphere.
const options = {
    color: 0x0000FF
}
To add the color palette, we use the addColor() method, passing the options object as the first argument and the key already included in options as the second argument, ensuring it is set as a string.
The next step is to call the onChange() method and define a callback function. This function specifies the action to be taken every time we change the color on the interface. In this example, we want to change the color of the sphere.
gui.addColor(options, 'color').onChange(function(e) {
    sphereMesh.material.color.set(e);
});
color.set(e) here is the method used to change the sphere's color, where the variable e contains the color code obtained from the color palette.
If you see a black sphere, it's likely because you're using a material other than MeshBasicMaterial. Remember, we haven't added any lights to our scene yet. Therefore, using materials like MeshStandardMaterial will result in the sphere appearing black, regardless of the color chosen from the palette.
Here's the full code:
import * as THREE from 'three';
import {OrbitControls} from
'three/examples/jsm/controls/OrbitControls';

import { GUI } from 'lil-gui';

const renderer = new THREE.WebGLRenderer();
renderer.setSize(window.innerWidth, window.innerHeight);
document.body.appendChild(renderer.domElement);

const scene = new THREE.Scene();

const camera = new THREE.PerspectiveCamera(
    75,
    window.innerWidth / window.innerHeight,
    0.1,
    1000
);

const orbitControls =
new OrbitControls(camera, renderer.domElement);

camera.position.set(0, 2, 5);
orbitControls.update();

const axesHelper = new THREE.AxesHelper(5);
scene.add(axesHelper);

const gridHelper = new THREE.GridHelper(15, 50);
scene.add(gridHelper);

const geometry = new THREE.BoxGeometry();
const material = new THREE.MeshBasicMaterial({color: 0x00FF00});
const box = new THREE.Mesh(geometry, material);
scene.add(box);

const planeGeometry = new THREE.PlaneGeometry(15, 15);
const planeMaterial = new THREE.MeshBasicMaterial({
    side: THREE.DoubleSide
});

const planeMesh = new THREE.Mesh(planeGeometry, planeMaterial);
scene.add(planeMesh);
planeMesh.rotation.x = -0.5 * Math.PI;


const sphereGeometry = new THREE.SphereGeometry(2, 50, 50);
const sphereMaterial = new THREE.MeshBasicMaterial({
    color: 0x0000FF
});
const sphereMesh =
new THREE.Mesh(sphereGeometry, sphereMaterial);
scene.add(sphereMesh);

const gui = new GUI();

const options = {
    color: 0x0000FF
}

gui.addColor(options, 'color').onChange(function(e) {
    sphereMesh.material.color.set(e);
});

function animate(time) {
    box.rotation.x = time / 1000;
    box.rotation.y = time / 1000;
    renderer.render(scene, camera);
}

renderer.setAnimationLoop(animate);
Checkbox
The GUI offers different types of elements, so we can, for example, add a checkbox to toggle the mesh between wireframe mode and regular mode.
To do that, let's add a property to the options object.
const options = {
    color: 0x0000FF,
    wireframe: false
}
This time, we use the add() method instead of addColor(), passing the options object and the property key as arguments. Then, we call the onChange() method to update the value of the wireframe property in the material of the sphere. In this case, e is set to true if the checkbox is checked and false otherwise.
Slider
Say we want to make the sphere bounce and we want to have a slider to control the bouncing speed.
First, let's add the speed property to the options object.
const options = {
    color: 0x0000FF,
    wireframe: false,
    speed: 0.01
}
Then, as we did earlier, we need to call the add() method. This time, we'll add a couple of extra arguments representing the minimum and maximum values of the speed range.
gui.add(options, 'speed', 0, 0.1);Next, I'll create a new variable, step, and add a couple of lines of code inside the animate() function to create the bouncing effect.
// ...

gui.add(options, 'wireframe').onChange(function(e) {
    sphereMesh.material.wireframe = e;
});

gui.add(options, 'speed', 0, 0.1);

let step = 0;

function animate(time) {
    box.rotation.x = time / 1000;
    box.rotation.y = time / 1000;

    step += options.speed;
    sphereMesh.position.y = 3 * Math.abs(Math.sin(step));

    renderer.render(scene, camera);
}

// ...
Light
There are various types of light in Three.js. In this tutorial, we're going to explore three of them.
Ambient Light
Ambient light is the overall illumination present in the environment, resulting indirectly from other light sources. An everyday example is the daylight in a room.
To add ambient light, we simply create an instance of the AmbientLight class, passing the desired color as an argument, and then add it to the scene.
const ambientLight = new THREE.AmbientLight(0xFFFFFF, 1);
scene.add(ambientLight);
When observing the result, you may notice that nothing has changed. This is because the materials of the meshes were created using MeshBasicMaterial, which is not affected by light.
That said, ensure that you change the material of the sphere and the plane, to MeshPhongMaterial or MeshStandardMaterial.
const sphereMaterial = new THREE.MeshPhongMaterial({
    color: 0x0000FF
});

const planeMaterial = new THREE.MeshStandardMaterial({
    side: THREE.DoubleSide
});
Directional Light
A common example of directional light is sunlight. It emanates from a source that is so large and distant that it effectively covers all space with parallel rays of light.
To add a directional light, we create an instance of the DirectionalLight class and specify the color and intensity of the light as arguments in the constructor.
const directionalLight =
new THREE.DirectionalLight(0xFFFFFF, 10);
scene.add(directionalLight);
Working with lights can be challenging, but fortunately, Three.js provides helpers to assist you in achieving optimal results with any type of light in your scene.
To add a directional light helper, we create an instance of the DirectionalLightHelper class and pass the DirectionalLight instance we've created as an argument to the helper's constructor method.
const dLightHelper =
new THREE.DirectionalLightHelper(directionalLight);
scene.add(dLightHelper);
Right on top of the cube is the location of the helper—a square that indicates the direction of the light.
Now, like any other element in the scene, we can adjust the position of the light source to alter its direction and consequently affect the direction of the shadows, which I'll discuss shortly.
directionalLight.position.set(-5, 8, 0);We can change the size of the helper square by setting a second argument to the constructor.
const dLightHelper =
new THREE.DirectionalLightHelper(directionalLight, 3);
Spotlight
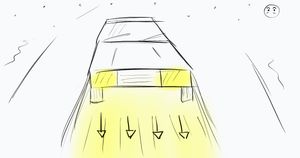
This source emits the light in the form of a cone. The farther the light source is from the surface that receives the light, the bigger the cone radius becomes.
To create a spotlight, we need to make an instance of the SpotLight class and set the color of the light and its intensity.
// Make sure you comment out the directional light code.
const spotlight = new THREE.SpotLight(0xFFFFFF, 1000);
scene.add(spotlight);
spotlight.position.set(-5, 8, 0);
Once again, working with lights, especially spotlights, can be a bit confusing. Fortunately, Three.js provides a helper for this type of light as well.
To introduce a spotlight helper into the scene we need to create an instance of the SpotLightHelper class.
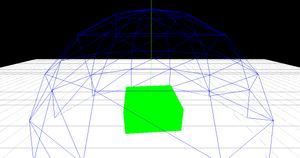
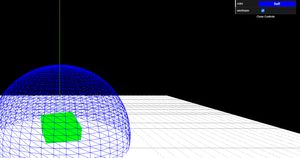
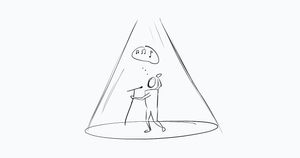
const sLightHelper = new THREE.SpotLightHelper(spotlight);
scene.add(sLightHelper);
The white segments here represent the direction and boundaries of the light cone created by the spotlight.
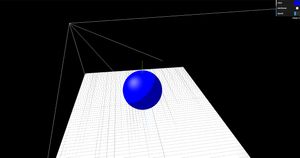
This type of light offers a range of properties that allow us to create various effects. We'll leverage the GUI interface to visualize the changes we make to the spotlight.
const options = {
    color: 0x0000FF,
    wireframe: false,
    speed: 0.01,
    intensity: 0,
    angle: 0.2,
    penumbra: 0
}gui.add(options, 'intensity', 0, 1000).onChange(function(e) {
spotlight.intensity = e;
});
gui.add(options, 'angle', 0, 2).onChange(function(e) {
spotlight.angle = e;
});
gui.add(options, 'penumbra', 0, 1).onChange(function(e) {
spotlight.penumbra = e;
});Keep in mind that we need to update the helper by calling the update() method whenever we plan to change the values of the light's properties in real-time.
function animate(time) {
    //...
    sLightHelper.update();
    //...
}
So, the intensity property speaks for itself. It's a common property of all the lights.
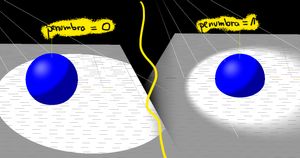
angle controls the radius of the light cone, which significantly influences the appearance of shadows cast by objects. More on this will be discussed in the next section.
penumbra essentially refers to the gradual blurring of the edge of the spotlight.
Shadow
Shadows in Three.js are not enabled by default. So to enable them we need to set the value of the shadowMap.enabled property of the renderer to true.
renderer.shadowMap.enabled = true;Then we need to manually set if an object receives or casts shadows.
The plane here receives the shadow emitted by the sphere being in front of the light source. To make it so we need to set its property receiveShadow to true.
planeMesh.receiveShadow = true;The sphere on the other hand casts a shadow by being in front of the light source. To make it as a shadow caster we need to set its castShadow property to true.
sphereMesh.castShadow = true;The light also casts shadows. After all, it is the main factor of the shadow creation.
spotlight.castShadow = true;Now you should be able to see the shadow. But if your settings are the same as mine, you'll notice that the shadow appears pixelated. However, by adjusting the angle of the spotlight, you'll observe that a narrower angle results in a better shadow, while a wider angle produces a less defined shadow. So keep this in mind when incorporating spotlight into your scene.

Another problem you may face is missing parts of shadows when using directional light. To better understand what I'm talking about, comment out or remove the spotlight's code and add directional light.
import * as THREE from 'three';
import {OrbitControls} from
'three/examples/jsm/controls/OrbitControls';

import { GUI } from 'lil-gui';

const renderer = new THREE.WebGLRenderer();
renderer.setSize(window.innerWidth, window.innerHeight);
document.body.appendChild(renderer.domElement);

const scene = new THREE.Scene();

const camera = new THREE.PerspectiveCamera(
    75,
    window.innerWidth / window.innerHeight,
    0.1,
    1000
);

const orbitControls =
new OrbitControls(camera, renderer.domElement);

camera.position.set(0, 2, 5);
orbitControls.update();

const geometry = new THREE.BoxGeometry();
const material = new THREE.MeshBasicMaterial({color: 0x00FF00});
const box = new THREE.Mesh(geometry, material);
scene.add(box);

const planeGeometry = new THREE.PlaneGeometry(15, 15);
const planeMaterial = new THREE.MeshStandardMaterial({
    side: THREE.DoubleSide
});

const planeMesh = new THREE.Mesh(planeGeometry, planeMaterial);
scene.add(planeMesh);
planeMesh.rotation.x = -0.5 * Math.PI;

const sphereGeometry = new THREE.SphereGeometry(2, 50, 50);
const sphereMaterial = new THREE.MeshPhongMaterial({
    color: 0x0000FF
});
const sphereMesh =
new THREE.Mesh(sphereGeometry, sphereMaterial);
scene.add(sphereMesh);

const gui = new GUI();

const options = {
    color: 0x0000FF,
    wireframe: false,
    speed: 0.01
}

gui.addColor(options, 'color').onChange(function(e) {
    sphereMesh.material.color.set(e);
});

gui.add(options, 'wireframe').onChange(function(e) {
    sphereMesh.material.wireframe = e;
});

gui.add(options, 'speed', 0, 0.1);

let step = 0;

const ambientLight = new THREE.AmbientLight(0xFFFFFF, 1);
scene.add(ambientLight);

const directionalLight =
new THREE.DirectionalLight(0xFFFFFF, 10);
scene.add(directionalLight);
directionalLight.position.set(-5, 8, 0);
sphereMesh.position.x = 5;

const dLightHelper =
new THREE.DirectionalLightHelper(directionalLight, 3);
scene.add(dLightHelper);

renderer.shadowMap.enabled = true;
planeMesh.receiveShadow = true;
sphereMesh.castShadow = true;
directionalLight.castShadow = true;

function animate() {
    step += options.speed;
    sphereMesh.position.y = 3 * Math.abs(Math.sin(step));

    renderer.render(scene, camera);
}

renderer.setAnimationLoop(animate);
Only half of the sphere's shadow is visible, which is due to the configuration of the shadow's camera.
Actually, shadows in Three.js use cameras internally. And the role of a shadow's camera is to delimit where to render the shadows.
That said, each type of light has a camera for its shadows. directionalLight for instance uses an orthogographic camera.
So in the above case, it is obvious that the portion of the plane delimited by the shadow's camera is not enough to fully render the shadow. And when I say delimited here I mean delimited by the 4 sides of the Orthographic camera.
Furthermore, to visualize the area marked by the shadow's camera where shadows will be rendered, we can use another helper.
This helper is an instance of the CameraHelper class, and it takes the camera associated with the directional light's shadow as an argument.
const dLightShadowHelper =
new THREE.CameraHelper(directionalLight.shadow.camera);
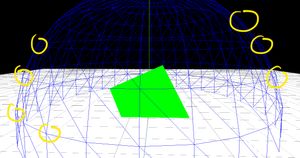
scene.add(dLightShadowHelper);As you can see, there are now four orange segments extending from the camera through the plane. The square formed by these segments represents the surface on which the cast shadow can be rendered.
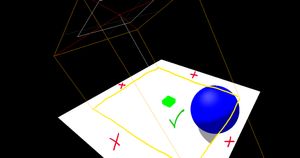
To expand the surface area for rendering shadows, we must separate these segments from each other. Specifically, we need to adjust the position of only the two top segments by moving the top side of the shadow's camera.
directionalLight.shadow.camera.top = 7;Fog and Background Color
Fog
We can add fog to a scene in Three.js using two different methods.
The first method involves creating an instance of the Fog class, which requires three arguments in its constructor method. The first argument specifies the color, while the other two define the near and far limits of the space where the fog should be visible.
The code below increases the density of the fog based on the distance of the objects to the camera. At a distance of 0 units from the camera, there's no fog. As the distance exceeds 50 units, the scene becomes completely foggy.
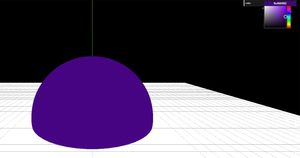
scene.fog = new THREE.Fog(0x5500AF, 0, 50);The second method of creating fog is by instantiating the FogExp2 class, whose constructor takes two arguments: the color and the density.
scene.fog = new THREE.FogExp2(0x5500AF, 0.03);With this method, the density of the fog increases exponentially as the distance from the camera grows.
Background Color
Up until now, we've had a black background, but we can change that by using the setClearColor() method from the renderer.
renderer.setClearColor(0x00EA00);Textures
Essentially, textures are images applied to the surfaces of 3D objects to give them color, pattern, or detail.
Textures are also used for more advanced purposes, such as displacement maps, alpha maps, roughness maps, and others, to enhance realism and visual interest in 3D scenes. I'll cover these topics more in future articles.
In your project directory, create a new folder and name it exactly public. This is where you put your static files such as images and 3D files.
And with that done, we're ready to use some textures.
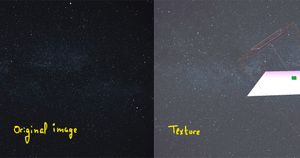
Texture as a Scene Background
To set an image as a background in our scene we need to load an image and transform it into a Texture object.
So first and foremost, put an image in the static folder.
Next, create an instance of the TextureLoader class. This is going to load images for us and transform them into Texture objects.
const textureLoader = new THREE.TextureLoader();Next, we call the load() method and provide the path to the image as an argument. Then, we assign the loaded texture to the background property of the scene.
const backgrounImage = textureLoader.load('/stars.jpg');

scene.background = backgrounImage;
After completing these steps, the texture will appear, but you may notice that it appears somewhat washed out.
The issue is related to color space, which is beyond the scope of this tutorial. For further details, refer to this article.
That said, to address the issue, simply add this line of code:
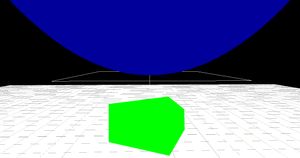
backgrounImage.colorSpace = THREE.SRGBColorSpace;The background has been changed, but it appears two-dimensional, which is expected from a 2D image. However, this can be altered because the scene is essentially a cube, with six faces, each capable of having its own background. This allows the overall background to create the illusion of a three-dimensional world.
To achieve this, we need to utilize another type of loader, namely the CubeTextureLoader. The load method of this loader accepts an array of image paths, where each path corresponds to a texture for a specific face of the cube (scene).
The images must have a 1:1 ratio, meaning each image should have the same height and width. In this example, I used images with dimensions of 1280 pixels by 1280 pixels.
const cubeTextureLoader = new THREE.CubeTextureLoader();

const cubeTexture = cubeTextureLoader.load([
    '/cubeTexture.jpg',
    '/cubeTexture.jpg',
    '/cubeTexture.jpg',
    '/cubeTexture.jpg',
    '/cubeTexture.jpg',
    '/cubeTexture.jpg'
]);

scene.background = cubeTexture;
Applying Textures to Meshes
To map a texture on a mesh, we first need to load the texture using a TextureLoader, set its color space, and then assign it to the map property within the material associated with the mesh.
// I'm using the same TextureLoader instance
// that I used to load the scene's background image.
const boxTexture =
textureLoader.load('/cubeTexture1.jpg');
boxTexture.colorSpace = THREE.SRGBColorSpace;

const boxGeo = new THREE.BoxGeometry(2, 2, 2);
const boxMat = new THREE.MeshBasicMaterial({map: boxTexture});
const boxMesh = new THREE.Mesh(boxGeo, boxMat);
scene.add(boxMesh);
boxMesh.position.set(-5, 2, 0);
In addition to that we can change the texture later, by updating the map property of the meshe's material.
const boxTexture2 =
textureLoader.load('/cubeTexture2.jpg');
boxTexture2.colorSpace = THREE.SRGBColorSpace;

boxMesh.material.map = boxTexture2;
Now, all the faces of the box are identical. However, if you want each face to have a different texture, you need to create a separate material for each face, with each material having its own texture.
// boxTexture and boxTexture2 are already loaded

const boxTexture3 =
textureLoader.load('/cubeTexture3.jpg');
boxTexture3.colorSpace = THREE.SRGBColorSpace;

const boxTexture4 =
textureLoader.load('/cubeTexture4.jpg');
boxTexture4.colorSpace = THREE.SRGBColorSpace;

const boxTexture5 =
textureLoader.load('/cubeTexture5.jpg');
boxTexture5.colorSpace = THREE.SRGBColorSpace;

const boxTexture6 =
textureLoader.load('/cubeTexture6.jpg');
boxTexture6.colorSpace = THREE.SRGBColorSpace;

const box2MultiMaterials = [
    new THREE.MeshBasicMaterial({map: boxTexture}),
    new THREE.MeshBasicMaterial({map: boxTexture2}),
    new THREE.MeshBasicMaterial({map: boxTexture3}),
    new THREE.MeshBasicMaterial({map: boxTexture4}),
    new THREE.MeshBasicMaterial({map: boxTexture5}),
    new THREE.MeshBasicMaterial({map: boxTexture6})
];

const box2Mesh = new THREE.Mesh(boxGeo, box2MultiMaterials);
scene.add(box2Mesh);
box2Mesh.position.set(0, 2, 0);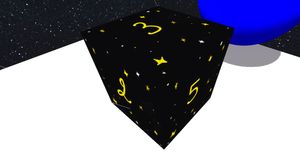
Making the Canvas Responsive
At present, the canvas is not responsive. If you try resizing the window, you'll notice that the canvas size remains fixed; it doesn't adapt to the window size changes.
To address this issue, we can add an event listener to detect window resize events. Within the callback function, we update the aspect property of the camera to match the new aspect ratio of the resized window.
Additionally, it's essential to call the updateProjectionMatrix() method each time we modify any camera property. In this case, we invoke it because we're adjusting the aspect ratio upon window resize.
Finally, we need to update the size of the canvas. This step should be familiar to you, as we've already used it at the beginning of the tutorial.
// At the end of the code.
window.addEventListener('resize', function() {
    camera.aspect =
    this.window.innerWidth / this.window.innerHeight;
    camera.updateProjectionMatrix();
    renderer.setSize(
        this.window.innerWidth,
        this.window.innerHeight
    );
});
Final Thoughts
Congratulations on completing this tutorial on Three.js! You've taken the first steps towards mastering this powerful library for 3D graphics in the browser. Now that you have a solid foundation, there's a whole world of possibilities to explore.
Remember, practice makes perfect! Don't hesitate to experiment with different features and techniques in Three.js to unleash your creativity and build stunning 3D experiences.
For more tutorials, tips, and resources, be sure to check out the related content section below. Happy coding!