Unreal Bloom Selective - Three.js Post Processing
Published on 06 Oct, 2024 | ~13 min read | Demo
In a previous article, we explored post-processing in Three.js, learning how to use it to enhance scenes, and applied Unreal Bloom as an example.
With that said, in this tutorial, we will take a step further by applying that effect to specific objects rather than the entire scene.
The Theory
The implementation of this idea will be carried out in phases.
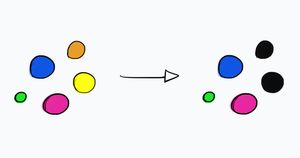
In the first phase, we will darken all the objects in the scene by replacing their original materials with a dark-colored material, excluding the objects we want to apply the bloom effect to.
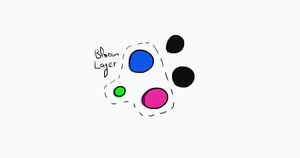
But how will we select these specific objects, you might be wondering?
Well, we'll simply assign these objects to a specific layer. By the way, if you're unfamiliar with layers in Three.js, be sure to check out this article.
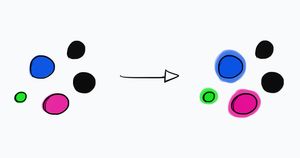
In the next phase, we'll apply the Unreal Bloom pass, where only the non-darkened objects will be affected by the bloom.
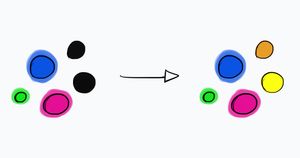
In the final phase, we will restore the original materials to the darkened objects, and that’s it, theoretically.
The Implementation
We'll basically pick up where we left off in this article, except we'll use this model instead.
import * as THREE from 'three';
import { OrbitControls } from 'three/examples/jsm/controls/OrbitControls';
import { GLTFLoader } from 'three/examples/jsm/loaders/GLTFLoader';
import { RenderPass } from 'three/examples/jsm/postprocessing/RenderPass';
import { EffectComposer } from 'three/examples/jsm/postprocessing/EffectComposer';
import { UnrealBloomPass } from 'three/examples/jsm/postprocessing/UnrealBloomPass';
import { OutputPass } from 'three/examples/jsm/postprocessing/OutputPass';

const renderer = new THREE.WebGLRenderer({ antialias: true });

renderer.setSize(window.innerWidth, window.innerHeight);

document.body.appendChild(renderer.domElement);

const scene = new THREE.Scene();

const camera = new THREE.PerspectiveCamera(
  45,
  window.innerWidth / window.innerHeight,
  0.1,
  1000
);

const controls = new OrbitControls(camera, renderer.domElement);
controls.enableDamping = true;

camera.position.set(0, -2, 18);
camera.lookAt(scene.position);

const renderScene = new RenderPass(scene, camera);
const bloomComposer = new EffectComposer(renderer);
bloomComposer.addPass(renderScene);

const bloomPass = new UnrealBloomPass(
  new THREE.Vector2(window.innerWidth, window.innerHeight),
  1.6,
  0.1,
  0.1
);
bloomComposer.addPass(bloomPass);

bloomPass.strength = 0.4;
bloomPass.radius = 1.2;
bloomPass.threshold = 0.1;

const outputPass = new OutputPass();
bloomComposer.addPass(outputPass);

renderer.toneMapping = THREE.ACESFilmicToneMapping;
renderer.toneMappingExposure = 1.5;
renderer.outputColorSpace = THREE.SRGBColorSpace;

const loader = new GLTFLoader();

let mixer;
loader.load('/eye_sword.glb', function (glb) {
  const model = glb.scene;
  scene.add(model);
  model.position.set(0, -2.4, 11);

  const animations = glb.animations;
  mixer = new THREE.AnimationMixer(model);
  const clip = animations[0];
  const action = mixer.clipAction(clip);
  action.play();
});

const clock = new THREE.Clock();
function animate() {
  controls.update();

  if (mixer) mixer.update(clock.getDelta());

  bloomComposer.render();

  requestAnimationFrame(animate);
}
animate();

window.addEventListener('resize', function () {
  camera.aspect = window.innerWidth / window.innerHeight;
  camera.updateProjectionMatrix();
  renderer.setSize(window.innerWidth, window.innerHeight);
  bloomComposer.setSize(window.innerWidth, window.innerHeight);
});
Now, it's time to turn the phases I mentioned earlier into code.
We'll begin by setting the renderToScreen property of the bloomComposer to false.
bloomComposer.renderToScreen = false;This ensures that the bloom effect is applied, but the results are not displayed on the screen.
Next, we'll need an instance of the ShaderPass. A ShaderPass is used to apply custom shader effects as post-processing to a scene. In other words, we'll create a new pass—how cool is that!
import { ShaderPass } from 'three/examples/jsm/postprocessing/ShaderPass.js';const mixPass = new ShaderPass();After that, we'll pass an instance of the ShaderMaterial as the first argument to the ShaderPass constructor.
We'll also pass the string 'baseTexture' as the second argument. This argument represents the name of a uniform variable that holds the original textures of the bloomed objects.
const mixPass = new ShaderPass(new THREE.ShaderMaterial(), 'baseTexture');Having done that, we'll pass an object to the ShaderMaterial constructor and set the uniform variables.
const mixPass = new ShaderPass(
  new THREE.ShaderMaterial({
    uniforms: {
      baseTexture: { value: null },
      bloomTexture: { value: bloomComposer.renderTarget2.texture },
    },
    vertexShader: document.getElementById('vertexshader').textContent,
    fragmentShader: document.getElementById('fragmentshader').textContent,
  }),
  'baseTexture'
);
The bloomTexture property contains the textures of the objects after the bloom effect has been applied. Here, we're obtaining the texture from the bloomComposer, specifically from renderTarget2, as the bloom effect is applied in the second pass.
The value of the baseTexture property is set automatically by the renderer.
By the way, notice that the second argument of the ShaderPass constructor is the same as the first property name of the ShaderMaterial. Typically, you don’t need to do this unless you pass the base texture with a key different from tDiffuse, which you’re probably familiar with.
So, the bottom line is that if you pass the base texture to the shader with the property name tDiffuse, you don’t need to set the textureID. On the other hand, if you want to use a more expressive property name for the base texture, ensure you set the exact same name as the second argument in the ShaderPass constructor.
Now, in the index.html file, we'll create the vertex and fragment shaders.
<!DOCTYPE html>
<html lang="en">
  <head>
    <meta charset="UTF-8" />
    <meta http-equiv="X-UA-Compatible" content="IE=edge" />
    <meta name="viewport" content="width=device-width, initial-scale=1.0" />
    <title>Unreal Bloom Selective - Wael Yasmina</title>
    <style>
      body {
        margin: 0;
      }
    </style>
  </head>
  <body>
    <script id="vertexshader" type="vertex">
         varying vec2 vUv;

      void main() {

      	vUv = uv;

      	gl_Position = projectionMatrix * modelViewMatrix * vec4( position, 1.0 );

      }
    </script>
    <script id="fragmentshader" type="fragment">
      uniform sampler2D baseTexture;
      uniform sampler2D bloomTexture;

      varying vec2 vUv;

      void main() {

      	gl_FragColor = ( texture2D( baseTexture, vUv ) + vec4( 1.0 ) * texture2D( bloomTexture, vUv ) );

      }
    </script>
    <script src="/main.js" type="module"></script>
  </body>
</html>
( texture2D( baseTexture, vUv ): this part represents the original colors of the scene's objects.texture2D( bloomTexture, vUv ): this part represents the colors after the bloom effect has been applied.vec4( 1.0 ): this small part represents the intensity.
With that done, we now need to create a new EffectComposer. Add the renderPass as usual, followed by the pass we just created. Lastly, as you may recall, we must add the outputPass as the final pass.
Note: Add the outputPass only to the finalComposer; there's no need to add it to the bloomComposer.
const finalComposer = new EffectComposer(renderer);
finalComposer.addPass(renderScene);

finalComposer.addPass(mixPass);

const outputPass = new OutputPass();
finalComposer.addPass(outputPass);
function animate() {
controls.update();
if (mixer) mixer.update(clock.getDelta());
bloomComposer.render();
finalComposer.render();
requestAnimationFrame(animate);
}
animate();
window.addEventListener('resize', function () {
camera.aspect = window.innerWidth / window.innerHeight;
camera.updateProjectionMatrix();
renderer.setSize(window.innerWidth, window.innerHeight);
bloomComposer.setSize(window.innerWidth, window.innerHeight);
finalComposer.setSize(window.innerWidth, window.innerHeight);
});At this point, you should have the same result, except that the rendering pipeline now consists of two effect composers.
With that said, let’s implement the selection code.
First, we'll create a constant that holds the number of the special layer, which can be any value between 1 and 31.
const BLOOM_SCENE = 1;Next, we'll create the layer and the dark material, as well as an object to store the original materials of the objects so we can restore them later.
const BLOOM_SCENE = 1;
const bloomLayer = new THREE.Layers();
bloomLayer.set(BLOOM_SCENE);

const darkMaterial = new THREE.MeshBasicMaterial({ color: 0x000000 });
const materials = {};
With that done, we’ll create the function responsible for darkening the objects.
function nonBloomed(obj) {
  if (obj.isMesh && bloomLayer.test(obj.layers) === false) {
    materials[obj.uuid] = obj.material;
    obj.material = darkMaterial;
  }
}
So, we have a condition that must be met. First, we need to ensure that the current object is a mesh, as it could be something else, such as a model's bone or an audio instance (if one exists in your scene).
The second part of the condition is that the object must not be a member of the bloomLayer.
If both parts of the condition are met, we will store the mesh's original material in the materials object using its uuid property as a unique key, allowing us to retrieve it later and apply it back to the mesh.
Then, we'll assign the darkMaterial to the mesh, and that will complete this function.
Now, we’ll create a function that restores the initial materials of the objects.
function restoreMaterial(obj) {
  if (materials[obj.uuid]) {
    obj.material = materials[obj.uuid];
    delete materials[obj.uuid];
  }
}
In this snippet, we check the materials object to see if a material with the current mesh's uuid exists. If it does, we’ll apply it to the object and then delete it from the materials object.
With that done, in the animate() function, we’ll call traverse() on the scene and pass the nonBloomed() function as an argument. This will execute the function on every object in the scene. Of course, we’ll do the same with restoreMaterial().
Keep in mind that the order in which we call these functions is crucial.
Note: you can find more information on traverse() and iterating through the scene objects in this article.
function animate() {
  controls.update();
  if (mixer) mixer.update(clock.getDelta());

  scene.traverse(nonBloomed);

  bloomComposer.render();

  scene.traverse(restoreMaterial);

  finalComposer.render();

  requestAnimationFrame(animate);
}
With that done, we now find ourselves in the opposite case: nothing is affected by the bloom because no object is a member of the bloomLayer.
So, to add a mesh to that layer, we can use the raycaster as follows:
const rayCaster = new THREE.Raycaster();
const mouse = new THREE.Vector2();
function onPointerDown(event) {
  mouse.x = (event.clientX / window.innerWidth) * 2 - 1;
  mouse.y = -(event.clientY / window.innerHeight) * 2 + 1;

  rayCaster.setFromCamera(mouse, camera);
  const intersects = rayCaster.intersectObjects(scene.children);
  if (intersects.length > 0) {
    const object = intersects[0].object;
    object.layers.toggle(BLOOM_SCENE);
  }
}
window.addEventListener('pointerdown', onPointerDown);
If the intersected object is not a member of the bloomLayer, the toggle() method will add it to the layer; otherwise, it will remove it.

With this model, we didn’t need a light source; however, if you’re working with other models, they may require light to be displayed. So, if you’re using a different model and everything appears dark, double-check to ensure that you have a light source.
Using lil-gui to Control the Bloom
In this section, we’ll use lil-gui to activate the bloom on certain parts of the model instead of clicking on them. So, make sure to install it, and if you’re unsure how to do that or how to use it, be sure to check out the dedicated section in my Three.js guide.
After importing the module, we’ll create the params object and set the names of the meshes we want to target, along with the properties of the bloom effect.
import { GUI } from 'lil-gui';const params = {
threshold: 0,
strength: 1,
radius: 0.5,
exposure: 1,
Object_11: true,
Object_12: false,
Object_13: true,
Object_14: true,
};Next, we’ll create folders for the bloom effect and tonemapping, then attach the corresponding values to the UI elements.
// bloomPass.strength = 0.4;
// bloomPass.radius = 1.2;
// bloomPass.threshold = 0.1;
bloomPass.threshold = params.threshold;
bloomPass.strength = params.strength;
bloomPass.radius = params.radius;
const gui = new GUI();
const bloomFolder = gui.addFolder('Bloom');
bloomFolder.add(params, 'threshold', 0.0, 1.0).onChange(function (value) {
bloomPass.threshold = Number(value);
});
bloomFolder.add(params, 'strength', 0.0, 3).onChange(function (value) {
bloomPass.strength = Number(value);
});
bloomFolder
.add(params, 'radius', 0.0, 1.0)
.step(0.01)
.onChange(function (value) {
bloomPass.radius = Number(value);
});
const toneMappingFolder = gui.addFolder('Tone mapping');
toneMappingFolder.add(params, 'exposure', 0.1, 2).onChange(function (value) {
renderer.toneMappingExposure = Math.pow(value, 4.0);
});After that, we’ll create a folder for the parts. Object_11, Object_12, Object_13, and Object_14 are the names assigned to the sword's meshes that we want to apply the bloom effect to.
Make sure to add the following snippet to the load() method.
The getObjectByName() method will provide access to that exact object, while toggle(), as I explained earlier, will toggle the object's membership in the bloom layer.
Finally, clicking on the UI will trigger the raycaster code, so remove it to prevent this from happening.
Full code:
import * as THREE from 'three';
import { OrbitControls } from 'three/examples/jsm/controls/OrbitControls';
import { GLTFLoader } from 'three/examples/jsm/loaders/GLTFLoader';
import { RenderPass } from 'three/examples/jsm/postprocessing/RenderPass';
import { EffectComposer } from 'three/examples/jsm/postprocessing/EffectComposer';
import { UnrealBloomPass } from 'three/examples/jsm/postprocessing/UnrealBloomPass';
import { OutputPass } from 'three/examples/jsm/postprocessing/OutputPass';
import { ShaderPass } from 'three/examples/jsm/postprocessing/ShaderPass.js';
import { GUI } from 'lil-gui';
const renderer = new THREE.WebGLRenderer({ antialias: true });
renderer.setSize(window.innerWidth, window.innerHeight);
document.body.appendChild(renderer.domElement);
const scene = new THREE.Scene();
const camera = new THREE.PerspectiveCamera(
45,
window.innerWidth / window.innerHeight,
0.1,
1000
);
// const controls = new OrbitControls(camera, renderer.domElement);
// controls.enableDamping = true;
camera.position.set(0, -2, 18);
camera.lookAt(scene.position);
const params = {
threshold: 0,
strength: 1,
radius: 0.5,
exposure: 1.5,
Object_11: true,
Object_12: false,
Object_13: true,
Object_14: true,
};
const renderScene = new RenderPass(scene, camera);
const bloomComposer = new EffectComposer(renderer);
bloomComposer.addPass(renderScene);
const bloomPass = new UnrealBloomPass(
new THREE.Vector2(window.innerWidth, window.innerHeight),
1.6,
0.1,
0.1
);
bloomComposer.addPass(bloomPass);
// bloomPass.strength = 0.4;
// bloomPass.radius = 1.2;
// bloomPass.threshold = 0.1;
bloomPass.threshold = params.threshold;
bloomPass.strength = params.strength;
bloomPass.radius = params.radius;
// const outputPass = new OutputPass();
// bloomComposer.addPass(outputPass);
bloomComposer.renderToScreen = false;
const mixPass = new ShaderPass(
new THREE.ShaderMaterial({
uniforms: {
baseTexture: { value: null },
bloomTexture: { value: bloomComposer.renderTarget2.texture },
},
vertexShader: document.getElementById('vertexshader').textContent,
fragmentShader: document.getElementById('fragmentshader').textContent,
}),
'baseTexture'
);
const finalComposer = new EffectComposer(renderer);
finalComposer.addPass(renderScene);
finalComposer.addPass(mixPass);
const outputPass = new OutputPass();
finalComposer.addPass(outputPass);
const BLOOM_SCENE = 1;
const bloomLayer = new THREE.Layers();
bloomLayer.set(BLOOM_SCENE);
const darkMaterial = new THREE.MeshBasicMaterial({ color: 0x000000 });
const materials = {};
function nonBloomed(obj) {
if (obj.isMesh && bloomLayer.test(obj.layers) === false) {
materials[obj.uuid] = obj.material;
obj.material = darkMaterial;
}
}
function restoreMaterial(obj) {
if (materials[obj.uuid]) {
obj.material = materials[obj.uuid];
delete materials[obj.uuid];
}
}
renderer.toneMapping = THREE.ACESFilmicToneMapping;
renderer.toneMappingExposure = params.exposure;
renderer.outputColorSpace = THREE.SRGBColorSpace;
const gui = new GUI();
const bloomFolder = gui.addFolder('Bloom');

bloomFolder.add(params, 'threshold', 0.0, 1.0).onChange(function (value) {
  bloomPass.threshold = Number(value);
});

bloomFolder.add(params, 'strength', 0.0, 3).onChange(function (value) {
  bloomPass.strength = Number(value);
});

bloomFolder
  .add(params, 'radius', 0.0, 1.0)
  .step(0.01)
  .onChange(function (value) {
    bloomPass.radius = Number(value);
  });

const toneMappingFolder = gui.addFolder('Tone mapping');
toneMappingFolder.add(params, 'exposure', 0.1, 2).onChange(function (value) {
  renderer.toneMappingExposure = Math.pow(value, 4.0);
});
const loader = new GLTFLoader();
let mixer;
loader.load('/eye_sword.glb', function (glb) {
const model = glb.scene;
scene.add(model);
model.position.set(0, -2.4, 11);
const animations = glb.animations;
mixer = new THREE.AnimationMixer(model);
const clip = animations[0];
const action = mixer.clipAction(clip);
action.play();
const partsFolder = gui.addFolder('Parts');
partsFolder.closed = false;
partsFolder.add(params, 'Object_11').onChange(function () {
model.getObjectByName('Object_11').layers.toggle(BLOOM_SCENE);
});
partsFolder.add(params, 'Object_12').onChange(function () {
model.getObjectByName('Object_12').layers.toggle(BLOOM_SCENE);
});
partsFolder.add(params, 'Object_13').onChange(function () {
model.getObjectByName('Object_13').layers.toggle(BLOOM_SCENE);
});
partsFolder.add(params, 'Object_14').onChange(function () {
model.getObjectByName('Object_14').layers.toggle(BLOOM_SCENE);
});
// Set the initial values from the GUI
model.getObjectByName('Object_11').layers.toggle(BLOOM_SCENE);
model.getObjectByName('Object_13').layers.toggle(BLOOM_SCENE);
model.getObjectByName('Object_14').layers.toggle(BLOOM_SCENE);
});
// const rayCaster = new THREE.Raycaster();
// const mouse = new THREE.Vector2();
// function onPointerDown(event) {
// mouse.x = (event.clientX / window.innerWidth) * 2 - 1;
// mouse.y = -(event.clientY / window.innerHeight) * 2 + 1;
// rayCaster.setFromCamera(mouse, camera);
// const intersects = rayCaster.intersectObjects(scene.children);
// if (intersects.length > 0) {
// const object = intersects[0].object;
// object.layers.toggle(BLOOM_SCENE);
// }
// }
// window.addEventListener('pointerdown', onPointerDown);
const clock = new THREE.Clock();
function animate() {
// controls.update();
if (mixer) mixer.update(clock.getDelta());
scene.traverse(nonBloomed);
bloomComposer.render();
scene.traverse(restoreMaterial);
finalComposer.render();
requestAnimationFrame(animate);
}
animate();
window.addEventListener('resize', function () {
camera.aspect = window.innerWidth / window.innerHeight;
camera.updateProjectionMatrix();
renderer.setSize(window.innerWidth, window.innerHeight);
bloomComposer.setSize(window.innerWidth, window.innerHeight);
finalComposer.setSize(window.innerWidth, window.innerHeight);
});Conclusion
And that’s it for this article. Although it’s not lengthy, we’ve explored several techniques and features that are useful not only in this specific case but also in many others.
More use cases will be covered, so stay tuned, and I will see you soon!