Babylon.js Tutorial for Absolute Beginners
Published on 20 Jul, 2024 | ~35 min read
In this article, I'll guide you through the essential features of the WebGL/WebGPU gem, Babylon.js. We'll begin with setting up the development environment, then move on to creating your first scene, loading and animating 3D models, picking objects from the scene using raycasting, and much more.
Although not crucial for understanding this article, I suggest checking out this short read to get an idea of the relationship between WebGL/WebGPU and libraries such as Babylon.js, Three.js, and Pixi.js.
Installations
Tip: You can skip this section by using the Babylon.js Playground, which lets you create and share Babylon.js snippets online.
First, create a folder for your project. Then, open a new terminal and type the following command to create a package.json file: npm init -y.
Next, we need a development server to handle local files and enable live reloading. This feature automatically refreshes the page whenever we make changes to the codebase, eliminating the need for manual refreshes.
In this tutorial, we'll be using Vite. To install it, run the following command: npm install vite --save-dev.
Now, let's install Babylon.js using this command: npm install @babylonjs/core.
With that done, create an index.html file and a main.js file in the project directory.
<!DOCTYPE html>
<html lang="en">
<head>
    <meta charset="UTF-8">
    <meta name="viewport" content="width=device-width, initial-scale=1.0">
    <title>Babylon.js Tutorial</title>
</head>
<body>
    <script type="module" src="/main.js"></script>
</body>
</html>
It's crucial to add the type="module" attribute in the <script> tag that links to main.js!
Lastly, start the dev server by running this command: npx vite. Then, Ctrl + left-click on the link generated to open the project page in the browser.
Now that everything's set up, we're ready to dive into our Babylon.js adventure. Let's get started!
The 4 Horsemen of Every Babylon.js Application
To display a piece of 3D art on a web page using Babylon.js we need 4 essential elements.
- The
<canvas>element. It is the dedicated space within your HTML where you can showcase your 3D masterpiece. - The
Engine. It is essentially the brain of your Babylon.js app, transforming the logic you write into dynamic 3D graphics. - The
Scene. This is the 3D space where the engine renders your 3D objects. - The
Camera. A camera's role is to display a specific area within the scene.
Now that we understand the four essential components, let's create our first Babylon.js application.
The first thing I'm going to do is create the <canvas> element. Notice that I placed the <canvas> before the <script>tag.
<body>
    <canvas id="renderCanvas"></canvas>
    <script type="module" src="/main.js"></script>
</body>
Next, in main.js, I'll import Babylon.js.
import * as BABYLON from '@babylonjs/core';The next step is to instantiate the Engine class with the <canvas> element. This directs the Engine to render the Scene within this <canvas>.
const canvas = document.getElementById('renderCanvas');

const engine = new BABYLON.Engine(canvas);
Now, I'll create a function that returns a Scene object. This function will contain all the application logic.
const createScene = function() {
    const scene = new BABYLON.Scene(engine);

    // Your application logic

    return scene;
}
Next, I'll call createScene() to create a Scene object and then call render() to display it in the <canvas>.
const scene = createScene();

scene.render();
When we talk about rendering and anything that involves animation—whether it's a video or a game, 2D or 3D—the first thing that should come to your mind is that you're dealing with sequences of images, also known as frames.
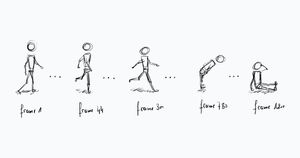
That being said, the above snippet captures only the first frame. This means we're essentially displaying a static image of the scene, not an interactive or animated element on the page.
To bring our scene to life, we'll use a render loop, which is basically a function that runs the render() method multiple times per second (the exact number depends on the capability of the user's device). This ensures that your scene is continually updated and rendered.
engine.runRenderLoop(function() {
    scene.render();
});
And there you go—congratulations! You have your first Babylon.js application up and running.
"But I thought you said we need 4 horsemen, not 3?"
Yeah, you're right. Actually, if you open the console, you'll see a red message indicating the missing piece, which is the Camera.

For the sake of this and the next few sections, I'll add a camera. Thankfully, Babylon.js provides a default camera that we can use on the go. However, we'll explore more details about the camera in its dedicated section later on.
To create a default camera, use the line below, and ensure you add it within the createScene() function because, again, that's where our application code lives.
scene.createDefaultCameraOrLight(true, false, true);Now we have a couple of things to add and adjust, and the first is to make the <canvas> occupy the entire page.
To do that, I'll simply add these few lines of CSS in the <head> section of the index.html file.
<style>
    html, body {
        overflow: hidden;
        width: 100%;
        height: 100%;
        margin: 0;
        padding: 0;
    }

    #renderCanvas {
        width: 100%;
        height: 100%;
        touch-action: none;
    }
</style>
The second and last thing I want to address in this section is responsiveness.
Let's add a box to the scene just to demonstrate the issue we're currently facing and how to address it. And you don't need to worry about how to create the box right now, as I'll cover that in the upcoming section.
Simply copy and paste the code below.
const box = BABYLON.MeshBuilder.CreateBox();
box.position.z = 3;
Now, if you take a look at your scene, you'll see a black cube—nothing crazy... yet.
What I want you to do now is resize the window. Doing that, you'll observe that the cube stretches and shrinks, which is typically not the behavior you want.
To address this, we simply need to invoke the engine.resize() method whenever a window resize event occurs.
// This is outside createScene()
window.addEventListener('resize', function() {
    engine.resize();
});
Now that we're ready to dive into the fun stuff, make sure your code looks exactly like this.
import * as BABYLON from '@babylonjs/core';

const canvas = document.getElementById('renderCanvas');

const engine = new BABYLON.Engine(canvas);

const createScene = function() {
    const scene = new BABYLON.Scene(engine);

    scene.createDefaultCameraOrLight(true, false, true);

    // The fun stuff

    return scene;
}

const scene = createScene();

engine.runRenderLoop(function() {
    scene.render();
});

window.addEventListener('resize', function() {
    engine.resize();
});
MeshBuilder
An object that appears within a scene in Babylon.js is often referred to as a mesh. This could be a simple shape like a box or a sphere, a more intricate form such as a torus knot, or even a complex model imported from a 3D modeling software like Blender.
With that in mind, Babylon.js offers MeshBuilder, a utility class that provides methods for easily creating and constructing different types of meshes in a straightforward manner.
In this article, I'll demonstrate how to create five types of meshes. Consider exploring the others as homework to further expand your knowledge.
Sphere
To add a sphere to the scene, use this line of code:
const sphere = BABYLON.MeshBuilder.CreateSphere();Now, we can modify the sphere by passing a few arguments to the constructor.
const sphere = BABYLON.MeshBuilder.CreateSphere(
    'mySphere',
    {},
    scene
);
The first argument here is a name that helps identify the mesh (we'll use this in the raycasting section).
The second argument is a configuration object, and the third one is the scene.
In the configuration object, we can modify properties of our sphere, such as the number of segments.
const sphere = BABYLON.MeshBuilder.CreateSphere(
    'mySphere',
    {
        segments: 5
    },
    scene
);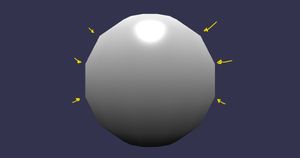
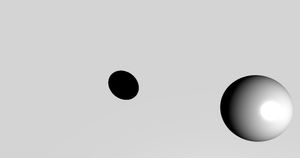
Setting the value of that property to 5 resulted in a loss of quality for the sphere. That's because meshes are composed of triangles formed by segments and vertices (points).
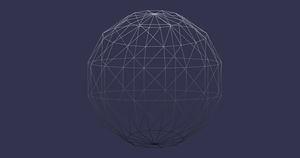
Increasing the number of segments creates more triangles, enhancing the level of detail that defines the surface of the mesh.
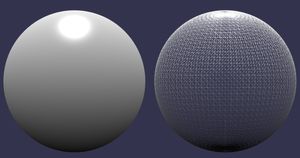
Another property we can modify is the diameter of the sphere.
const sphere = BABYLON.MeshBuilder.CreateSphere(
    'mySphere',
    {
        segments: 50,
        diameter: 0.3
    },
    scene
);
Furthermore, we can also adjust the diameter along a specific axis.
const sphere = BABYLON.MeshBuilder.CreateSphere(
    'mySphere',
    {
        segments: 50,
        diameter: 0.3,
        diameterY: 0.4
    },
    scene
);
Box
To create a box, you should use the CreateBox() method.
const box = BABYLON.MeshBuilder.CreateBox(
    'myBox',
    {}
);
As you can see, I skipped the third argument because having only one scene makes the presence or absence of the third argument irrelevant.
In the configuration object, you can specify the size of the box.
const box = BABYLON.MeshBuilder.CreateBox(
    'myBox',
    {
        size: 0.1
    }
);
You can also adjust each component of the size individually using the width, height, and depth properties.
const box = BABYLON.MeshBuilder.CreateBox(
    'myBox',
    {
        width: 2,
        height: 0.05,
        depth: 0.5
    }
);
We can also customize the color of the box faces using the faceColors property.
const box = BABYLON.MeshBuilder.CreateBox(
    'myBox',
    {
        width: 2,
        height: 0.05,
        depth: 0.5,
        faceColors: [
            new BABYLON.Color4(1, 0.2, 0.5, 1),
            new BABYLON.Color4(0.2, 0.1, 0.3, 1),
            new BABYLON.Color4(0.5, 0, 1, 1),
            new BABYLON.Color4(1, 0.5, 0.8, 1),
            new BABYLON.Color4(0, 0.7, 0, 1),
            new BABYLON.Color4(0.2, 0.5, 1, 1)
        ]
    }
);
A color is represented using an instance of the Color3 or Color4 classes. The difference lies in opacity, which can be set using the fourth argument of the Color4 instance.
The first three arguments of both classes' constructors represent the red, green, and blue channels of the color.
Another way to specify a color is by using its name.
const box = BABYLON.MeshBuilder.CreateBox(
    'myBox',
    {
        width: 2,
        height: 0.05,
        depth: 0.5,
        faceColors: [
            new BABYLON.Color4(1, 0.2, 0.5, 1),
            BABYLON.Color3.Green()
        ]
    }
);
Ground
We can add a ground, which is a 2D plane defined by its width and height.
const ground = BABYLON.MeshBuilder.CreateGround(
    'myGround',
    {
        width: 3,
        height: 3
    }
);
Additionally, we can specify the number of subdivisions, which is similar to the segments property of the sphere.
const ground = BABYLON.MeshBuilder.CreateGround(
    'myGround',
    {
        width: 3,
        height: 3,
        subdivisions: 30
    }
);
Currently, the effect of this property is unnoticeable even though it is present. To see how this property actually affects the ground, add the following couple of lines, and I'll explain them later on.
ground.material = new BABYLON.StandardMaterial();
ground.material.wireframe = true;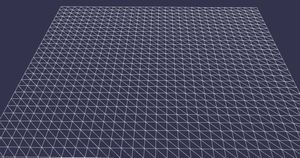
With that done, we can change the number of subdivisions horizontally and vertically.
const ground = BABYLON.MeshBuilder.CreateGround(
    'myGround',
    {
        width: 3,
        height: 3,
        //subdivisions: 30
        subdivisionsX: 10,
        subdivisionsY: 20
    }
);
Now, you might be wondering why we need this property if it doesn't affect the appearance of the ground, right?
Well, it actually does matter when you want to change the positions of the vertices that compose the ground, such as creating a terrain with high and low areas.
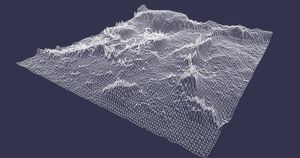
Speaking of terrain we can do that right now using a variant of ground. It's called groundFromHeightMap.
Ground from Height Map
A height map is an image we attach to a ground to set the height of each point composing that ground.
It consists of a range of gray colors, where each level of gray represents the height of a point on the ground. The closer the color is to white, the higher the point; conversely, the closer it is to black, the lower the point.

So, the difference between changing the positions of a ground's vertices with a normal ground and a ground created from a height map is that with the former, we adjust the positions manually, whereas with the latter, we derive the data from an image (a height map).
What I want you to do now is create a folder in the project directory named exactly public. Inside this folder, create another directory called images and place a heightmap there.
Next, create an instance of GroundFromHeightMap.
const ground2 = BABYLON.MeshBuilder.CreateGroundFromHeightMap(
    'myGround2',
    '/images/heightmap.png',
    {
        width: 3,
        height: 3
    }
);
Notice that I added a second argument, which is the path to the heightmap.

As you can see, the ground is visible, but it doesn't look different from the first except for a couple of vertices set at different heights. That's because by default, the number of subdivisions of the ground is set to 1.
const ground2 = BABYLON.MeshBuilder.CreateGroundFromHeightMap(
    'myGround2',
    '/images/heightmap.png',
    {
        width: 3,
        height: 3,
        subdivisions: 100
    }
);
By doing that, you'll see that the ground has changed drastically!
Actually, let's activate the wireframe mode for this ground as well.
ground2.material = new BABYLON.StandardMaterial();
ground2.material.wireframe = true;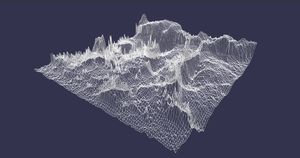
As you can see, increasing the number of subdivisions also increases the level of detail shown, due to the higher number of vertices. However, be cautious: increasing subdivisions requires more resources from the machine running the application.
Another pair of properties we can set are maxHeight and minHeight, which affect the altitude of the vertices.
const ground2 = BABYLON.MeshBuilder.CreateGroundFromHeightMap(
    'myGround2',
    '/images/heightmap.png',
    {
        width: 3,
        height: 3,
        subdivisions: 100,
        maxHeight: 0.5
    }
);
Text
In Babylon.js, we can create meshes from text by using a font file in .json format.
For example, let's say we want to use the Great Vibes font. First, we'd need to convert the .ttf font file to .json using an online tool like Facetype.js.
After conversion, place the .json font file in the public folder, or you can create a fonts folder under the public directory for organization.
Next, we need an additional dependency called earcut. So, stop the server and install it using this command: npm install earcut.
With that done, we now need to load the font.
const fontData = await (await fetch('/fonts/Great Vibes_Regular.json')).json();As you can see, we have two asynchronous calls. Therefore, we need to add the async keyword when defining the createScene() function and use the await keyword when calling the function.
const createScene = async function() {
    const scene = new BABYLON.Scene(engine);

    scene.createDefaultCameraOrLight(true, false, true);

    const fontData = await (await fetch('/fonts/Great Vibes_Regular.json')).json();

    return scene;
}

const scene = await createScene();
With that done, we now need to create a text mesh using the createText() method, which takes five arguments:
- The name of the text instance.
- The text to display.
- A configuration object.
- The scene.
- The earcut reference.
import earcut from 'earcut';const text = BABYLON.MeshBuilder.CreateText(
'myText',
'Hello Babylon!',
fontData,
{
size: 0.5,
depth: 0.05,
resolution: 32
},
scene,
earcut
);
Cameras
There are a variety of camera types in Babylon.js, but you'll probably stick to just two types for most of your time as a Babylon.js app developer.
Universal Camera
The universal camera is commonly used in first-person shooter games. You choose the direction with the mouse and use the arrow keys to move.

To add a universal camera to the scene, we need to create an instance of the UniversalCamera class. The constructor takes three arguments: a name to identify the camera, the initial position of the camera, and the scene it belongs to.
First, remove the previous default camera and add a default light. Detailed information about lighting is covered in its dedicated section.
//scene.createDefaultCameraOrLight(true, false, true);
scene.createDefaultLight();

const camera = new BABYLON.UniversalCamera(
    'uCamera',
    new BABYLON.Vector3(0, 1, -5),
    scene
);
In addition to that, we need to enable user input to move the camera around. To do that, we call the attachControl() method.
camera.attachControl();So now we can move forward and backward using the arrow keys. Additionally, we can add this functionality to the mouse wheel.
camera.inputs.addMouseWheel();We can also set an initial direction for the camera using the setTarget() method, which requires a vector representing the point toward which the camera is directed.
// We can replace new BABYLON.Vecor3(0, 0, 0)
// with BABYLON.Vector3.Zero()
camera.setTarget(new BABYLON.Vector3(0, 0, 0));
Arc Rotate Camera
The arc rotate camera is designed to orbit around a target. It is defined by a couple of rotation angles, a target, and a radius.
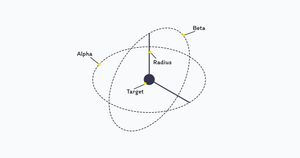
To create an arc rotate camera, we need to instantiate the ArcRotateCamera class. The constructor method takes six parameters: the name, alpha, beta, radius, target, and the scene.
const camera = new BABYLON.ArcRotateCamera(
    'arCamera', // Name
    0, // Alpha
    0, // Beta
    10, // Radius
    new BABYLON.Vector3(0, 0, 0), // Target
    scene // Scene
);Actually, we can use the setPosition() method to position the camera using units, which is much easier than dealing with rotation angles.
const camera = new BABYLON.ArcRotateCamera(
    'arCamera',
    0,
    0,
    10,
    new BABYLON.Vector3(0, 0, 0),
    scene
);

camera.attachControl();

camera.setPosition(new BABYLON.Vector3(0, 0, -10));
We can set limits to the camera rotations. By setting the lowerBetaLimit and upperBetaLimit, we can reduce the range of vertical rotation.
camera.lowerBetaLimit = Math.PI / 4;
camera.upperBetaLimit = Math.PI / 2;
The lowerAlphaLimit and upperAlphaLimit, on the other hand, define the horizontal limits of the camera rotation.
camera.lowerAlphaLimit = Math.PI / 4;
camera.upperAlphaLimit = Math.PI / 2;
We also have lowerRadiusLimit and upperRadiusLimit, which establish a minimum and maximum distance between the camera and its target.
camera.lowerRadiusLimit = 8;
camera.upperRadiusLimit = 15;
Materials
A mesh is composed of two elements: a set of points and segments that define its shape, and a material that covers those lines and points.
So, for example, if we want to change the color of a mesh, we need to pass the color data to its material.
Now, to create a material, we'll instantiate the StandardMaterial class and assign it to the material property of the sphere.
const sphere = new BABYLON.MeshBuilder.CreateSphere(
    '',
    {diameter: 0.5}
);

const sphereMaterial = new BABYLON.StandardMaterial();

sphere.material = sphereMaterial;
Trying this, you'll see that nothing has changed. However, now we're able to apply a lot of changes to our sphere.
Colors
Let's start by changing the color of the sphere.
sphereMaterial.diffuseColor = new BABYLON.Color3(0, 1, 0);To change the color of the highlight spot created by the light, we'll use the specularColor property.
sphereMaterial.specularColor = new BABYLON.Color3(1, 0, 0);
Keep in mind that these two properties depend on a light source.
That said, let's remove the light and see what happens.
//scene.createDefaultCameraOrLight(true, false, true);
scene.createDefaultCamera();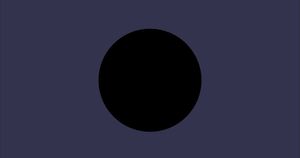
As you can see, we got a dark object, as expected from an object placed in a lightless room.
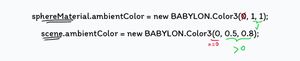
Now, after bringing back the light, add another color property, which is ambientColor.
scene.createDefaultCameraOrLight(true, false, true);
//scene.createDefaultCamera();

const sphere = new BABYLON.MeshBuilder.CreateSphere(
    '',
    {diameter: 0.5}
);

const sphereMaterial = new BABYLON.StandardMaterial();

sphere.material = sphereMaterial;

sphereMaterial.ambientColor = new BABYLON.Color3(0, 1, 1);
Doing that alone won't change anything. To better see the effect, we need to add an ambient color to the scene.
scene.ambientColor = new BABYLON.Color3(0, 0.5, 0.8);Important: the channels of the material's ambientColor won't be effective unless the corresponding channels of the scene's ambientColor are set to a value other than 0. Here, only the green and blue channels are making a difference.
We also have emissiveColor, which colorizes the mesh even without light. The value of this property is mixed with the final result when you have another color set by the ambientColor property, for example.
//scene.createDefaultCameraOrLight(true, false, true);
scene.createDefaultCamera();

const sphere = new BABYLON.MeshBuilder.CreateSphere(
    '',
    {diameter: 0.5}
);

const sphereMaterial = new BABYLON.StandardMaterial();

sphere.material = sphereMaterial;

sphereMaterial.ambientColor = new BABYLON.Color3(0, 1, 1);
scene.ambientColor = new BABYLON.Color3(0, 0.5, 0.8);

sphereMaterial.emissiveColor = new BABYLON.Color3(0.5, 1, 0);
Next, we have the alpha property, which controls the opacity of the material.
scene.createDefaultCameraOrLight(true, false, true);
//scene.createDefaultCamera();

const sphere = new BABYLON.MeshBuilder.CreateSphere(
    '',
    {diameter: 0.5}
);

const sphereMaterial = new BABYLON.StandardMaterial();

sphere.material = sphereMaterial;

sphereMaterial.diffuseColor = new BABYLON.Color3(0, 1, 0);

sphereMaterial.alpha = 0.1;
We also have the wireframe mode, which displays the mesh in its "skeleton form," showing the lines and vertices that form its geometric shape.
sphereMaterial.wireframe = true;Textures
We can set a texture to a material using the diffuseTexture property.
Note: a light source must be present for the diffuseTexture to be displayed.
sphereMaterial.diffuseTexture = new BABYLON.Texture('/images/earth_texture.jpg');If you want your texture to appear without the need for a light source, you can use an emissiveTexture.
sphereMaterial.emissiveTexture = new BABYLON.Texture('/images/earth_texture.jpg');To apply a texture to a box, we should do the same as we did with the sphere.
scene.createDefaultCamera(true, false, true);

const box = new BABYLON.MeshBuilder.CreateBox(
    '',
    {size: 0.3}
);

const boxMaterial = new BABYLON.StandardMaterial();
box.material = boxMaterial;

boxMaterial.emissiveTexture = new BABYLON.Texture('/images/cats.png');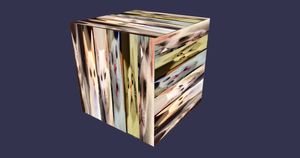
Now, if we want to apply a unique texture to each face, we need to use the faceUV property.
The faceUV property is an array of six Vector4 instances. Each instance represents a portion of the texture that we want to assign to a specific face of the cube.
So, we have the texture below, which is an 1800 by 300 pixel image. What I want to do is divide this texture into six blocks and then apply each block to a different face of the box.

To do that, we need to store the coordinates of the lower-left and top-right corners of each block in a Vector4 instance, and then push it to the faceUV array.
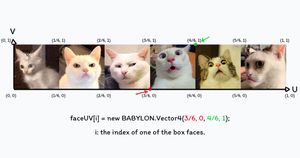
const box = new BABYLON.MeshBuilder.CreateBox(
    '',
    {
        size: 0.3,
        faceUV: [
            new BABYLON.Vector4(0, 0, 1/6, 1)
        ]
    }
);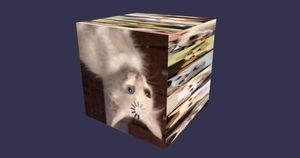
We've mapped the first part of the image to the first face of the box, but it's flipped. To rotate it back, I'm going to set the wrap property to true.
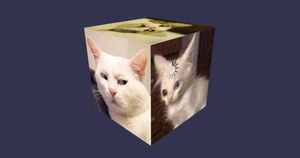
const box = new BABYLON.MeshBuilder.CreateBox(
    '',
    {
        size: 0.3,
        faceUV: [
            new BABYLON.Vector4(0, 0, 1/6, 1),
            new BABYLON.Vector4(1/6, 0, 2/6, 1),
            new BABYLON.Vector4(2/6, 0, 3/6, 1),
            new BABYLON.Vector4(3/6, 0, 4/6, 1),
            new BABYLON.Vector4(4/6, 0, 5/6, 1),
            new BABYLON.Vector4(5/6, 0, 1, 1)
        ],
        wrap: true
    }
);
Sometimes, you may want to shift the texture in a certain direction, which is often referred to as texture offset.
Actually, let's apply a texture to a ground mesh to better demonstrate this concept.
const camera = new BABYLON.ArcRotateCamera(
    'arCamera',
    0,
    0,
    10,
    new BABYLON.Vector3(0, 0, 0),
    scene
);

camera.attachControl();

camera.setPosition(new BABYLON.Vector3(0, 10, -5));

const ground = new BABYLON.MeshBuilder.CreateGround(
    '',
    {
        width: 8,
        height: 4
    }
);

const groundMaterial = new BABYLON.StandardMaterial();
ground.material = groundMaterial;

groundMaterial.emissiveTexture = new BABYLON.Texture('/images/cats.png');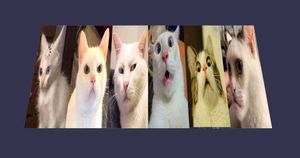
Now, let's say we want to move the texture to the right or left. To do that, we need to apply a uOffset.
groundMaterial.emissiveTexture.uOffset = 1.4;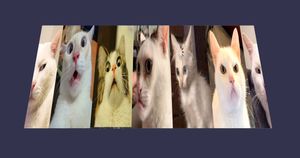
To move the texture up or down, we need to apply a vOffset.
groundMaterial.emissiveTexture.vOffset = 1.4;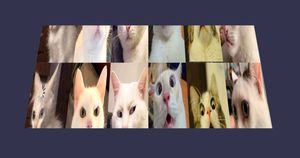
We can also scale the texture using uScale and vScale. By scaling, I mean reducing the texture to cover the mesh when scaling down, and repeating the texture when scaling up.
groundMaterial.emissiveTexture.uScale = 3;
groundMaterial.emissiveTexture.vScale = 2;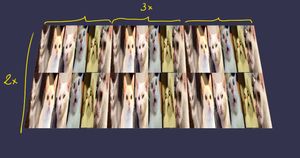
Geometric Transformations and Gizmos
Geometric Transformations
By default, any newly added mesh to the scene is positioned at (0, 0, 0). If you want to move it to a different location, you need to specify new values for the coordinates (x, y, or z) along which you want to reposition it.
scene.createDefaultCameraOrLight(true, false, true);

const box = new BABYLON.MeshBuilder.CreateBox(
    '',
    {size: 0.3}
);

box.position.x = 1;
If, however, you want to apply translations along all three axes simultaneously, you can pass a Vector3 instance to the position property.
box.position = new BABYLON.Vector3(-0.5, 0.2, 0.1);The same approach applies to rotation, except that we need to replace position with rotation.
box.rotation.z = Math.PI / 3;box.rotation = new BABYLON.Vector3(0, 0, Math.PI / 3);The same approach applies to scaling as well.
box.scaling.x = 2;box.scaling = new BABYLON.Vector3(2, 0.8, 2.5);Gizmos
A set of gizmos can be handy sometimes for debugging, and they can even be shipped in the production version.
That said, to add a position gizmo, we need to create an instance of the PositionGizmo class.
As a beginner, that's enough to create the gizmo. However, it's recommended to pass a UtilityLayerRenderer instance to the constructor. Actually, I won't explain this in this article, but I may cover it in future articles when encountering cases where it's necessary.
const utilLayer = new BABYLON.UtilityLayerRenderer(scene);

const positionGizmo = new BABYLON.PositionGizmo(utilLayer);
Next, we need to attach it to the mesh we want to move.
positionGizmo.attachedMesh = box;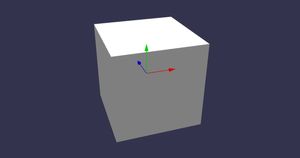
We also have the rotation gizmo.
const rotationGizmo = new BABYLON.RotationGizmo(utilLayer);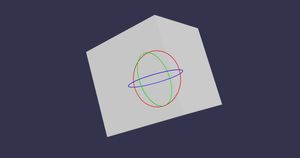
And we also have a gizmo for scaling.
const scaleGizmo = new BABYLON.ScaleGizmo(utilLayer);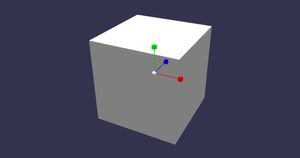
As we've seen with the rotation gizmo, we have three axes to rotate around. However, we can focus on rotating around a single plane using the plane rotation gizmo.
The PlaneRotationGizmo class constructor takes three arguments: the first is the axis to rotate around, the second is the color, and the third is the utility layer renderer.
const planeGizmo = new BABYLON.PlaneRotationGizmo(
    new BABYLON.Vector3(0, 1, 0),
    new BABYLON.Color3(1, 0, 0),
    utilLayer
);
Animation
Back to the runRenderLoop() method. 3D scenes are essentially a sequence of frames, displayed at a certain frequency.
Knowing this, we can take advantage of it to animate objects in our scene.
registerBeforeRender
The first and easiest way to animate objects in the scene is by using the registerBeforeRender() method.
The logic within the callback function of registerBeforeRender() runs before rendering every single frame.
scene.registerBeforeRender(function() {
    box.rotation.x += 0.01;
    box.rotation.y += 0.01;
    box.rotation.z += 0.01;
});The code above translates to: rotate the box by 0.01 radians 60 (or more, depending on the device's performance) times per second.
CreateAndStartAnimation
Another way to animate objects is by using the CreateAndStartAnimation() method, which takes the following arguments:
- Name of the animation: A string that identifies the animation.
- Mesh to animate: The mesh object that will be animated.
- Property to update: The property of the mesh that will change over time (e.g., position, rotation, scale).
- Frames per second: The rate at which frames are rendered.
- Total number of frames: The total duration of the animation.
- Initial value: The starting value of the property being animated.
- Final value: The ending value of the property being animated.
BABYLON.Animation.CreateAndStartAnimation(
    'xScaleAnimation',
    box,
    'scaling.x',
    30,
    120,
    0,
    2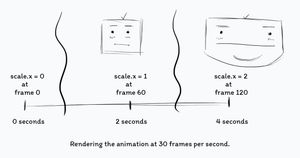
);The code above means we're animating the box to scale from 0 to 2 along the x-axis. The animation spans 120 frames, with the scene rendering 30 frames per second. Therefore, the entire animation will take 120 divided by 30, which equals 4 seconds.
Another argument we can add is the looping mode. By default, it's set to ANIMATIONLOOPMODE_CYCLE, which makes the animation loop infinitely. To make it play only once, you need to set it to ANIMATIONLOOPMODE_CONSTANT.
BABYLON.Animation.CreateAndStartAnimation(
    'xScaleAnimation',
    box,
    'scaling.x',
    30,
    120,
    0,
    2,
    BABYLON.Animation.ANIMATIONLOOPMODE_CONSTANT
);
We can also pass an easing function.
BABYLON.Animation.CreateAndStartAnimation(
    'xScaleAnimation',
    box,
    'scaling.x',
    30,
    120,
    0,
    2,
    BABYLON.Animation.ANIMATIONLOOPMODE_CONSTANT,
    new BABYLON.CircleEase
);beginAnimation
Another way of animating in Babylon.js, which provides more control over the animation, is the following.
The first step is to create an Animation instance. The constructor method takes five arguments: the animation name, the property to animate, the number of frames per second, the type of the property's value, and the loop mode.
const animation = new BABYLON.Animation(
    'yRotAnimation',
    'rotation.y',
    30,
    BABYLON.Animation.ANIMATIONTYPE_FLOAT,
    BABYLON.Animation.ANIMATIONLOOPMODE_CYCLE
);
The next step is to create an array where each element is an object containing a frame number and a corresponding value.
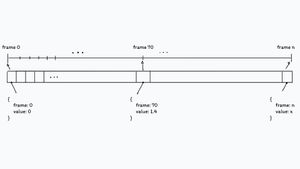
In this example, I'll set the rotation value at the first frame and the rotation value at the last frame. If you want to customize it further, you can add more objects between the first and last frames.
const animationKeys = [];

// First frame
animationKeys.push({
    frame: 0,
    value: 0
});

// Last frame
animationKeys.push({
    frame: 60,
    value: Math.PI * 2
});
The third step is to assign the keys array to the animation.
animation.setKeys(animationKeys);The fourth step is to assign the animation to the box.
box.animations = [];

box.animations.push(animation);
And the final step is to start the animation by calling the beginAnimation() method.
The arguments of beginAnimation() are: the target to animate, the initial frame, the total number of frames, and a boolean that specifies whether it should loop.
scene.beginAnimation(box, 0, 60, true);Note: if you want to slow down the animation, simply increase the number of frames.
// Last frame
animationKeys.push({
    frame: 120,
    value: Math.PI * 2
});
Lights
Another important component that makes a significant difference when properly set in a scene is the lighting.
That being said, Babylon.js offers a variety of light types that we can use depending on the specific use case.
Before we start experimenting with different lights, make sure you don't have a default light in the scene.
const scene = new BABYLON.Scene(engine);

const camera = new BABYLON.ArcRotateCamera(
    'myCamera',
    0,
    0,
    10,
    BABYLON.Vector3.Zero(),
    scene
);

camera.attachControl(true);

camera.setPosition(new BABYLON.Vector3(3, 6, -8));

const ground = new BABYLON.MeshBuilder.CreateGround(
    '',
    {
        width: 10,
        height: 5
    }
);

return scene;
Point Light
A point light emits light from its source in all directions, similar to how a candle works.

To create a point light, instantiate the PointLight class.
The constructor method takes three arguments: the name, the position of the source, and the scene.
const light = new BABYLON.PointLight(
    'pointLight',
    new BABYLON.Vector3(0, 1, 0),
    scene
);
Babylon.js provides a gizmo for lights to help visualize their positions and directions.
That being said, I'll create a LightGizmo instance and attach it to the light.
const utilLayer = new BABYLON.UtilityLayerRenderer(scene);

const lightGizmo = new BABYLON.LightGizmo(utilLayer);

lightGizmo.light = light;
Spotlight
A spotlight is defined by a cone of light oriented towards a given direction. An example of that is theatre lighting.
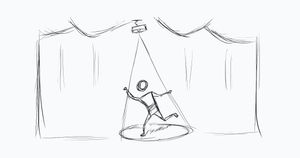
To introduce a spotlight into the scene, create an instance of the SpotLight class.
The constructor takes the name, the position of the light, the direction it points, the angle of the cone, the decay of the light with distance, and the scene.
const light = new BABYLON.SpotLight(
    'spotlight',
    new BABYLON.Vector3(0, 1, 0),
    new BABYLON.Vector3(0, -1, 0),
    Math.PI / 3,
    2,
    scene
);
We can update the range property, which defines the maximum distance the light can reach from its source.
light.range = 10;Directional Light
A directional light is a type of light that simulates sunlight or other parallel light sources.
Unlike point light, which emits light from a single point and spread out in all directions, directional light emits parallel rays of light from a specific direction, as if it were infinitely far away.
To add a directional light to the scene, we need to create an instance of the DirectionalLight class.
The constructor method takes three arguments which are: the name, the direction, and the scene.
const light = new BABYLON.DirectionalLight(
    'directionalLight',
    new BABYLON.Vector3(-2, -3, 0),
    scene
);
We can also change the light intensity.
light.intensity = 0.5;Hemispheric Light
This light is used to create ambient lighting that simulates natural light from the sky and ground, providing a soft, even illumination to the scene.
To introduce hemispheric light to the scene, we need to create an instance of the HemisphericLight class.
The second argument of the constructor is the direction of the light.
const light = new BABYLON.HemisphericLight(
    'hemisphericLight',
    new BABYLON.Vector3(-5, 2, 0),
    scene
);
There are a couple of properties that are specific to this light type.
The first property is groundColor, which defines the color of the light in the direction opposite to the one specified when creating the light.
light.groundColor = new BABYLON.Color3(0, 1, 0);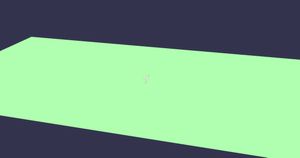
The second property is diffuse, which provides the primary color applied to the scene objects.
// This affects the colors if you leave it.
// light.groundColor = new BABYLON.Color3(0, 1, 0);

light.diffuse = new BABYLON.Color3(0, 0, 1);
We also have specular, which affects the color of the highlight spots on the objects.
light.specular = new BABYLON.Color3(0, 1, 0);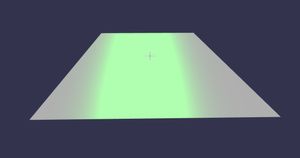
Shadow
We can't discuss light without mentioning shadows.
First, ensure you have three components: one to act as the shadow caster, one as the shadow receiver, and of course, a light.
const scene = new BABYLON.Scene(engine);

const camera = new BABYLON.ArcRotateCamera(
    'myCamera',
    0,
    0,
    10,
    BABYLON.Vector3.Zero(),
    scene
);

camera.attachControl(true);

camera.setPosition(new BABYLON.Vector3(3, 6, -8));

camera.wheelPrecision = 10;

const ground = new BABYLON.MeshBuilder.CreateGround(
    '',
    {
        width: 10,
        height: 5
    }
);

const sphere = new BABYLON.MeshBuilder.CreateSphere(
    'shadowCaster',
    {
        diameter: 0.3
    }
);
sphere.position = new BABYLON.Vector3(1, 1.5, 0);

const light = new BABYLON.DirectionalLight(
    'directionalLight',
    new BABYLON.Vector3(-2, -3, 0),
    scene
);

const utilLayer = new BABYLON.UtilityLayerRenderer(scene);
const lightGizmo = new BABYLON.LightGizmo(utilLayer);
lightGizmo.light = light;

return scene;
For each light that casts a shadow, we need to create a shadow generator. To do this, we'll create an instance of the ShadowGenerator class.
The first argument of the constructor method essentially defines the quality of the shadows, with lower values resulting in pixelated shadows. The second argument is the light source.
const shadowGenerator = new BABYLON.ShadowGenerator(1024, light);Next, we need to specify which objects can cast a shadow by using the shadowGenerator associated with the light source.
shadowGenerator.addShadowCaster(sphere);And we’ll do the same for the shadow receivers.
ground.receiveShadows = true;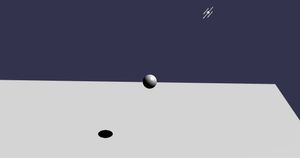
Now we have a couple of properties to change the appearance of the shadows. For example, darkness adjusts the opacity of the cast shadows.
shadowGenerator.setDarkness(0.8);If you look closely at the shadow, you'll notice that it appears pixelated at the edges.
To fix that, we need to activate the useBlurExponentialShadowMap property.
shadowGenerator.useBlurExponentialShadowMap = true;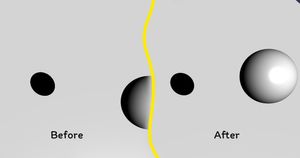
And as you can see, we now have a smoother shadow. However, we can still make it look even more realistic.
Shadows in real life typically have blurry edges. To replicate this effect, activate useKernelBlur and set a value for the blurKernel property.
shadowGenerator.useKernelBlur = true;

shadowGenerator.blurKernel = 64;
Fog
Introducing fog to a scene can greatly enhance the atmosphere. Babylon.js offers four modes of fog: None, Linear Fog, Exponential Fog, and Exponential Squared Fog.
With Linear Fog, the density increases linearly with the distance from the camera.
To add Linear Fog to our scene, we need to set values for the fogStart and fogEnd properties.
fogStart defines the distance at which the fog begins to appear, while fogEnd specifies the distance at which the fog completely obscures an object.
scene.fogMode = BABYLON.Scene.FOGMODE_LINEAR;

scene.fogStart = 10;
scene.fogEnd = 50;
The EXP and EXP2 fog modes are similar in that they both create an exponential increase in fog density with distance.
scene.fogMode = BABYLON.Scene.FOGMODE_EXP;

// scene.fogStart = 10;
// scene.fogEnd = 50;scene.fogMode = BABYLON.Scene.FOGMODE_EXP2;In addition to the different modes, we also have control over the density of the fog.
scene.fogDensity = 0.2;We can also change the color of the fog.
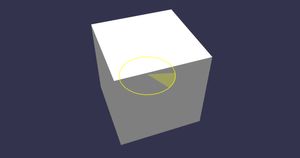
scene.fogColor = new BABYLON.Color3(0.3, 0.2, 0.6);Picking Objects (Raycast)
Picking objects using the cursor is quite straightforward in Babylon.js.
First, we need to handle a pointer event, which could be a mouse movement, a click, or a screen touch.
That said, let's say we want to change the color of the sphere when it is clicked.
To achieve this, we'll use the onPointerDown event and attach a handler function. In this function, we'll capture the object clicked at the precise mouse position and store it in a variable.
scene.onPointerDown = function castRay() {
    const hit = scene.pick(scene.pointerX, scene.pointerY);
}
The hit variable could potentially contain various objects such as the ground, the scene, or the sphere. Therefore, we need to identify the specific object clicked by checking its name, for instance.
scene.onPointerDown = function castRay() {
    const hit = scene.pick(scene.pointerX, scene.pointerY);

    if(hit.pickedMesh.name === 'shadowCaster') {
        hit.pickedMesh.material = new BABYLON.StandardMaterial();
        hit.pickedMesh.material.diffuseColor = BABYLON.Color3.Red();
    }
}
This approach may lead to an error if the selected object does not have a name, such as the scene. To handle this, first we need to verify that the object is a mesh before checking its name.
scene.onPointerDown = function castRay() {
    const hit = scene.pick(scene.pointerX, scene.pointerY);

    if(hit.pickedMesh && hit.pickedMesh.name === 'shadowCaster') {
        hit.pickedMesh.material = new BABYLON.StandardMaterial();
        hit.pickedMesh.material.diffuseColor = BABYLON.Color3.Red();
    }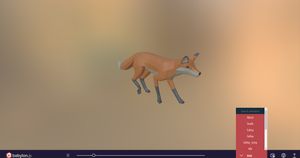
}Loading and Animating Models
Babylon.js supports various file extensions for loading models. The default extension is .babylon, and no additional plugins are required for loading these files. However, for other formats such as .obj and .glb, you need to install an additional module.
To load a .gltf file, which is a common format for web use, you'll need to install the @babylonjs/loaders package. To do this, stop your server temporarily and run the following command: npm install @babylonjs/loaders.
Once you've installed the module, you'll need to import only the specific loader for .gltf files.
import '@babylonjs/loaders/glTF';Now, in the public directory, create a new folder named models (or any name of your choice) and place your .gltf file inside it.
Next, call the ImportMesh method and pass the following four arguments:
- The specific mesh to load from the model. To load the entire model, set this to an empty string or
null. - The root URL where the model is located.
- The file name of the model.
- The scene where the model will be imported.
BABYLON.SceneLoader.ImportMesh(
    null,
    '/models/',
    'Fox.gltf',
    scene
);
If you want to execute some code once the model has finished loading, pass a callback function to ImportMesh. This function will receive four arguments. This function will receives four arguments; in this article, we'll focus on the first and last arguments. The others will be covered in future articles.
BABYLON.SceneLoader.ImportMesh(
null,
'/models/',
'Fox.gltf',
scene,
function(meshes, particleSystems, skeleton, animationGroups) {
// Tasks to perform once the
// loading process is complete.
}
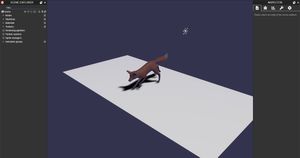
);The first argument is an array containing the meshes from the .gltf file.
The model I'm using contains only one mesh, so it's stored as the first element in the meshes array.
BABYLON.SceneLoader.ImportMesh(
    null,
    '/models/',
    'Fox.gltf',
    scene,
    function(meshes, particleSystems, skeleton, animationGroups) {

        const model = meshes[0];

        model.scaling = new BABYLON.Vector3(0.5, 0.5, 0.5);

        shadowGenerator.addShadowCaster(model);
    }
);
We can also play different animations by selecting one from the animationGroups array.
Since the first animation plays by default, we need to stop it first. After that, we can play a specific animation using the play() method. And to make the animation loop, set the loop property to true.
We can also combine playing and looping by passing true as an argument to the play() method.
BABYLON.SceneLoader.ImportMesh(
    null,
    '/models/',
    'Fox.gltf',
    scene,
    function(meshes, particleSystems, skeleton, animationGroups) {

        const model = meshes[0];

        model.scaling = new BABYLON.Vector3(0.5, 0.5, 0.5);

        shadowGenerator.addShadowCaster(model);

        animationGroups[0].stop();

        animationGroups[5].play();
        animationGroups[5].loopAnimation = true;

        // Or
        // animationGroups[5].play(true);
    }
);Another variant of the ImportMesh method is ImportMeshAsync.
Note: both methods are asynchronous.
BABYLON.SceneLoader.ImportMeshAsync(
    null,
    '/models/',
    'Fox.gltf',
    scene
).then( (result) => {
    const importedAnimGroups = result.animationGroups;

    const model = result.meshes[0];

    shadowGenerator.addShadowCaster(model);

    model.scaling = new BABYLON.Vector3(0.5, 0.5, 0.5);

    importedAnimGroups[3].play(true);
});Sound
Time to add some ambient music in the background.
So, first and foremost, create another folder and name it audio (for example), and add your audio file to it.
Next, create an instance of the Sound class and pass the following arguments: the name, the file location, the scene, a callback function for when the file has finished loading, and an options object.
const bgMusic = new BABYLON.Sound(
        'backgroundMusic',
        '/audio/piano.wav',
        scene,
        null,
        {
            autoplay: true,
            loop: true
        }
    );
Tools
One of the best parts of Babylon.js, which sets it apart from other libraries, is its powerful set of tools that make debugging much easier and less frustrating.
Additionally, these tools allow for code sharing and collaboration with peers and the community.
One of the tools is the Playground, which I have been using throughout this article to share snippets.
Inspector
The Inspector is a comprehensive WYSIWYG tool that allows you to interact with your scene and its components in real time with just a few clicks.
To add this UI to our local app, we need to install the inspector module.
That being said, open the command line and run this command: npm install @babylonjs/inspector -D
Once that's done, we need to import the module.
import { Inspector } from '@babylonjs/inspector';Then, add this line of code at the end of your script.
Inspector.Show(scene, {});And that's it! Now you can access every component of your scene through a well-organized UI. You can manipulate objects, textures, and materials, change animations, take screenshots, and record videos of your app. You can even export your entire scene as a .babylon or .gltf file.
Sandbox
Another great tool in this set is the Sandbox. It’s useful for inspecting and previewing the models you want to use in your projects.
Node Material Editor
Finally, we have the Node Material Editor, a literal "beast" of a tool that allows you to create shaders without writing any code.
"Wait what? what do you mean by shaders?"
Unfortunately, it is out of the scope of this tutorial. In the meantime, stay tuned for future articles where we'll dive into these advanced topics and explore how to use the Node Material Editor for creating custom shaders.
Final Thoughts
And with this, we come to the end of this tutorial. I hope I was able to provide you with a solid foundation in Babylon.js.
That being said, keep in mind that, with this overview, we've barely scratched the surface of what this amazing library is capable of.
So, armed with this knowledge, you have a long journey ahead to explore and experiment further. I'll also do my best to keep updating the blog with more articles related to Babylon.js to help you out and inspire you with new ideas.
Until next time!