How to Deploy Your App to Github Pages
Published on 02 Sep, 2024 | ~3 min read | Demo
In this tutorial, I'll guide you through the steps needed to deploy your applications to GitHub Pages, allowing you to showcase your masterpieces to the world.
Making Sure We're on the Same Page
First, you need to have a GitHub account.
Second, I'm using Visual Studio Code for some of the steps in this tutorial. While it's not crucial, I highly recommend using it to follow along more easily.
Third, you need to have a project—obviously. It could be a React app, a vanilla Javascript app with Three.js or Pixi.js, or even a simple project consisting of just an HTML and a CSS file.
Fourth, I'm using Vite as bundler. Again, it's not essential to use it to follow along. As long as you know how to bundle files with your preferred bundler, or even if you don't use one at all, you can still follow the tutorial.
The Process
First, you need to create a GitHub repository for your project. To do that, click on the Source Control icon in the sidebar, then push the Publish to GitHub button.
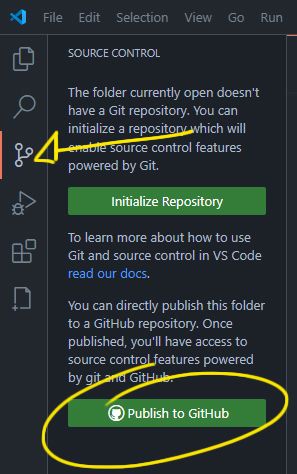
Once that's done, you'll be prompted to add a name for the repository and set its visibility. Make sure to set it to public by choosing the second option.

Now that we have our repository ready, we need to install a dev dependency that will allow us to publish the app with a simple command.
Open a new terminal and run the following command to install the dev dependency: npm install --save-dev gh-pages.
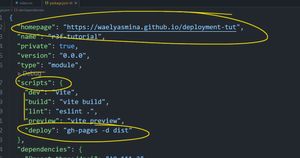
Now, open the package.json file and add the following properties.
"homepage": "https://<github-username>.github.io/<project-repo>"Make sure to replace <github-username> with your GitHub username and <project-repo> with the name of your repository.
Next add this one within the scripts property.
"deploy": "gh-pages -d <bundle-folder>"Replace <bundle-folder> with the directory where your bundled files are located. This depends on the bundler you're using. For instance, Vite names the folder dist, while Parcel names it build.
Next, run the following command to bundle the files: npm run build or npx vite build, depending on your bundler and setup.
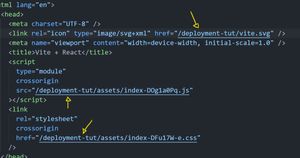
Once that's done, open the index.html file located in the bundle folder and ensure you add /<repository-name> to all your .css, .js, and images links.
Finally, run the following command to deploy: npm run deploy.
To see how your deployed app is doing, open a new tab in your browser and go to https://<github-username>.github.io/<project-repo>
Here's mine: https://waelyasmina.github.io/deployment-tut/
Wrap Up
And with this, we come to the end of this tutorial. It’s time to show the world what you’re up to!
See ya.