Water Displacement Effect Using Pixi.js
Published on 29 Sep, 2024 | ~5 min read | Demo
Although often seen as just a 2D web game engine, Pixi.js offers a powerful set of tools that make it an excellent choice for creating stunning effects for websites and web applications.
With that in mind, in this tutorial, we'll use one of the options Pixi.js provides to create the effect shown in the demo.
DisplacementFilter and Displacement Map
First, I assume you have a basic understanding of Pixi.js fundamentals. Based on that, I want you to create a project with a Sprite for the background and a Text instance added to the stage.
main.js:
import { Application, Text, Assets, Sprite } from 'pixi.js';

(async () => {
  const app = new Application();
  await app.init({
    resizeTo: window,
  });

  app.canvas.style.position = 'absolute';
  document.body.appendChild(app.canvas);

  const text = new Text({
    text: 'UNDERWATER',
    style: {
      fontSize: 42 + window.innerWidth * 0.06,
      fill: '#ffffff',
      dropShadow: true,
      dropShadowDistance: 2,
      dropShadowAngle: Math.PI / 2,
      dropShadowBlur: 3,
      dropShadowColor: '#000000',
    },
  });

  text.anchor.set(0.5);
  text.x = app.screen.width / 2;
  text.y = app.screen.height / 2;

  const bgTexture = await Assets.load('/images/background.jpeg');
  const bgSprite = Sprite.from(bgTexture);
  app.stage.addChild(bgSprite);

  app.stage.addChild(text);
})();index.html:
<!DOCTYPE html>
<html lang="en">
  <head>
    <meta charset="UTF-8" />
    <meta name="viewport" content="width=device-width, initial-scale=1.0" />
    <title>Water Displacement - Wael Yasmina</title>
    <style>
      body {
        margin: 0;
      }

      canvas {
        width: 100%;
        height: 100%;
        display: block;
        position: absolute;
        left: 50%;
        top: 50%;
        transform: translate(-50%, -50%);
      }
    </style>
  </head>
  <body>
    <script type="module" src="/src/main.js"></script>
  </body>
</html>
Before we dive into the code, it's important to understand what a displacement map is, as it's essential for achieving the effect.
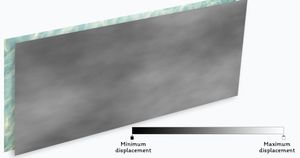
A displacement map (or height map) is essentially a grayscale image that determines the amount of displacement needed at specific pixels.
A completely black point in the displacement map indicates that the original image receives no displacement at that point. Conversely, a completely white pixel means that the original map is affected by the maximum amount of displacement.
That being said, let’s create a sprite using a displacement map.
const displacementTexture = await Assets.load('/images/heightmap.jpeg');
const displacementSprite = Sprite.from(displacementTexture);
app.stage.addChild(displacementSprite);
To animate the effect, we will continuously move the displacement map.
app.ticker.add(() => {
  displacementSprite.x++;
  if (displacementSprite.x > displacementSprite.width)
    displacementSprite.x = 0;
});When we mention animation in Pixi.js, the ticker should come to mind immediately. In this case, we’re use it to move the displacement horizontally over time.
The condition ensures that the displacement map does not cross the bounds of the stage. Once it has moved 100% of its width, it should restart from 0.
Next, we need to create a displacement filter and pass the displacement texture as an argument to the filter's constructor.
import {
  Application,
  Text,
  Assets,
  Sprite,
  DisplacementFilter
} from 'pixi.js';
const displacementFilter = new DisplacementFilter(displacementSprite);
app.stage.filters = [displacementFilter];By doing this, we achieved the effect, but it only works for the first half of the stage.
To fix this, we need to set the wrap mode of the displacement texture, which is similar to the tileScale property in TilingSprite objects.
So, first we need to load the GL_WRAP_MODES module.
Next, we will apply the REPEAT mode to the texture of the displacement sprite.
displacementSprite.texture.source.addressMode = GL_WRAP_MODES.REPEAT;The problem has now been resolved; however, you may encounter three warning messages in the console.
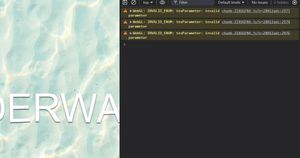
If your app functions correctly, you can safely ignore these messages. However, if you’re a perfectionist, you can resolve this issue by using the deprecated version of the GL_WRAP_MODES module.
import {
  Application,
  Text,
  Assets,
  Sprite,
  DisplacementFilter,
  // GL_WRAP_MODES,
  DEPRECATED_WRAP_MODES,
} from 'pixi.js';
// displacementSprite.texture.source.addressMode = GL_WRAP_MODES.REPEAT;
displacementSprite.texture.source.addressMode = DEPRECATED_WRAP_MODES.REPEAT;With that done, if you want the filter to appear more prominently, scale down the size of the displacement map to make it repeat more times.
displacementSprite.scale.set(0.5);Responsiveness
Responsive Text
Currently, the text size may seem responsive since we're setting its font size based on the window size. However, a hidden problem arises when you resize the window.

The issue is that the text initially appears at the perfect size, but when you shrink the window, the text stays at its original size, making it larger than it should be—and vice versa.
The second problem is that the text also stays in the same position, making it far from being centered.
To solve this problem, we simply need to update the size and position of the text whenever a window resize event occurs.
window.addEventListener('resize', function () {
  text.style.fontSize = 42 + window.innerWidth * 0.06;
  text.x = app.screen.width / 2;
  text.y = app.screen.height / 2;
});
Responsive Background
The same issue applies to the background; if you resize the window, it maintains its original size.
While it may not be considered an issue if your intention is to keep the background fixed, there is a better approach. This involves resizing the background while maintaining the aspect ratio by cropping the image from the sides.
To achieve this, we need to set a fixed width and height for the app.
await app.init({
  // resizeTo: window,
  width: 1920,
  height: 1080,
});
Doing this will ensure that the background always covers the stage, but it won't preserve its aspect ratio. To maintain the aspect ratio, we need to add the following line to the canvas CSS code.
object-fit: cover;Wrap Up
And with that, we reach the end of this tutorial. I hope it has opened your eyes to the incredible capabilities of Pixi.js filters for creating stunning effects.
Remember, this is just a glimpse of the vast possibilities this library offers, so I encourage you to explore further and unleash your creativity.
Happy coding!